Pain de Savoie, from Paul Hollywood’s ‘Bread’ – Cooking the Books, week 2

We seem to have ended the Christmas season with rather a lot of lovely cheese in the fridge! So today’s challenge was to find a recipe in my cookbook collection which would let me use some of it to make something absolutely scrummy. I haven’t baked any bread for a couple of weeks and remembered that Paul Hollywood might have something that would suit… So I dug out ‘Paul Hollywood’s Bread’, which accompanied last year’s popular BBC TV series.

Bread inner page view

And there it was – Pain de Savoie – a lovely looking loaf stuffed with cheese (yes!) and bacon (even better!). Savoie is an alpine region, and as everyone knows, mountain folk have all the best gorgeous stodgy winter comfort food. I had high hopes!

To make this loaf, I used –

  • White & rye flour400g of strong white bread flour
  • 100g of organic rye flour
  • 1 small tsp of sea salt (I can’t bring myself to put more than this into a loaf)
  • 7g pack of fast action dried yeast (oddly, the recipe wanted 8g)
  • 150g of home-cured smoked streaky bacon, rind removed, and cut into lardons
  • 200g of wonderful aged Gruyère
  • Olive oil
  • 330ml of tepid water

Start by weighing your flours and combining in a large mixing bowl, add the salt, yeast, a generous tablespoon of olive oil, and then mix in about two thirds of the water, using your fingers.

Roughly mixed ingredientsThis should roughly combine the dry ingredients but leave them a little dry, so add the remaining water progressively until all the dry ingredients come together as a ball, leaving the sides of the bowl reasonably clean. I found I had just over 50ml left over, but this will depend on the characteristics of your flours. The dough should look a little like this before kneading.

Now knead for 5-10 minutes until it becomes smooth and elastic. You’ll notice the difference – it may take longer than this if you’re not accustomed to kneading, but you’ll get there! I have wholeheartedly adopted Paul’s recommendation of kneading dough on an oiled surface, after a lifetime of using flour – I don’t think it makes very much difference to the dough, but it doesn’t half reduce the mess you make of your kitchen!

After kneadingOnce you’re done, the dough ball will look like this. [You’re supposed to add the fried & cooled lardons at this stage. I suffered an unfortunate spot of reading comprehension fail, and didn’t.] Oil the mixing bowl and put the dough ball back inside, cover with a piece of oiled PVC-free cling film, and set aside for a couple of hours until it’s doubled or more in size.

Ignore anything you might have heard about putting dough to rise somewhere warm like an airing cupboard, just sitting out on the kitchen counter should be fine, unless it’s very very cold, in which case I’ve done well with putting the bowl in the oven with just the oven light turned on. Letting bread rise in a warm environment certainly will speed the process up, but at the expense of the flavour that develops with a slower, lower temperature rise – and if you wanted tasteless bread, you’d just eat the junk from the supermarket.

Fried bacon lardons
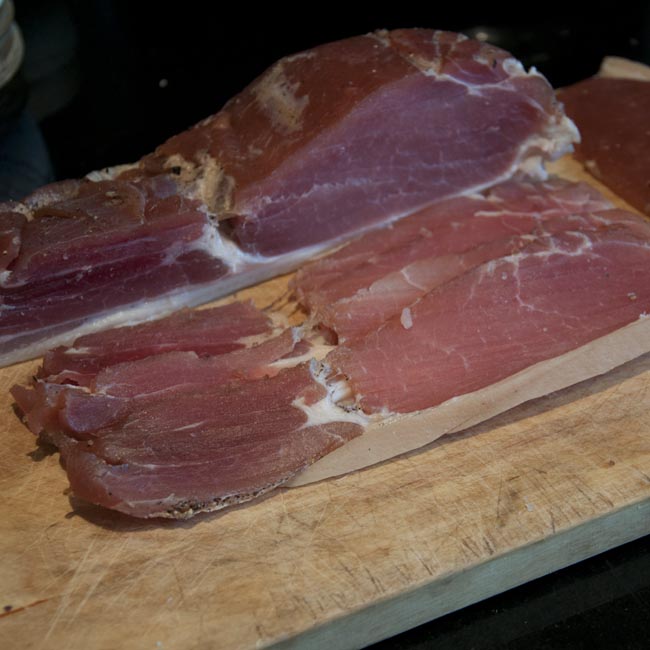
If like me you’ve forgotten to include your lardons, now is the time to fry them until golden. I used my home-cured black pepper bacon, which is lightly smoked. Incidentally, this is what really good dry-cured bacon should look like, when you’re frying it. See that lovely, clear bacon fat in the pan? That’s all that should ever leak out. And because it’s not wet, and doesn’t leach phosphate water, it fries to a beautiful golden caramelised surface. Fabulous. Once it’s cooked, set aside to cool. And try not to sample too many pieces in the name of ‘quality control, eh?

Combine with baconI turned the dough out onto the work surface, knocked it back into a rough rectangle, and sprinkled over the cooled bacon pieces before rolling it up into a rough sausage and cutting it into three (very roughly) equal sized pieces. Each of these pieces I kneaded a little to get the bacon well combined and formed into balls. [If you had already added the bacon before the dough proved for the first time, you could just cut the dough into thirds, knock them back gently and form into balls, and go straight ahead to assembling the loaf in the loaf tin. But I hadn’t, so…]

Dough balls and cheese cubesAfter kneading the little dough balls, they were a bit tight, so I gave them a little time to relax before moving on to the next stage. About half an hour did the trick. In the meantime, cut your cheese up into ~1cm cubes. The original recipe calls for Comté, which would be glorious. This Gruyère, which happened to be what I had in the fridge, and will be a pretty good match, but really any good firm well flavoured cheese will do very nicely – I think a decent mature cheddar would work a treat!

Assemble the breadOil your tin – the recipe calls for a 20cm ‘springform’ tin. I haven’t got one of those, but I do have an 8″ loose-bottomed cake tin I usually use for Christmas cake. Paul says to roll out the dough with a rolling pin into tin-sized rounds. I just pushed it out with my fingertips, which seemed to work fine. After putting the first circle of dough in the bottom of the oiled tin, spread out half the cheese cubes over the surface, repeat with the second ball of dough, and then finally press the third circle of dough over the top. Sprinkle the top with a little bit of rye flour, and cover with the clingfilm for another hour or so until it’s nicely risen.

Before rising  Nicely risen  Fresh from the oven

Once you’re happy, pre-heat your oven to 220 and, once it’s up to temperature, slide the tin into the oven and bake for half an hour. It should come out a lovely rich mid-brown colour on top.

Rest in the tin for 10 minutes before turning out onto a wire rack to cool for as long as you can bear it, before carving off a thick slice, adding a bit of lovely unsalted butter, and cramming it in your mouth.

Cooling

This is really really good bread. The rye flour gives it a lovely nutty flavour without making it heavy. The cheese has melted during baking to leave quite striking square holes in the dough. Hubby compared it to a really good cheese and bacon sandwich, and I suppose that’s it, really. It’s a thing of great simplicity, but simple things can be fabulous and this really is. But of course the simpler the dish, the more it depends on the quality of the ingredients. So, make it! But be sure to use really good cheese and bacon, m’kay?

Share and enjoy!

Technically, it’s not difficult, though having a ‘feel’ for bread dough will obviously be helpful. Not much equipment required and relatively minimal washing up – kitchen scales, a large mixing bowl, and a deep round cake tin are essential. A dough scraper is useful but not actually necessary. If you don’t have a wire cooling rack, it’s perfectly reasonable to use a (cold!) oven rack

**
Bread cover shot‘Paul Hollywood’s Bread’
Bloomsbury Publishing PLC, 2013. ISBN 978-14088-4069-6
Hardcover, full colour, 224 pages. RRP £20.

[Full disclosure: This is my book, which I bought in the traditional way! I have received no payment or sponsorship for this post, nor have I accepted a review copy. I do not have an amazon affiliate account and do not profit from any links provided.]

This is a really great book for anyone interested in bread baking, whether you’ve never baked a loaf before and just want to know how to get started, or have a fair amount of baking experience, there’s something for you here. I would definitely recommend it to any keen but inexperienced home-bakers, as the techniques are well explained and the book is quite lavishly illustrated with step-by-step photography.

Sourdough baking is even covered a little, though after my experiences with getting a sourdough starter going a couple of years ago, I think the process given for this may be a tad on the optimistically simple side! (Incidentally, if you’re just taking up baking, and particularly if you’re interested in sourdough, I would also recommend ‘River Cottage Handbook No. 3 – Bread’ by Daniel Stevens)

There are some lovely unusual bread recipes, such as this one, and one or two ‘extras’ to accompany them, and there should be something new to try here even if you’re already a confident baker!

‘Cooking the Books’ is my self-imposed blog challenge for 2014 – I’ll be trying to cook a new recipe from one of my (rather extensive!) collection of cookbooks once a week, write it up and review it. Wish me luck!

Read more from the Country Skills blog >>

No Smoke Without Fire – Boxing Day ham and Christmas bacon – Blog Advent (2)

This morning, bright and early (probably a little *too* early after last night’s lovely Christmas dinner with some excellent friends!) and in the freezing cold, I got my smoker out and set up.  For the past couple of weeks, my fridge has been half full of partly cured pork products.  Well, the curing finished last week, and today it was time for some smoke!

Smoker, set up ready

What you can see hanging there is my boxing day ham, and a batch of Christmas streaky bacon.  For more information on my DIY cold smoker, you can have a look at the smoking and curing posts, collected here.  For suggested UK supplies of smoking and curing ingredients and paraphernalia, have a look at my suppliers list.

The little sawdust-burning ProQ cold-smoke generator has served me very well in the course of the last year or so, but we had a bit of excitement with it this morning, after the tea light which is used to start the sawdust smouldering decided to overheat and do a striking impression of a miniature chip pan fire!  You’ll be relieved to hear, I’m sure, that no serious harm was done to the bacon, and that I still have my eyebrows!  It was however alarming enough that I’m going to look into alternative ways of starting the smoulder in future.

Boxing-Day Ham

Baked home-cured hamThe amazing colour of the ham comes from the same treacle-based cure I blogged about using earlier this year, though in deference to the larger piece of pork leg, and the fact that this time, it has the bone in, I allowed a curing time of 10 days.  The only other change was the addition of a couple of fresh bay leaves to the curing solution.  The gorgeous 2.5kg piece of pork leg came from our local farm shop butcher, who has wonderful meat.

Between now and Boxing Day, once it’s rested for 48 hours to let the smoke flavours permeate, I’ll wrap it up and put it in the freezer.  I’m expecting that, once boiled and glazed, it will look a lot like this – I can’t wait to see what difference the smoke makes!

Christmas Bacon

Gorgeous pork bellyThe bacon is mostly intended for gifts (except for the biggest piece, which is mine-all-mine!).  It was a great success last year, and seemed popular with its recipients!

It’s been curing over the last week, using a bacon-in-a-bag technique I’ve been refining over the last year.   Nearly all my home-cured bacon is made this way now, and I’ve settled on an 8% cure for most purposes, made up with between 66-75% curing salt and 25-33% sugar.

This total batch was about 2.5kg in weight.  In addition to the meat, I used –

  • AromaticsSupracure – 133g  (see my other curing posts for more information about this pre-mixed curing salt)
  • Mollasses sugar – 66g
  • Aromatics, consisting of 4 bay leaves, 20 juniper berries, 40 allspice berries, one clove, and about 1/4 of a whole nutmeg
  • Two large strong freezer bags

Prepared bacon cureGrind up all the spices in a spice grinder (except the nutmeg, which you’ll probably be safer grating by hand), and then mix the spices into the salt and sugar.  Prepare the pork belly by trimming it if required and then slicing into the appropriate pieces.

With cure rubbed inNow rub about half of the cure generously over all the surfaces of the pork, and pack it into the freezer bags.  Put these in the fridge and turn them over at least once a day, alternating which one is on top if you have more than one bag.

In two days (three if you’re using pork loin rather than belly), pour off any liquid which has accumulated in the bag – this may be very little if you started with excellent quality meat that hasn’t had water added! – and apply the rest of your cure mixture before returning to the fridge for a further 3 days, turning daily as before.

Bacon in a bagAfter your 5 or 6 days in total have elapsed, take the bacon out of the bag, rinse it carefully under cold tap water, dry with kitchen towel, and place on open racks or uncovered on plates in the fridge for another day (or ideally two) to allow the pellicle to form – this is a sticky glossy surface which will develop on the surface of the bacon.

Then, you can eat your bacon, or, as I did today, smoke it.

I’ve used a mix of beech and apple sawdust for todays smoke run, it gives quite a strong, aromatic smoke which I think will stand up well against the robust flavours in both the ham brine and the bacon cure.

The bacon will be frozen, wrapped as individual pieces in waxed baking paper, until we use ours to make our pigs-in-blankets on Christmas day (it was amazing last year!), or give it as gifts.

Advent - day 2

I’m trying to write a post a day during Advent, so, please come along with me while I try to Blog Advent – the Country Skills Way – and forgive me if I don’t quite manage it!

Read more from the Country Skills blog >>

Brilliant Bangers – in praise of the full English breakfast

Those of you who come here regularly will know this isn’t the sort of food blog (if it’s even a food blog, really?) where I regularly post photos of my meals.  This time, though, I’m making an exception.

This was my Sunday breakfast –

Full English breakfast

What’s so special about that, you might wonder?  Well, everything on that plate was made here, by us.  I’m not going to claim to have grown the mushrooms or the tomato, or churned the butter, but the bacon was home-cured and smoked, the bread was my own sourdough, the eggs were laid in the garden by our hens, and, most excitingly for me, the sausages were made here, in my very own kitchen.  Even the ketchup is homemade.

This blog started with bacon, over a year ago, and curing and smoking have been among the recurring themes as the months have gone by.  The trouble with sausages is that they’re so often so disappointing, so much less than they ought to be, a disposal route for otherwise less than tempting ingredients and fillers.  Of course, the more lovely the rest of your breakfast – the fresher and richer your eggs, the tastier your home-cured bacon – the more obvious the deficiencies of your bangers become.

The Porkert PP88I’ve wanted to make sausages for a very long time – so long, in fact, that we received a sausage press (the rather wonderful chromed cast-iron, sparsely named Czech ‘Porkert PP88’) as a wedding gift over six years ago.  I regret that, until last weekend, it hadn’t yet managed to have an outing!  I finally decided that enough was enough, and ordered some sausage skins from Weschenfelder, which arrived very promptly last week.  A trip to our friendly local farm shop butcher provided us with 1kg of minced pork shoulder, and we were ready to rock!

Sausage mixTo the kilo of minced pork, we added a bit short of the recommended 200g of breadcrumbs (I didn’t have enough – they were a mix anyway of shop-bought breadcrumbs I had in the cupboard, and a couple of slices of dried and crushed homemade sourdough), 200ml of water (this, along with the breadcrumb, is essential for getting the mix to a consistency where it will pass through the sausage press), a teaspoon of salt and a half a teaspoon of crushed black pepper.

Soaking sausage casingsThe sausage skins were already soaking in warm water – we had bought the ready spooled sheep’s casing as Hubby’s preference runs to smaller bangers.  Sausage skins are not pleasant smelling things!  So, don’t sniff them, would be my advice.  A lot of the odour disappears once they’ve been soaked, so I’d recommend trying not to think about it too much in the meantime!

Ours probably hadn’t been soaked for as long as they ought to, since when I loaded the first length, they were very tricky to feed onto the nozzle of the sausage stuffer – I put it down to inexperience, but the second length, which had had about half an hour longer to soak, went on much more easily.  As they can soak for 12 hours or so without harm, get started with the soaking early!

Feed your skins onto the nozzleOK, so there’s no polite way of saying this – there’s something unavoidably prepucial about sausage skins!  Feed your skins onto the nozzle of the sausage stuffer (ours were quite a snug fit on the 20mm nozzle), leaving a couple of inches, untied, dangling free from the tip.  And try not to contemplate the resemblance to condoms too closely!

Don’t overfill your sausage stuffing press, especially if it’s manually powered like ours!  Add a couple of hand-fulls to the barrel and start to push down steadily.  We discovered around this time that we didn’t have the mechanical advantage at counter height to operate the lever usefully, and moved the whole sausage pressing rig down onto the kitchen floor. Really, we should have had mounting bolts to allow us to seat the press firmly in position, but we had to make do without.  Something to add to my ‘fantasy kitchen’ wish-list, I guess!

Filling sausagesPut a nice shallow tray (a baking sheet is ideal) under the sausage press to catch the sausages as they’re filled.  Once you get the sausage meat flowing, you want to kind of let it fill the casing and pull it off the nozzle itself as it goes.  This is definitely a two man job with any kind of manual press, I’m afraid!  Don’t pull the skin away from the nozzle unless it seems to be getting stuck, but equally don’t let the skin be over-filled, as you’re going to need a bit of ‘freedom’ when you come to twist and link the sausages.

The skins will split in places – you might have weakened them when you were incompetently loading them! – but don’t worry, it’s not a disaster. Carry on until you run out of sausage meat, or skins!

Linked sausagesNow it’s time to link your sausages.  I looked at various diagrams and instructions in books and on the web, but in the end I just fiddled with them until they did what I wanted – one of these days I’ll try to take photos but it never made much sense to me at the time!  Still, by the end of the process I had two strings of traditionally linked sausages.  The first  – on the left – are noticeably ‘scrappier’ than the second, but I’m really thrilled with all of them.

It’s advised to hang them to dry for a while – the cabinet doors were useful here – and then let them rest overnight before eating them.  We refrigerated one breakfast’s worth and put the rest in the freezer.

They’re great sausages.  They cooked well under the grill, but I’ll admit the first mouthful was almost underwhelming, I worried they were bland but then realised that they were, by any commercial standard, just seriously ‘under-seasonned’ compared to what my taste-buds were expecting.  I have to say I’m now rather worried about how much salt must be in shop-bought bangers!  But on the second bite, the lovely sweet pork flavour came through beautifully.  I’m looking forward to experimenting with some herbs, spices, and other flavours in future batches – we intentionally kept this batch quite plain as a ‘baseline’!

Finished sausages

So, homemade sausages – the last part of the Holy Trinity of the great Full English breakfast of sausage, bacon and eggs.  Go on, try it!  And no doubt, there will be more sausage making posts in the future!

Read more from the Country Skills blog >>

Offally Good – liver with bacon and onions, fast fresh frugal food

Offal certainly divides opinions!  One of my favourite ever dishes is liver, bacon and onions – so simple, really just three ingredients –  I’ll order it in a pub whenever it’s on the menu, but sadly it’s often a disappointment.  When it comes to liver, freshness is everything.  It doesn’t reward maturation!  Lamb’s  and calf’s livers are the ones to choose – pig’s liver has a nasty bitter flavour, which some people seem to believe can be mitigated by doing things like soaking the liver in milk before cooking.  Don’t bother!  Get the best, freshest lamb or calf liver you can, it needs very little preparation, and makes a wonderful meal.

Liver, bacon and onion

As much of our meat as we can manage comes from the little farm-shop butcher just up the road from us.  Chris, the butcher and farmer, knows us quite well these days – so when my husband was in there last week, Chris happened to mention he’d just that very day come back from taking a few lambs in to slaughter.  He had the ‘plucks’ (the slaughterhouse term for the heart, lungs and liver).  A lovely fresh lamb’s liver, inevitably, made its way into the shopping bag!

Fresh lamb's liverGood fresh liver is dark burgundy in colour, firm but yielding in texture.  There will probably be some blood in the packaging, wash this off and pat it dry.  Fresh raw liver has almost no smell. It shouldn’t be mushy, crumble, or disintegrate under gentle pressure – if it does, then a process known as ‘autolysis’ has started, and the liver is starting to break down.  Blotchiness and pale areas can also suggest less than ideal freshness, or issues with the health of the liver.  This liver, in thick slices, was beautiful.

Liver slicesThere will be some fibrous tissue in the liver,  you can trim this away as you slice the liver into pieces.  I like my liver in bite sized pieces, cut on the diagonal from the original thick slices.  Try to keep the pieces as even sized as you can, so they will cook evenly.

Prepared trimmed liver piecesDecide what you want to serve with your liver, bacon and onions – mashed potato is traditional, but don’t let that stop you.  Ours was for lunch, so we enjoyed it with a little gravy, and warm buttered toasted muffins.  If you want side dishes, get started with those first – the liver will take less than ten minutes, and you want to serve it as soon as it’s ready.

As well as your lovely fresh lamb’s liver, to serve two you will require –

  • Bacon pieces and sliced onionsOne onion, peeled and sliced thinly from root to tip
  • Four slices – or two thick pieces – of dry cured bacon, cut into chunks
  • Pepper, olive oil, flour or gravy granules (optional)

Slice an onion into thin slices from tip to root, some dry cured bacon into pieces.  Use the very best bacon you can – my home-cured maple bacon is perfect – the last thing you want is that nasty bacon-water from commercially produced bacon leaking out into your pan.

Add liver to pan & fry offFry off your bacon and onion in a large frying pan until starting to caramelise.  Add a very little bit of olive oil if you need to.  Once it’s starting to show a little colour, push it to one side  in the pan.  Now add the liver and fry off until the pieces are just a little bit pink in the middle.  You’re nearly done – just time to make the gravy.  Mix the onion and bacon back among the cooked liver.

Cooked liver piecesNow add a generous splash of boiling water to the pan, and stir it all around to capture all the lovely pan flavours.  If you want your gravy a little thicker, thicken it by your preferred method.  Gastropub recipes often have red wine in the gravy – I’m not sure this is an improvement, simplicity is everything here!  You probably won’t need to add any salt – the bacon has enough – but season with pepper to your taste.

Making gravy

Serve, and enjoy!  This is such great comfort food – it’s food for the soul as well as the body!  And a timely reminder to me that I need to remember to enjoy offal much more often!

Read more from the Country Skills blog >>

Basic Butchery – how to butcher & portion a pork belly

Pork belly is such a wonderful and versatile cut, and so under-rated here in the UK.  Most of my bacon making is with belly, so we get through quite a lot of it.  As a result I tend to buy it most-of-a-belly at a time!  The process of butchering it to remove the ribs and prepare it for curing or roasting is quite simple, and worth learning, since it means you’ll end up with precisely the piece of meat you want for the task at hand, and a couple of little bonus items, too!

Large piece of pork belly

Your butcher will probably offer to prepare your belly for you, removing the ribs and trimming it to your preference, but you never quite seem to get exactly what you were after, somehow!  Doing the job yourself means you get exactly what you want.  This is my starting point – just under 2kg piece of pork belly .

Peel away the inner layer of fatStart by removing the layer of fat on the inside of the belly piece, if there’s one there.  You shouldn’t need your knife for this, it should just pull away if you work gently beneath it with your fingers, leaving a clean muscle surface beneath.  Once you’ve removed it, set it to one side (I usually keep an ‘offcuts’ plate or bowl handy when I’m portioning or butchering meats).  This is effectively pork suet.

Belly portion with fat removedNow you can get a better look at the anatomy of your piece of meat.  As it’s laid out in the photo here, the ribs are on the left, you can see the flap of diaphragm meat lying above them.  On the right side of the belly is a band of smooth muscle.  The ends of the ribs lie almost exactly where the visible edge of this muscle joins the diaphragm.

Cut beneath ribsTake a long, thin bladed, sharp knife and first cut beneath the ribs, as close as possible to them to reduce wastage.  The piece has been rotated 180 degrees from where it was in the previous photograph so that the ribs are now bottom right.  You should be able to feel roughly where the ribs end, so extend your cut beneath them as close as possible to this level.

Finding the ends of the ribsNow gently slice beneath the strap-like muscle we identified earlier, where it lies over the ends of the ribs, and peel it back,  You’ll find the ends of the ribs and the strips of cartilage which link them together.  Gently slice around these and then back underneath. By lifting the rib section it should now be quite easy to join up with the cut beneath and remove this as a block.

Rack of ribs, as removedEither put the rack of ribs to one side, or cut them up into individual ribs at this stage.  This couldn’t be simpler – just feel for the gap between each pair of ribs and slice down the centre parallel to them, your knife, if it’s nice and sharp, should cut straight through the connecting cartilage.

Ribs, divided up.You can trim away any strips of cartilage that area easy to identify – you can see this top left.  That bit is genuinely wastage, incidentally, so chuck it away if you want!  Bag your butchered ribs up, label them, and freeze them for another day (they’re great done on the BBQ with a jerk marinade!).

Pork belly with ribs removed

Now let’s turn our attention back to the pork belly itself.

You can really see now that mine is anything but rectangular! It’s actually sitting ‘upside down’ in terms of how it was on the pig – the top as we look at that photo is the part closest to the middle of the pig’s body, the rib side is towards the back.  As we get closer to the abdominal midline, the proportion of fat to muscle increases, so I trimmed the piece to rectangular, discarding the part which is most top-left in this photograph.

Pork belly, trimmedBecause I’m planning to prepare the belly as streaky bacon, this will give me more manageable, even chunks.  You can see the effect of the trimming in this photograph – the piece has been rotated again so the rib-side is now away from us.  Add your trimmings to the ‘offcuts’ bowl.

Belly pieces, divided upNow simply divide up your belly as you like.  Mine weighed almost exactly 1.6kg at this point, so I divided it evenly into four ~400g pieces.   A large piece like this would be fantastic roasted slowly whole, too, perhaps with chinese spices, for a special meal for a big gathering!  Roast pork belly has the *best* crackling.

Bag your ribs and your offcuts – these will make fantastic quite fatty minced pork for adding to any minced-meat dish that requires extra juiciness and succulence, or for sausages.  Then sit back and admire your work.

Fully-butchered pork belly

My belly portions were for curing, so I prepared a maple syrup cure made up of 100g of supracure and 90g of pure maple syrup, applied about half to all the bellies, and then bagged them together in the fridge. (More discussion of the bacon-in-a-bag ‘dry’ cure method can be found here.)

Belly pieces with maple syrup cureI’ll apply the second half after 48 hours and re-arrange the bellies so they’re skin-side together for the second half of the curing process.  The total curing time would normally be 5 days for belly pork, but these pieces are thicker than usual, so I may decide to let them go a day longer, depending on the texture and appearance at the 5 day mark.  It would be great to get some maple smoke into some of them – but that’ll depend on the weather.  I’ll keep you posted!

Read more DIY Cold Smoker & Home-Curing posts >>

Read more from the Country Skills blog >>

Banner320-260

Maple Bacon – and a bonus summer salad

Every so often I ask my lovely husband for ideas – most recently last time I was making streaky bacon.  ‘What cure shall I use?’ I called out from the kitchen.  ‘Maple!’ he replied.  Right oh, maple bacon.  It’s a new one for us.  I ferreted around in the cupboard and dug out a bottle of pure maple syrup.  This was sounding plausible, after all!

[This bacon was made using a variation on the bacon-in-a-bag technique I wrote about the other week, so you should probably go and read that first if you’re not familiar with it.]

For my bacon, I used –

  • 480g piece of pork belly from our local farm butchers’ shop
  • 30g of supracure
  • 26g of pure maple syrup (really, buy the good stuff, not the blended rubbish)
  • A plastic bag big enough to contain the pork, and a sealed container for the cure.

I was aiming for an 8% total cure weight to the meat (lower than the 10% I normally use), with a 1/3rd to 2/3rd ratio of sugar to salt. This was in deference to the rather aggressive salt flavour I got from the outside pieces of my last bacon-in-a-bag effort.  I got the ratio right but slightly overcooked the total quantity, in this event.  You’re thinking now that my arithmetic doesn’t add up, and that 56g is clearly well over 10% of 480g.  You have to consider that maple syrup is about 40% water to 60% sugar (check the nutritional analysis on the back of the bottle for your particular sugar) so my 26g of syrup is in effect 15g of maple sugar, for a total dry-equivalent cure weight of 45g or ~9%.

Bacon-in-a-bag with maple cureThe mix of salt and syrup is not so much a dry cure, more of a ‘gloop’.  Put the pork in the plastic bag and rub all over with half the cure, massaging in well.  Seal the bag, excluding as much air as possible, and place it in the refrigerator.  Store the rest of the cure in an airtight container.  At least once a day (but in practice I tend to do this whenever I’m going to the fridge and remember) give the meat a bit of a massage, and return to the fridge the other way up.

Maple bacon after curingAfter two days, I poured off the pickle, and applied the rest of the cure.  After three more days (a total cure time of 5 days), remove the bacon from the fridge, rinse it under cold running water, dry carefully with kitchen paper and then wrap loosely in baking parchment and return it to the fridge for at least 24 hours (and preferably a few days) to rest.

Maple bacon, slicedYou’ll notice that compared to our previous bacon, this one is a lot paler in colour, and retains a much whiter rind.  Most of the change in the meat before and after curing is in the texture, with a slight pink flush to the meat.  This is because we’ve not added colour by using a dark sugar in this cure.  It slices very nicely!

Bacon pieces fryingAt this time of year, with the warmer weather, perhaps you don’t fancy a bacon roll so much as in winter?  For lunch on a hot day, I love a spinach and bacon salad.  It’s the quickest and simplest of light summer lunches.  First slice your bacon into lardons, and fry it off until slighty crispy.  This bacon cooks beautifully, caramelising very rapidly and rendering off lovely clean clear bacon fat.

Spinach and bacon salad with balsamic dressing

Then, toss your crispy bacon pieces, while still warm, into a big bowl of baby leaf spinach, dressing with balsamic vinegar and olive oil.

The empty bowl

Doesn’t it look appetising??  It didn’t last long here!

We had a few more rashers for breakfast this morning.  We will certainly be making this one over and over again in the future.  In summary – this is great bacon, subtly flavoured, gently salted, with a gorgeous traditional bacon flavour.  Make it!

Read more DIY Cold Smoker & Home-Curing posts >>

Read more from the Country Skills blog >>

Bacon Basics – bacon-in-a-bag method for ‘dry’ curing at home

Readers (& participants) in the Big Bacon Challenge will have noticed how little effort is involved in making dry cured bacon at home.  While I was teaching myself to make bacon by this process (which involves daily application of dry cure to the piece of meat), I came across several references to bag methods of ‘dry’ curing.

In this ‘bacon in a bag’ method, you apply the cure to your meat, put the whole thing in a plastic bag, seal it up, and leave it in the fridge for several days, turning occasionally, and adding fresh cure once in mid-process.  It removes the trivial once-daily intervention in the curing process, and the need to find space for a dish in the fridge for the length of the curing process, so might be even easier for busy busy folk… *if*, that is, the results stack up in terms of flavour and quality.

I used my normal black pepper cure for this experiment.  My total cure weight was 10% of the weight of the meat and made up of 4 parts of supracure to 1 part of dark soft brown sugar with about a teaspoon of freshly ground black pepper added (see here for more advice on mixing your dry cure).

Dry cure applied, in bagIn addition to your piece of belly or loin pork and cure, you need a nice large freezer bag which is reasonably robust, and some sort of clip or bag tie to seal it.  Sprinkle a bit of your cure into the bottom of the bag, place the washed and dried piece of pork in the bag skin-side down, and then continue to rub cure on the meat until you’ve used about half of your total dry curing mix.  Seal the bag excluding as much air as possible, and put it in the fridge.

After 3 days, pickle in bagTurn the bag over from time to time (I turned it every time I went into the fridge for something else, but once a day is fine).  You will notice quite a lot of pickle accumulating in the bag.  After two days for belly, or three days for loin, take the bag out of the fridge.

Drain the pickle, and apply the rest of the cure, before returning the bag to the fridge for another three days.  Effectively we’re curing in a very concentrated brine made from the applied salt and the meat’s own water.  By this stage, at around the half-way mark, it’s already showing the changes I’d expect from successfully-curing bacon, which is a good sign!

Bacon out to restAfter these three days have passed (making a total curing time of five or six days depending on your bacon cut), take the bacon out of the fridge.  Remove it from the bag, rinse it off under the tap, pat dry carefully with kitchen paper, and return it to the fridge un-covered on a plate for 24 hours to finish drying and form a pellicle (that glossy, slightly tacky surface layer).  After that, wrap it loosely in a piece of baking paper and keep it in the fridge until you want to slice it and eat it.

I rested mine for three days before slicing – I was planning to put it through the smoker but the weather on my day off wasn’t particularly suitable.

Sliced for breakfast this morning, the texture and appearance on slicing was exactly as I have come to expect from my home dry-cured back bacon.

Sliced bacon

I sliced away but retained the outside piece for lardons before carefully preparing four slices for frying.  The piece of loin pork I used was very lean, and needed a little olive oil to the frying pan to really get things going.  The bacon re-arranged itself in the pan as the rind buckled, but didn’t noticeably shrink, and there certainly wasn’t any of that nasty white watery muck we’re so used to seeing in commercial bacon!

Bacon for breakfastBreakfast this morning was my bacon with some butcher’s black pudding and a fresh home-reared egg, served on a toasted English muffin.  What could be nicer on a lazy Saturday?

And tasting wise?  I would say I couldn’t detect a difference between bacon prepared this way, and my usual technique – but with one caveat.  One of my slices was the second-slice from the edge after the one I’d held over for lardons.  This slice, quite unlike the others, was unpalatably salty, with almost a salt ‘sting’ on the tongue.  I think this can probably be ascribed to the concentration of cure applied at once in this method, despite a good long resting period, the outside surfaces of this bacon are quite aggressively salted.  I would cut off a thicker end-slice in future when using this method – probably somewhere between 5mm and 10mm of the end grain at both ends.  Used in a stew or sauce, it would be fine, but it’s less than ideal to eat as sliced bacon.

So, if you want an *even* easier method for home-cured bacon, do give this one a whirl!  For me, though, it’s likely to be a technique I fall back on when I know I’m going to have a really busy week and still want some bacon for the following weekend.

See more Smoking & Curing posts >>

Read more from the Country Skills blog >>

Big Bacon Challenge: Rounding Up – volunteers’ feedback

A few weeks ago now, all my lovely volunteers for the Big Bacon Challenge made their first batches of home-cured streaky or back bacon.  Several of them have blogged about their experiments, so I’d like to bring together some of their comments and reports.  I wanted to show as many people as possible that making your own bacon at home is not only incredibly simple and straightforward, but produces some of the best bacon you will ever have eaten – these reviews I hope go some way to supporting that!

Streaky bacon mid-curing, with dry curing mix applied

‘Ghoti’ writes about her bacon over on LiveJournal:  My favourite exerpt from her report – “So, in summary: utterly delicious, and a three year old can make it.”

‘Amlees’ wrote up her bacon day-by-day at Alison Was Here, and her collected bacon challenge posts can be found here:  “So the bacon is cured and rested and ready to eat.  John cuts thick slices and fries them for breakfast, with an egg on the side.  The bacon is delicious and satisfying, if a little salty. (…)  However, the bacon is as good as the bacon we normally buy (the expensive dry-cured kind).”

Finally (for now at least) ‘5greenway’ wrote on the Very Berry Handmade blog about their bacon in two posts – at the start and end of the process – “So, the process was really easy. But it would all count for nothing if the bacon wasn’t up to scratch… Just looking at it before cooking, we suspected it’d be pretty good, but it tasted even better than we expected. Not too salty, a nice flavour from the cure & a kind of melt in the mouth texture.”

I’m informed by several of my volunteers that they have since bought their own supply of curing salt and continue to make home-made bacon (and other goodies!), so I’m declaring the challenge a success!

A great big THANK YOU to all of my volunteers, and if any of you have any further feedback, please do comment or email so that I can include it here!

All the Big Bacon Challenge posts will be collected under the ‘BigBaconChallenge’ category heading – so go there to read them all!

Read more from the Country Skills blog >>

Big Bacon Challenge: after the challenge – what now?

You’ve come to the end of the bacon challenge, hopefully sampled your efforts and agreed they are *good*, so where do you go from here?

I was very pleased (a teeny bit smug, even?) to hear that one of my volunteers has already dived in and ordered her own supply of Supracure – if you want to do the same, I can heartily recommend both HotSmoked and Weschenfelder (details in my Suppliers List) for curing and smoking supplies.  Both sell Supracure in 2kg packs for about six or seven pounds.

Before considering whether to do the same, and make curing a regular part of your culinary routine, it’s worth giving the costings a little thought.  By necessity this is just a snapshot – since food prices are constantly shifting – but it gives an indication.

Retail-packed back baconLet’s look at 1kg of back bacon.  On the basic recipe this will take 1kg of pork loin, 80g of curing salt and 20 g of sugar.  We’ll ignore the sugar for convenience, since it’s a small quantity and you almost certainly have it already.  The curing salt costs – round figures – about 30p.  So really it’s just the meat we need to consider.  You can generally get hold of bog-standard own-brand back bacon on ‘2 packs for £4’ type offers where the pack size is between 230g and 250g. Bearing in mind this bacon is about 13% added water, let’s call that an equivalent per kilo cost of about £9.

Compare with this, Tesco this week list their Rind-on Pork Loin Roasting Joint at 3.99/kg – admittedly a half-price special offer, but even the full cost of £7.99/kg represents a *small* saving.  The key to really making this work is to buy whatever’s cheap this week – be it loin or belly, or even belly slices.  It’s a pretty safe bet most supermarkets will be discounting something suitable at any given time.  Of course it pays to be flexible, but if you only like back bacon, buy loin when it’s cheap and freeze it – or make a big batch all at once and then freeze it once it’s bacon – personally I can see no difference in quality from doing this, though obviously you should do one or the other, not both!

To even start to compare like with like, though, it’s really good dry cured butcher’s bacon you need to consider – a spot of quick googling suggests this is for sale from various producers at about £15/kg.  So it’s clear that with a bit of canniness, not only is the end product fantastic, but there’s an easy 50% saving to be made on the cheap & nasty brine-injected supermarket commercial bacon offering, and a tidy 75% off the nearest equivalent butcher’s bacon.  Streaky bacon is usually a little cheaper than back, but since belly pork is a cheap cut par excellence, the maths for home-cured streaky bacon generally adds up just fine without depending on special offers.

Convinced?  Then you’ll need to decide what to try next.

My usual ‘house’ cure is actually a black pepper cure – essentially the cure we used for the Big Bacon Challenge, but with 3 grams of freshly ground black pepper (I recommend a pestle and mortar for this) added per 50-60g of cure mix (curing 500 – 600g of bacon).  This cure is great with or without smoking the bacon after curing – more of which later.

Juniper and Bay cure, and ingredientsIf your taste runs more to cooking bacon for stews and sauces than to breakfast rashers, perhaps try the bay and juniper cure, which produces a lovely deep rich aromatic flavour.

The limit to what to add to cures really is your imagination – within some basic limits on proportion of salt and sugar (I’ve used between 20% and 33% sugar with great success) – do some reading (perhaps look in the Library for inspiration) and see what you fancy!

I can’t leave the subject of bacon curing without a brief mention of smoking.  Not everyone likes smoked bacon, of course – though since commercial ‘smoked’ bacon has concentrated smoke-flavour added to the brine, and bears about as much resemblance to the real thing as Nescafé does to a real steaming espresso, perhaps it deserves a second chance..?

I’m British, so when I think about smoking bacon we’re talking about cold smoking.

The key to this process is bathing your cured meat in cold smoke over a period of several hours (I usually smoke my bacon for 10 – 12 hours), so you either have to produce your smoke consistently, and with as little heat as possible, within the smoking box, or produce hotter smoke at a distance from the box and then ‘duct’ it in allowing time for it to cool down.  It’s a tinkerer’s paradise, so please do consider it for a bit of a mad project – there are as many designs for DIY smokers as there are people who build them I think!

ProQ cold smoke generator, lit

We designed and built a wooden tower smoker – effectively just a fancy wooden box with some shelves in it – which I fill with smoke using a commercially available cold smoke sawdust burner.  I probably could have constructed a smoke generator very similar for not much money, but I wanted to start with something that would Just Work, the cost wasn’t prohibitive (around £20) and I don’t regret the decision.  It’s a great piece of culinary gear, think how much fun – and flavour! – you could have with smoked trout and salmon, smoked salt, smoked garlic and chillies, as well as your bacon!

Finally, a big thank-you to all my Big Bacon Challenge volunteers – looking forward very much to hearing what you all thought of your efforts  – and to the rest of my readers, thank you for your patience with the bacon-centric tone of the blog the last couple of weeks, normal service will be resumed very soon!

All the Big Bacon Challenge posts will be collected under the ‘BigBaconChallenge’ category heading – so go there to read them all!

Read more from the Country Skills blog >>

Big Bacon Challenge: time to share and enjoy!

You’ve made your bacon, and now it’s time to sample it!

You can do anything with your home-cured bacon you can do with shop-bought bacon, and more.  Of course you can slice it and fry or grill it as part of a full english breakfast (or in a floury bap with ketchup, or in a sandwich with lettuce tomato and mayo).  You can dice it and enjoy it in stews and pasta sauces (think lardons or pancetta).  Really the only limit is your imagination.

Sliced home-cured streaky bacon

I recommend you sample your bacon for the first time cooked very plainly – sliced and fried or grilled – since you’ll get the best sense of what the flavour and texture is like this way.  Get a nice sharp long-bladed knife – it’s worth taking the extra couple of minutes to sharpen this if the blade isn’t quite up to scratch – and slice the bacon as thinly as you can.

Sliced home-cured baconYou’re not going to get it as thin as commercial bacon, but that’s fine – aim for about 2mm thickness, this should be very achievable with some practice.  It’s worth cutting a thicker piece off first to get a nice flat edge – this won’t go to waste as you can dice it for a stew or a sauce later.  Leave the rind on – you don’t have to eat it, you can always trim it off later.

Bacon in the panPut your sliced rashers into your frying pan on the hob, and wait for the sizzle.  This really will be the first sign you get that things are cooking.  What you won’t get is the pan full of white liquid we’re all so familiar with from commercial bacon, in fact it will stay completely dry until later in the cooking process when the fat starts to render.

Frying bacon in panCook your bacon, turning occasionally, until the fat is rendering and you have some lovely golden caramelised areas.  This bacon will take longer to cook than stuff from a packet – it’s sliced thicker, and it’s a lot denser, so be patient and take the time.

Bacon & egg breakfastThen serve in whatever way you like – we had ours with a fried egg and toasted muffin for breakfast.  The hens get a mention for the gorgeous fresh egg, too!

If there’s any bacon left over, wrap it up in the paper again and put it back in the fridge.  It will keep at least a week and usually two.  Don’t be tempted to seal it in a plastic bag, cling film or in a tupperware box, it’s a natural product and needs to breathe!

When you taste your bacon, please let me know what you think of it!  In the last post of the bacon challenge series, I’ll suggest some ideas of places your new skill might take you next!

All the Big Bacon Challenge posts will be collected under the ‘BigBaconChallenge’ category heading – so go there to read them all!

Read more from the Country Skills blog >>