Pitta and Naan Breads – from the Fallback Pantry

Pittas and other flatbreads are so versatile – whether you like to stuff them, wrap them or dip them – and the difference between the pre-packed long-life supermarket versions and freshly cooked bread is night and day. There are essentially two sorts of flatbreads – yeast leavened flatbreads, of which pittas and naan breads are good examples, which tend to be cooked in an oven, and unleavened breads, such as chapatis and tortillas, which are usually cooked on a hotplate or skillet. Different breads vary in their ingredients, but the process for each type is essentially the same.

Pittas are served

These are some of the easiest and fastest breads to make – it’s a mystery to me really why anyone ever buys them when they’re so quick, easy and satisfying to make at home. You can even make the dough a day or more ahead of baking – once baked it’s best to eat these breads immediately, as they go stale quickly. If you bake more than you can eat in one go, they’re best frozen as soon as they’re cold.  This recipe for pitta breads can easily be adapted to make naan, with the modifications to the ingredients noted below. 

To make 12 pittas (takes about 2 hours, including proving and baking time):

  • 500g strong bread flour (I use a 75% white, 25% wholemeal mix because I prefer the flavour and texture, but 100% white is fine too. Flatbreads are more forgiving of lower gluten flours, so if you only have plain flour at home you can still attempt this bread, it will just be a little less elastic / chewy) plus extra for dusting / shaping.
  • 2 tsp sugar
  • 1 tsp salt
  • 1 tsp instant dried yeast
  • Oil – I use cold pressed rapeseed oil for this (and almost everything), but olive oil would be more traditional
  • Water (about 300-400ml)

In a bowl (or bowl mixer fitted with a dough hook) combine all the dry ingredients, about a tablespoon of oil, and mix in enough water to form a nice elastic dough. One of the most common mistakes people make when making bread is not adding enough water to the mix. The best bread comes from a really well-hydrated dough that’s just on the edge of being too wet to work with, under-hydrated dough makes stodgy, heavy bread with poor texture and rise. The more practice you have with this, the easier it will become to judge – I use a little shortcut, which is to add water until I’ve gone a little bit too far, so the dough is starting to become sticky, and then add a spoon or two of extra flour back in just to make it handleable again.

Knead the dough for 5-10 minutes, by hand or in the mixer, until it becomes lovely, smooth and elastic. I oil my countertop for kneading rather than flouring it, as that avoids accidentally incorporating more flour into the dough. 

What you do next depends on whether you want the bread today, or not:

  • If you want to bake the pittas straight away, oil your ball of dough, return it to the bowl, cover with a clean tea-towel and leave it at room temperature to double in size, which should take an hour and a half or so. 
  • If you don’t want the pittas until tomorrow (or a little later) oil the dough and cover the bowl with cling film, or put it in a good-sized Tupperware-type container, and put it in the fridge at least overnight. (What you’ve done here is create a batch of ‘fridge dough’, which is really versatile – more on this later. If you’re short of baking yeast at the moment, this is a game changer!).

When you’re ready to bake: 

Set your oven to its highest temperature (ideally at least 220C), with a heavy baking sheet or baking stone inside. 

Decide how many pittas you want to bake – I tend to take half the dough and divide it into six pieces. Flour your work surface generously for this bit.  Form each piece into a tight ball by drawing the edge repeatedly into the centre, and then leave the balls to rest for about 10 minutes, covered with a tea towel. 

To shape the breads, you could use a rolling pin (in which case try to roll them out about 5mm thick and in an oval sort of shape). Personally though I can’t see the point, it’s just as easy to stretch them out by hand and I think the texture is better. First, squash the balls down into a thick disk, then slowly stretch them out.

IMG_6576_1

Only stretch the edge, the middle will take care of itself. You’ll find they want to spring back but keep working on them in turn, each time you ‘go around’ you’ll find them willing to stretch a little bit further. Get them to the size and shape you want, around 5mm thick (but this will be a bit variable – it’s fine, but try to avoid going particularly thin as these areas won’t be able to ‘puff’ into the traditional pocket). Cover them again with the tea towel for about 5 minutes. 

IMG_6577

When the oven is up to temperature, working very quickly, pull out the hot baking sheet or stone. Place each pitta on it, the opposite side up to the way they were on the work surface (having the ‘dry’ upper side down seems to help them bake nicely), and get them back in the top of the very hot oven as quickly as you can. You want to avoid losing any heat if you can. 

If everything has gone right, they should puff up in the oven into little ‘pillows’. Once they’ve puffed, you can turn the baking sheet around (particularly important if your oven has hot spots). You want to cook them until the outside of the bread is dry but still soft. Don’t wait for the top to brown, they’ll be crispy by then – they’ll normally have some colour on the bottom where they have been in contact with the baking sheet. Take them out of the oven and cover with a tea towel until serving, just as soon as they’re still warm but not too hot. 

IMG_6580

They’re perfect for stuffing, dipping in home-made hummus, or enjoying with soups, salads – anything you can think of!

Variation: To make naan – 

  • Use strong white flour or a 50:50 mix of strong and plain flour (Or 100% plain, see note above). 
  • Use a mix of half-milk, half water, and add about four tablespoons of plain yoghurt (you’ll need less water/milk as a result). 
  • You can use a plain-flavoured oil or melted ghee in the dough.
  • Once out of the oven, brush with melted ghee or butter while still wet. Mix crushed garlic with this butter for a garlic naan, or fold chopped dried sultanas, figs, or dates and almonds into the dough, before shaping, for a Peshwari-style naan. 
  • I expect my naan to be a bit bigger than pittas, so I would make six or eight from a full quantity of dough. 


More from the Fallback Pantry  ::  More from the Country Skills Blog >>


Give Us This Day Our Daily Bread – a collection of recipes from the Fallback Pantry

Limited shopping opportunities mean many of us are baking bread at home for the first time – or at least, for the first time in a long while! So here’s a quick round-up of recipes and techniques to give you some extra ideas and inspiration.

“But I can’t get…” Some advice on ingredients and making do:

Flour and yeast seem to be ingredients in short supply at the moment, so some creative baking may be required.

If you can’t get bread flour, you still have options if you have other flour types available.

  • Chapati (Atta) flour works well as a bread flour, it makes a slightly dense but very tasty wholemeal loaf. I recommend using a bread tin for this.
  • Soda bread and flatbreads are more forgiving than traditional loaves – you can make pittas, tortillas, chapatis and all sorts of lovely things.
  • You can bake with any mix of bread flours – combining rye, spelt, or wholemeal flour with strong white gives a tasty satisfying loaf which rises better than these flours will on their own.

If yeast is the problem:

  • Get cracking with that sourdough starter!
  • In the meantime, experiment with soda bread.
  • Old expired yeast (those packets in the back of that cupboard!) will be sluggish and produce poor results, but can often be brought back to life. It will take a little care and attention – activate the yeast in some warm water with a bit of sugar before baking, even if the instructions say this isn’t necessary, and use more than the recipe says. Be prepared to give it extra time to prove – time is flavour so this is not a bad thing!
  • If you have a little bit of yeast, you can make it last (almost!) indefinitely by making a ‘fridge dough’, which maintains a live yeast culture in the fridge for batch after batch of baking. This is what traditional bakeries have done for centuries, and works really well – store the live dough in the fridge and plan to bake two or three times a week to keep it refreshed and active.

Good luck and happy baking!

Yeasted breads:

No Weigh! – the bake-anywhere, traveller’s loaf
A basic, white bread recipe and technique which requires no special kitchen equipment – if you have flour, water, salt, yeast and oil, access to an oven and some sort of a baking tray, you can make this loaf.

Don’t be Sour – a dalliance with yeasted ‘quick’ bread
A good basic ‘pain d’épi’ loaf recipe that can be adapted for all sorts of different flour types.

Roast Garlic & Rosemary Bread
A lovely fougasse-type bread ideal for serving with pasta.

Pain de Savoie, from Paul Hollywood’s ‘Bread’ – Cooking the Books, week 2
This is a filing, savoury loaf with which is a meal in itself – made with bacon (or ham) and cheese, it really hits the spot.

Milk Loaf, from ‘How To Bake’ by Paul Hollywood – Cooking the Books, week 14
Something a little sweeter and more sophisticated – if you’re missing posh breakfast breads this simple but delicious milk loaf might be for you.


Sourdough (and semi-sourdough) baking:

Sourdough Saga: Episode 1 – failure to launch
How (not) to create a sourdough starter.

Sourdough Saga: Episode 2 – keep calm and carry on?
We got there in the end!

Sourdough Saga: Episode 3 – good things come to those who wait!
My basic sourdough recipe.

Sourdough Saga: Episode 4 – cheese and sun dried tomato bread
A nice recipe variation.

Sourdough Saga: Episode 5 – how to look after your starter

Sourdough Saga: Episode 6 – awesome home-made sourdough pizza
This is a really good replacement for take-away!

Sourdough Saga: Episode 7 – six months on, life with my sourdough starter

Sourdough Saga: Episode 8 – semi-sourdough baguettes
Not a ‘novice’ bake, but one I’m really really proud of. These baguettes are the business!


Read more from the Country Skills blog >>

Stinging Nettle Gnocchi with Garlic and Sage butter – advice on eating weeds, from the Fallback Pantry

Welcome to a new blog series here at the Country Skills Blog: in the ‘Fallback Pantry’ I plan to build a collection of recipes to help make the best of what’s in the kitchen and garden. At the time of writing, at least a quarter of the world’s population is under some sort of ‘lockdown’ restriction resulting from the COVID-19 pandemic, making the sorts of recipes and techniques the blog has always focused on more valuable and relevant than ever.

Whatever our circumstances, a slow, thoughtful look at the resources at our disposal will hopefully yield options to help us eat well and make the best of what we have available.

With regular trips to the shops on hold for most of us, access to fresh greens can be a particular challenge. Thank goodness it’s stinging nettle season! Nettles are a great wild food, really nutritious and full of good things, widely found in gardens and other green spaces, and can be used very much like spinach. This recipe for home-made gnocchi really makes the best of them, I think – and they’re fun to make, so you can keep the kids entertained for several hours, too!


An important note about wild food – 

When picking wild plants to eat, it’s really important that you’re completely confident that you know what it is you’re picking. There are one or two seriously poisonous wild plants out there, and eating the wrong one could kill you. That said, stinging nettles are some of the easiest wild plants to identify – most British children will have mastered this skill by the age of five or six (though an adult friend of mine admitted to me recently that she wasn’t that confident she could!). Invest in a well-illustrated field guide and learn how to use it, take someone with you who knows what they’re doing, and if you’re ever in the slightest doubt, don’t take a risk! Remember that in many countries there are rules about what you can and can’t pick, pull, or harvest on land that doesn’t belong to you, so please stay on the right side of the law, and check with the landowner first to be sure.


Stinging Nettle Gnocchi with Garlic and Sage Butter

SERVES TWO

Ingredients:
100g stinging nettle tops
200g potatoes
One free-range egg
Around 100g Type-OO white flour (you can substitute strong white bread flour (better), or even plain flour will do in a pinch. Not self-raising, please!)
Semolina (not essential – you can use more of your flour for shaping but will sacrifice a bit of texture)

To Serve:
50g unsalted butter
3-4 sprigs of fresh sage
2 cloves of garlic
Parmesan cheese
Salt & pepper
Optional extra: dry-cured streaky bacon lardons

Serving alternative: any other sauce you fancy – all sorts of pesto-type sauces will work well here, so the only limit is your imagination.


Picked stinging nettlesPick nettles carefully – I wear washing up gloves – selecting the top two or three pairs of leaves only. Nettles are best early in the year, they can get rather tough and coarse flavoured later on. Actually, I tend to pull up a whole batch of nettles – I’m usually weeding – and then pick through them for the nettle tops afterwards. Remove the leaves from the stems, wash them thoroughly, and dry in a salad spinner (keeping your gloves on all the while!). 100g is roughly the amount you get in one of those prepared salad bags.


Start by boiling your potatoes, skins on, in a pan of briskly boiling water. 

Meanwhile, in a large frying pan with a well-fitting lid, put a splash of water and a little knob of butter, add all the nettle leaves, cover, and steam until the leaves start to soften and go a slightly darker shade of green. You can take your gloves off now, as the sting will have been disarmed. 

Wilted steamed nettles

Squeeze all the water out of your nettle leaves, by hand in a tea towel, or in a sieve. Then chop the steamed nettles up as well as possible. 

Keep an eye on your potatoes. When they’re cooked, drain them into a colander and once they’re cool enough to handle, you can peel their skins off really easily. 

Your chopped nettles should now be essentially cold. In a food processor (or pestle and mortar) combine the nettles with the egg and reduce to a reasonably fine pulp. 

Mash your potatoes, ideally using a potato ricer if you have one.

Combine the mashed potato with the egg & nettle paste, and mix well. 

Now, start adding the flour until it makes a soft but manageable dough. This will probably be about 100g but will vary depending on how much moisture was left in your nettles & potato, and how large your egg was.

NettleGnocchi_3

Once you have a workable dough (it will still be a bit sticky) dust your counter with semolina, take a handful of dough, and roll it into a sausage about ¾” in diameter. Then cut the sausage into individual gnocchi about ½” thick and place – spaced apart – on a semolina-dusted baking sheet or chopping board. Carry on until you have used up all the dough. 

Allow your gnocchi to rest for about 30 minutes and then press gently with the tines of a fork to get the traditional ridges, which help sauces cling to the gnocchi.

Gnocchi ready for cooking

To Serve:

Bring a large saucepan of salted water to a brisk rolling boil. 

Meanwhile, in a large frying pan, melt the butter. Chop the garlic finely, add to the butter, and cook very gently until golden.

While the garlic is cooking, add the gnocchi to the boiling water. They will sink initially, and are done when they float to the surface.

Finely slice the fresh sage leaves. When the gnocchi are cooked, add the sage leaves to the butter and garlic, stir quickly, and then transfer the gnocchi into the garlic and sage butter in the frying pan using a slotted spoon. 

Mix well to coat the gnocchi evenly with the herb butter, and serve, topped generously with freshly grated Parmesan and a good pinch of ground black pepper.

Variation – fry off some good smoked streaky bacon lardons until golden and crispy, before you start cooking the gnocchi, and add these to the gnocchi and sauce at the end.

Read more from the Country Skills blog >

Unprocessed Lent – a food challenge

I’ve been thinking for some time about giving up processed foods – at least as an experiment. The time has never seemed right, but with Spring on the way, and Lent around the corner, it seemed a very Lenten sort of exercise in food discipline.

Hang on, what do you mean by processed food?

When I’ve discussed this idea with friends in the past, one question arises, sooner or later. ‘What do you consider to be processed? I mean, all cooked food is processed. Even flour is processed!’ And this is a very fair question. Everything apart from raw fruit, vegetables, meat and fish has been processed to some extent – arguably, even those have, unless you start with a live chicken or dig the potato from the ground yourself.

unprocessed-lent_7What I’ve tried to do is construct a logical ‘traffic light’ system that categorises foods purely by their degree of processing. I’m not making any moral judgement here, or asserting that one category of foods is healthier, better, or more environmentally sound than any other. This isn’t by any means a ‘clean eating’ thing (I think that’s a rather pernicious fad, and well past it’s sell-by date). It’s purely a list of categories sorted by – if you’ll forgive the expression – increasing ‘buggered-aboutness’.

There are definitely other criteria that we might want to be considering, as thoughtful, ethical consumers, and I refer to some of these in the annotations to the categories. They will colour the degree to which I’m inclined to be militant about the degree of processing. For instance, freezing, drying, and canning foods – all undoubtedly forms of processing – significantly increase the shelf life and preserve the nutritional value of foods, reduce food waste, and allow us access to fresh produce all year around without needing it to be flown half way around the globe. I would rather eat frozen peas or tinned tomatoes in February than fresh ones flown in from Kenya or produced in an artificially lit and heated glasshouse somewhere.

I’m not making an argument here that additives / preservatives / flavourings and so on are necessarily and axiomatically bad (though many undoubtedly are) – just that they are more likely to disappear invisibly into certain sorts of food than others, along with trans fats, invert sugar syrups, and artificial sweeteners, and I like to know what’s on my plate. For me, the most worrying thing about the 21st century food chain is that it introduces black boxes, and unknowns, into what we’re eating. When food is a commodity, we lose touch with our food and our farmers. As a planet, we have never been more divorced and isolated from the origins of our food. Making a point of starting from simple ingredients, and shopping, cooking, and eating thoughtfully, is a great place to start in reconnecting ourselves to the food on our plates.

Embarking on this challenge at this time of year means that I can’t cheat by drawing heavily on my veggie garden – we’re fully in the ‘hungry gap’ and there’s pretty much nothing growing just now. Where I will be benefiting from our usual lifestyle is that I have a good stock of home-made preserves – pickles, jams, chutneys and so on – which, assuming they were made from simple ingredients, I consider absolutely fair game.

unprocessed-lent_6

Why are you doing this?

As thoughtful consumers, there are plenty of important questions we might want to ask about the food we eat –

  • Where was it grown, and how was it stored and transported?
  • What resources – water, soil etc – and other inputs such as fuel, insecticides and herbicides were used in its production?
  • What are the consequences of that for the local and global environment?
  • Who produced it, and were those farmers able to work safely and be paid fairly?
  • Is it good for us, or will eating it have negative consequences for us as consumers?
  • Is it good value for money?

Different people will have different priorities. But whatever is important to you when it come to food, we are deluding ourselves if we think we can start to answer any of these important questions without first being able to answer a much more basic one. And that question is –

 “WHAT AM I EATING?”

When we eat processed and highly manufactured foods, we cannot possibly answer this question. And without that answer, any attempt to answer any of the others is meaningless. Stripping out processed foods from our diets is the first, essential step towards being able to make good decisions about food. If we don’t know what’s in the food on our plates, we can’t possibly make good choices about it – whatever ‘good’ means for us, at any given time in our lives.

It’s not Lent until the 1st of March, so why the preview? 

Well, I’m asking you to argue with me, I guess. Point out important food groups that I’ve missed, or places where you think my categories are not working or where I’ve introduced false-equivalences. I think it’s very unlikely that I’ve got this right first off. So, folks, what have I forgotten or got wrong?


Unprocessed Lent – food categories


Green
 – Fresh foods
unprocessed-lent_4Permitted – first choice if home-grown or locally produced and in season, otherwise substitution with yellow or amber items may be preferred.

  • Fresh whole fruit & vegetables
  • Fresh whole identifiable pieces of meat or fish
  • Fresh egg
  • Honey

Yellow – Single-ingredient foods simply processed for preservation purposes
Permitted – in my view these are no ‘worse’ and in some respects more desirable than fresh – they make foods available out of season without causing dramatic food miles, without significant deterioration in food value, and reduce food waste.

  • Frozen meat, fish and vegetables (otherwise as above)
  • Pasteurised whole milk
  • Whole grains (brown rice, pearl barley etc)
  • Un-roasted seeds and nuts
  • Dried pulses (peas, beans, lentils etc)
  • Cold-pressed (extra virgin) vegetable oils

Amber – these are still primarily single-ingredient foods, but have been processed more heavily.
Permitted – these foods may be starting to lose some food value compared to their fresh or unprocessed equivalents, or have had small additions of other ingredients. In exchange, they often store better than fresh, reducing food miles and food waste. I can’t see how we can do without them and there’s nothing here that would have bothered my grandmother.

  • unprocessed-lent_9Tinned vegetables in their own juice (eg tomatoes)
  • Dried fruit & vegetables
  • Roasted nuts and seeds
  • Lightly processed whole grains – white rice, rolled oats etc
  • Wholemeal flours
  • Fruit juices (fresh or pasteurised, but preservative free)
  • Skimmed & semi-skimmed milk (pasteurised)
  • Cream
  • Unsalted butter
  • Animal fats (lard, suet)
  • Natural unsweetened yoghurt
  • Maple syrup
  • Coffee beans roasted (& ground)
  • Loose-leaf tea
  • Unsweetened cocoa powder
  • Dried herbs and spices
  • Sea salt

unprocessed-lent_5Amber+ – similar to amber but more processed
Substitute – where possible

  • White flour
  • Refined sugars
  • Minced meats

Orange – foods created by traditional preservation techniques such as fermentation, curing and smoking. These are foods with amazing, complex flavours; the very stuff human food culture is made of.
With Care – source is everything here, so buy carefully, from small – ideally local – makers using traditional techniques (actual smoke, rather than liquid, for example), look for PDO products, consider alternatives & home-made. The industrially manufactured versions of these foods fall into the ‘black’ group.

  • unprocessed-lent_8Cheese
  • Cured and/or naturally smoked meats & fish (anchovies, bacon, smoked haddock)
  • Real ale & cider
  • Wine
  • Natural wine and cider vinegars
  • Lacto-fermented foods (kimchi, sauerkraut)

Red – multi-ingredient manufactured foods. These are foods that our grandparents would have recognised, and may have bought from outside the home (at least some of the time). They can often be a source of hidden ingredients (salts, sugars, fats & additives)
Avoid – unless home-made

  • Bread & bakery products
  • Fresh & dried pasta and noodles
  • Prepared ‘deli-style’ meats ready to eat
  • Sausages, burgers
  • Jams, pickles, chutneys
  • Tinned fruit and vegetables in brine or syrup
  • Tinned fish
  • Squashes, cordials, and flavoured syrups
  • Manufactured condiments (mustard, ketchup, sweet chilli sauce, mayonnaise etc)
  • Tea bags

Black – convenience, industrially manufactured foods. Our grandparents would have been mystified by many of these, or, while recognising them, would never have thought to buy them ‘off the shelf’. These sorts of foods are where all the hidden sugars, salts, and oils (not to mention invert sugar syrups, trans fats, artificial sweeteners, preservatives, flavour enhancers, and so on) sneak into our diets. Obviously, all of these foods made at home from lower category ingredients are fine!
Off-limits

  • unprocessed-lent_3Any ‘orange’ food produced industrially
  • Ready meals (including prepared sandwiches)
  • Convenience fruit & veg (bag salad, peeled / chopped fruit & veg)
  • Prepared pizza
  • ‘Chorleywood process’ bread
  • Breakfast cereals
  • Prepared sauces (pasta, curry etc) and raw foods coated in them
  • Tinned prepared foods (baked beans, pasta in sauce etc)
  • UHT or homogenised milks
  • Solvent-extracted vegetable oils
  • Margarine and similar non-dairy spreads
  • Non-dairy creamer
  • Sugar-free sweetners
  • unprocessed-lent_1Fruit juices containing preservatives
  • Prepared soups (fresh & tinned)
  • Instant noodles & soups
  • Sweet & savoury pies, scotch eggs
  • Crisps, biscuits, prepared snack foods
  • Sweets, chocolates, etc
  • Carbonated drinks
  • Spirits
  • Instant coffee
  • ‘Coffee pod’ coffee (Nespresso, Tassimo)
  • Stock cubes & gravy granules
  • Packet sauces & seasoning mixes
  • Take-aways


‘Tricky’ foods – additives and additions traditionally used in kitchens, and manufactured condiments in small quantities.

Additives / additions – our grandparents would have been familiar with all of these, even though, as kitchen ingredients, some have fallen out of common use. I plan to continue to use them when appropriate. Yes, some of them even have E-numbers.

  • Bicarbonate of soda
  • Baking powder
  • Dried yeast
  • Citric acid [E330]
  • Sodium nitrite [E250](saltpetre, used in tiny quantities in curing salt)
  • Sodium metabisulfite [E223] (Campden, used as a preservative and sterilising agent in brewing)

Condiments – while noting these are ‘red’ foods, they may be used occasionally, while looking for home-made alternatives.

  • Soy sauce
  • Mustard
  • Worcestershire sauce
  • Balsamic vinegar
  • Ketchup, brown sauce, sweet chilli sauce

It’s just under a week until we start. Looking forward to your comments!

Read more from the Country Skills blog >

A Basket of Adorables – the chicks have hatched!

It’s surprising how long three weeks can seem, when you’re waiting for eggs to hatch! But by day 18, it definitely feels like you’re getting there. It’s time to go into ‘lockdown’, switch off any automatic turning devices, and increase the humidity in the incubator for hatching. Then, you just have to wait for the longest three days you can imagine.

As it happens, a couple of our chicks seemed in a bit of a hurry to get hatched, and we had our first external pip – the crack in the eggshell the chick makes to help it breathe before the real hatching effort takes place – on the morning of day 20.

eggscapade-3_1  eggscapade-3_2

You can imagine, I was checking the eggs every five or ten minutes! The excitement and anticipation was better than a childhood Christmas. The first cheeping sound from an as-yet unhatched egg was a magical noise. It suddenly seems plausible that, inside an egg which three weeks ago would have made a perfectly good omelette, there might be a tiny, perfect little creature. The hatching process from external pip to the chick finally emerging from the egg will commonly take 12-18 hours. An eternity! But by that evening, the very first chick – a Light Sussex – had hatched. We were on our way!

eggscapade-3_3

It is advised to leave newly hatched chicks in the incubator – which after all is perfectly warm and comfortable for them – for around 24 hours after hatching. This allows them to get all nice and dry and fluffed up, from their rather bedraggled initial state. They don’t immediately require food and water, as their internal egg sac continues to supply their needs for around 48 hours after hatching. The less often you open the incubator during hatching, the higher the humidity stays, which is important because if the egg membranes dry out during hatching they become stiff and crispy and can effectively ‘shrink wrap’ the chick and prevent it hatching, a tragic fate so late in the process.

Somehow, despite the excitement and anticipation, we managed to get some sleep that night. By the next morning, we had a second egg hatched, and a third making real progress. Day 21 – ‘hatch day’ – had begun.

We had 21 eggs in the incubator at ‘lockdown’, from the 24 we had started incubating – three eggs appeared infertile when we candled them at 10 days, so these were removed at that stage. By mid-morning on day 21, things had really got going.

eggscapade-3_4  eggscapade-3_5

At various points I was rather confused about how many chicks were hatched or actively hatching, and eventually the incubator became so full of chicks that it was impossible to keep track. A quick dive into the incubator to remove the first batch of fluffy chicks made a bit of space – and revealed a problem. One egg, which I had noticed pipping on the evening of day 20, over 18 hours ago, wasn’t making progress. I could see the chick moving inside, but there was only quite a small hole rather than the progressive line of chipped open shell that develops during an active hatch, and the membranes I could see appeared worryingly dry.

I had a decision to make. Most of the advice on hatching chicks will tell you not to intervene, and for good reason. Fiddling about with the incubator reduces the humidity and will increase the risk of hatching problems. Not only that, but hatching chicks are very fragile little creatures and the risk of causing catastrophic injury by interference is significant. Assisting a chick which isn’t quite ready to hatch is likely to lead to potentially life threatening bleeding from an umbilicus and from the blood vessels lining the shell which have not properly shut down yet, something that happens in the final hours before hatching. These are all extremely good reasons to leave well alone.

Another reason is also often given – that chicks which are not hatching correctly are probably ‘wrong’ in some way, and are as a result better left to die. This reason, I’m not buying. Animals of all sort can struggle to be born normally for all sorts of reasons, but many of those reasons are just plain bad luck – they find themselves positioned wrong (in the case of chicks, they fail to wriggle themselves around in the egg so that they can get their beak into the air cell, and start to breathe before hatching), or get tangled up somehow (with littler-mates, cords, or membranes). After speedy but considered soul-searching, I decided that this little chick needed my help, and that I was willing to go against the advice and try to assist the hatching.

Very gently, using my fingertips and a cotton bud damped with warm water, I enlarged the little hole the chick had made, until the cap – the bit of the shell overlying the air cell – was completely removed. I could see the little chick – a russety-coloured Rhode Island Red – tangled up tight in a rigid dried egg membrane, which had stuck to its downy feathers. Let me tell you, I was terrified of hurting the poor little thing and even tearing its skin as I eased the membrane away with my wet cotton bud. But very slowly, I was able to tease the membrane away without any damage to the little chick, releasing it from its entanglement. Having seen what was going on inside the egg, I have no regrets about helping – I can’t see how the chick could have got out on its own, it was well and truly welded to the membranes, had no way to rotate around to remove enough egg shell to complete its hatching, and would rapidly have been running out of the energy it needed to keep struggling. But I can also see quite how delicate, and risky, the process could be – and I might have been wrong, and taken those risks unnecessarily.

The rescued chick was popped back into the incubator. Meanwhile, we transferred the first batch of hatched chicks to the brooder cage which was set up in the corner of the living room.

eggscapade-3_9

The brooder set-up is a bit ‘make do and mend’. I had bought a second hand Brinsea Eco-glow ‘electric hen’ style brooder, rather than use the more traditional hanging heat lamp, both because it has far lower energy consumption than a lamp, and because it seemed to me a more natural thing from a behavioural point of view – chicks would likely feel more comfortable and reassured by a dark warm place to snuggle under than a mysterious warm light in the sky. The brooder cage is Dave the dog’s old puppy crate, wrapped around with cling film to prevent drafts at chick height, with cardboard baffles around the edges, and bedded with newspaper and a thin layer of clean dust extracted wood shavings.

Hatching continued at great pace. By bedtime on day 21, we had 15 hatched, with six eggs still in the incubator showing no sign of activity. While I was delighted by the little fluffy bundles, if I’m honest I was feeling a little disappointed with these numbers – which would have given us a total hatch percentage only just over 62% from the starting 24.

eggscapade-3_7  eggscapade-3_6

Patience is a virtue, and I was planning to give the eggs at least 48hrs after ‘due’ just to make sure no one was running behind. The following day (day 22) two more eggs had pipped, one hatched but the second failed to progress. We noticed that the water reservoir had run dry, which made me worry that perhaps it was another ‘shrink wrapped’ chick. After watching for a while, it looked like we were getting nowhere. I decided to intervene again, and carefully peeled this final chick out of the shell. The membranes were a bit dry but not quite as crispy as the little Rhode Island. This little chick had a visible umbilicus which seems to be some sort of a congenital abnormality. Maybe it isn’t quite ‘right’, but we’re giving it the benefit of the doubt for now.

With a total of 17 eggs hatched, there was no further activity in the final four, despite leaving them another couple of days. I candled the remaining eggs and three had clearly stopped developing at some point in the last week or so. The final one seemed to be absolutely packed full of chick, as you’d expect from a fully developed egg. But there was no sign of a little beak pushing into the air sac, and no sound from within the egg. Perhaps this was the unlucky one – positioned wrong and not able to get a breath to start the hatching process.

Our final statistics, by breed, for those of you who are curious about the nerdy details –

Our eggs originated from two batches, a dozen Buff Orpington eggs from one source, and dozen mixed breeds (RIR, Light Sussex, Vorwerk and Barnevelder) from a second. Both sets of eggs arrived in the post, he mixed breed eggs came about four days earlier than the Orpingtons and had probably been stored longer.

Breed – Initial (Removed – infertile) Hatched – %

  • Buff Orpington – 12 (0) 10 – 83%
  • RIR – 3 (1) 1 – 33%
  • Light Sussex – 4 (1) 3 – 75%
  • Vorwerk – 4 (1) 2 – 50%
  • Barnevelder – 1 (0) 1 – 100%
  • Mixed breed overall – 12 (3) 7 – 58%

Considering both batches of eggs went through the post, the significant difference between the two batches goes to show the value of obtaining the freshest possible eggs for incubation.

Two days after hatching, the little treasures look like this.

eggscapade-3_10

And they’re developing at a remarkable pace. After three days it’s quit clear you couldn’t cram them back into the egg, no matter how hard you tried. Wing feathers started to become visible within a couple of days, and the chicken behaviours are all coming along, eating and drinking, pecking and scratching, preening, dust bathing, and even bickering for pecking order.

eggscapade-3_12

Ten days after hatching, all 17 chicks continue to do well, including the weaker little final chick. Fingers crossed!

Read more from the Country Skills blog >


Don’t Count your Chickens – incubation, day 10

On January 5th, I put my first ever batch of eggs into my incubator, after each one was weighed, numbered, and recorded. The instructions I’ve read all recommended candling after 7 days to check for evidence of development, which would have been this past Thursday.

Unfortunately, at short notice, I had to go away for a few days on Wednesday morning. Not knowing quite when I’d be back, I couldn’t resist sneaking a quick peek with the candling lamp on Tuesday night, at only 5 days incubation. I quickly picked four eggs at random from the 24 in the incubator and was delighted to see clear evidence of developing blood vessels in every one of them. Now, four was a small sample of the total, but it was a reassuring result!

I asked my husband to check all the eggs on Thursday, and let me know his findings. He emailed me his list, with ‘question marks’ over six eggs and definitely nothing in two. For a batch of eggs that had been through the post, these weren’t too bad, amounting to a failure to develop of 1/3rd of the total batch. But it was his first time candling and he wasn’t that confident, so we decided to leave all the eggs in the incubator, and I would double-check when I got back, whenever that happened to be.

A word or two about egg candling – this is a really simple technique which quite literally allows you to see inside the egg, by shining a very bright light through the shell while sitting in a darkened room. I’m afraid I haven’t got any photos from my candling session – I was far more concerned about getting it done carefully and quickly than about documenting the process – but there are plenty of good guides online, and any book about the hatching process should also be a good resource.

Fertile egg during candling [Creative Commons licensed image by Graibeard]

This photo gives an idea of what the developing embryo looks like within the egg at around 7 days. You can see the developing blood vessels inside the shell, the dark shadow of the embryo, and the bright air cell at the pointy end of the egg. Unfertilised eggs just look bright, with a bit of a shadow from the yolk. Darker-shelled eggs are harder to see detail in.

When I got home yesterday, I couldn’t wait to double check the eggs. To my delight, while I agreed with Hubby on his two ‘definite’ infertile eggs, only one of his six ‘question mark’ eggs appeared not to be developing. That means that, as of yesterday, I have 21 of my original 24 eggs still in play.

While I had them out for candling, I also weighed all my eggs. Tracking the weight loss of the eggs through incubation is really important because eggs need to loose around 14% of their total weight by evaporation during incubation. That way, the air cell is the right size at hatching so the chick is able to breathe without drowning during the hatch process. If the incubator has been too humid, there will be too little evaporation; if it has been too dry, then too much moisture can be lost, resulting in weak, undersized chicks. There are reported ‘target’ humidity ranges for hatching eggs of different species, but only really expensive incubators directly control and monitor humidity. What’s more, cheap electronic humidity meters (hygrometers – not the same thing as a hydrometer, which measures the density of a fluid) are notoriously unreliable, particularly outside normal room temperature ranges.

Egg recording spreadsheet 2

In most cases, then, we’re making a best guess at the humidity levels in the incubator. My incubator has two water channels in the base, and the instructions recommend filling one of them during incubation. (The second is filled later, at the 18 day mark, when we want to ramp the humidity of the incubator right up to help with hatching.) But the resulting humidity in the incubator has as much to do with the ambient, climatic temperature and humidity levels. The colder the outside air, the less moisture it can hold within it, resulting in lower humidity levels inside the warmed incubator. So how do we know we’re getting it right? Well, if we can compare the weight loss from the eggs with the target of 14% over 21days, by graphing, we can get a good idea if we’re in the right area.

This is what my weight loss data looks like.

Egg hatching weight loss graph

The long lines are the upper, middle, and lower bound of my expected weighs and weight losses. The shorter lines each represent one of the eggs in my incubator. As you can see, they aren’t quite all neatly parallel but all of them are within a reasonable variation of the target weight loss. One or two are more steeply angled down than the target. When I looked to see which eggs these were, they tended to be the ones located more centrally in the incubator. This makes a certain sense, as my incubator is a ‘forced air’ style incubator with a fan which circulates the air around. The fan is in the centre of the incubator lid, so while all the eggs in the incubator should be broadly at the same temperature, the ones in the centre are getting more of a draft, and that air movement will increase the evaporation from those eggs.

Bearing this in mind, I have ‘reshuffled’ the eggs in the incubator today to bring the eggs from the corners and sides in to the middle, and from the middle out to the edges, making sure to keep them pointy-end down at all times. This should hopefully equalise the water loss from the eggs during the second half of the incubation process.

At 10 days, now, we’re approximately half way there. A lot of things can still go wrong, and I’m certainly not counting my chickens just yet! But the excitement is definitely increasing…

Read more from the Country Skills blog >

Ready, Set, Go – incubation has begun!

Last Thursday, I set 24 eggs in my incubator. We ran the incubator for 24 hours to check and stabilise the temperature before-hand. I think we have it all set up right – fingers crossed!

Eggs loaded into incubator

The eggs are made up of 12 Buff Orpingtons (I’ve been wanting a little breeding group of Orps for some time), sent to me by a very kind friend, along with a little ‘lucky dip’ selection including Rhode Island Reds, Light Sussex, and Vorwerk. All of the eggs have been through the post, which is reported to reduce their hatchability. So I have no idea at all how many little fluffy chicks we might actually be expecting at the end of the process!

Before being put into the incubator, I numbered and weighed each egg and dipped them in warm egg disinfectant, which is meant to reduce the risk of contamination causing infection which would kill the developing embryo. I have a spreadsheet (which will come as no surprise to those of you who know me) where I will be tracking the weight loss of the eggs and recording fertility and candling outcomes.

Egg recording spreadsheet

Our first idea how things are going comes after 7 days, when we should be able to candle the eggs – shining a bright light inside them to see if anything inside is casting shadows –  to find out which eggs are fertile and developing, and which are not.

So, here goes. Wish us luck!

Read more from the Country Skills blog >

Beginnings and Endings – hopes of new life for a new year

The time around New Year is always a rather liminal time. A time of real and imaginary ends and beginnings. This year has been a particularly difficult one for me – and for a lot of people, I think. So, for the end of the year, I thought I would tell you a story. It’s a perfectly true story, as far as stories remembered from deep childhood ever can be. It’s a small story, really. But like many long-remembered stories, you can still hear its echoes, its resonance, if you listen.

In this story, I’m a small girl of six or seven. We’re on our first long-haul overseas holiday. It’s the first time we have left Europe, and we’re visiting California. We’ve ridden the teacups and the runaway mining cart at Disney World, and acquired a family portrait in pioneer dress, leaning on the rail of a wagon, which is still in the family album today. We’ve petted the bottle nose dolphins at Sea World, and marvelled at the flying Orca (this is long before Free Willy, and a more sensitive approach to these things). And on this particular day, we are at the San Diego Zoo.

Now, San Diego Zoo is an amazing place. Even in the mid 1980s, when our story takes place, it was a bastion of conservation zoology, blazing the trail with wide open, naturalistic, enriched enclosures. But I can’t honestly tell you that I remember any of that. Actually, that’s not quite true – I do remember the goat in the petting farm who stole a billfold from the back pocket of a man’s trousers, and then ate it. But apart from the goat with a taste for greenbacks, what I remember is the chicks.

P1120859

You see, there was an exhibit of hatching eggs. In my memory, it’s been set up in the middle of some sort of amphitheatre get-up, round or hexagonal maybe, with benching around, and a roof over. But who knows. Anyway, in the middle, is a large tray of hatching eggs in a big glass box. Fifty or sixty eggs. A few little chicks are standing around looking a bit dazed, some all fluffed up, some still rather damp and dishevelled. But this one egg, just here, is hatching. By family story, I refused to be moved for the more than two hours it took the chick to finally emerge from its shell. In my recollection, there’s no sense of time; just complete fascination and rapture.

img_3124

I can trace to that moment my focused fascination with animals, with biology and zoology. It must go some way to explain my later decision to study veterinary medicine, and so account, at least in part, for my current life as a working veterinary surgeon, and developing smallholder.

Earlier this year, I was thinking about the chicks for some reason – I can’t remember why, now – and I was struck with a thought that had somehow eluded me for the best part of three decades. San Diego Zoo, I realised, is not noted for its poultry collection. It is, however, recognised as holding one of the finest reptile collections anywhere in the world.

Now, I’m not overly sentimental, by and large. But the realisation, years later, that my little chick probably became snake food shook me. Looking back now, it was a very 2016 moment.

*

Why am I telling you this? Well, I’ve been thinking about chicks quite a lot, the past few days. And this is why.

img_3107
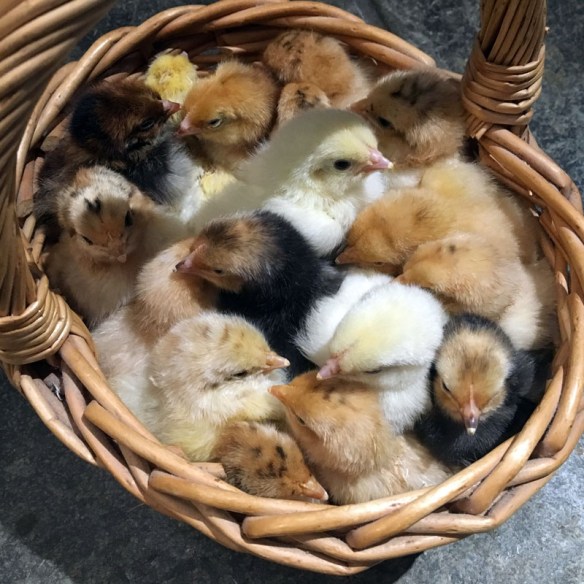
On Christmas morning, I unwrapped an incubator. It’s a Brinsea Octagon Eco 20, with an automatic turning cradle, and I can think of few occasions, going right back to six year old me – perhaps with the exception of the year I received the My Little Pony Castle – when I have been so excited to unwrap a gift and get to work on the contents.

So, watch this space! I plan to load the incubator with a “pick ‘n mix” selection of fertile eggs next week, to hatch into a clutch of little fluffy chicks – with a lot of good luck, given it’s my first ever hatching attempt – around the end of January.

After what has been a pretty dreadful 2016, I could not be more ‘eggcited’ for 2017!

P.S. On the subject of bird ‘flu (H5N8 avian influenza), and the current restrictions in the UK – because someone is bound to ask – we’re lucky to have outbuildings here where we can keep our birds completely indoors if that becomes necessary. So while I’m hoping that restrictions will have been lifted by the time our little chickies are ready to go outdoors – once they have feathers rather than fluff, around the start of March – we’re in a really good position hopefully to take care of them while this awkwardness continues.

Read more from the Country Skills blog >

Sourdough Saga: Episode 8 – semi-sourdough baguettes

It’s difficult to believe that it’s over three years since sourdough baking became a regular part of our life and our diet, back in May 2012. I predicted at the time that life would never be quite the same again and, in a variety of small ways, that’s definitely true. A lot has changed in our lives since then, but home baking has remained a constant despite upheavals and long working hours. We make a mix of sourdough and traditionally-yeasted breads at home, and they’re all wonderful in their own ways; the bar is set very high for bought breads and when time precludes home-baking, we’re inevitably disappointed by what we can buy in the shops.

Fresh from the oven

Bread can seem like such a small, inconsequential thing, a cheap commodity which requires very little consideration. But good bread – really good bread – is a thing of great joy, not an afterthought but the crowning glory of a meal, or even a meal in itself. Still warm from the oven, with wonderful cornish unsalted butter melting into the crumb, I wonder if there is any more satisfying food in the world?

My wholemeal sourdough starter, ‘Seymore’, continues to thrive, and in some sense procreated last year when I started the process of converting a batch of starter to white flour. Each white flour feed progressively shifted the proportions and the starter is now 100% white. I find the white starter raises white loaves quite a bit more effectively than the wholemeal one did (presumably because the balance of microbes within it is already adapted to using white flour as a food source), so now like raises like – Seymore has an outing when I’m baking wholemeal or spelt, and the new white starter makes a quite wonderful, airy and chewy 100% white sourdough loaf.

A year or more ago, I had a hankering for home-made baguette. Initial experiments and trials with recipes in my cookbook library were all rather disappointing – they produced baguette-shaped loaves, but lacked not just the flavour, but also the crumb and the chewy, toothsome, slightly elastic crust of a genuine French loaf. French cookbooks, of course, were no use whatsoever – no French housewife in her right mind bakes her own bread, when there’s still a traditional ‘boulangerie’ in almost every village and on almost every street corner.

So I kept reading, and asking questions, and stumbled upon Paul Hollywood’s recipe from his pre-TV ‘100 Great Breads’ book, which begins with an overnight sponge, much like my everyday sourdough loaf. A bake through of his recipe produced one of the worst-behaved doughs I have ever worked with, but also gave me the best results to date. But it was still most definitely lacking ‘something’ in the flavour and texture departments. The sponge step, though, gave me an idea – what if I incorporated some of my white sourdough starter into the mix? Might that add, not just the complex savoury flavour that was lacking, but also the chewy elasticity to the crust? I had to experiment.

A year of trials later, I have a process that, while it’s not a ‘novice bake’, works very well and reliably for me, and as a bonus, can even be baked the same day you start if you forget to start the sponge the night before baking. It’s a ‘hybrid’ bread, making use of both the sourdough starter and of bakers’ yeast (much as many commercial loaves labelled as ‘sourdough’ do!). And while the results can sometimes look a little ‘wobbly’ and rustic, they have every bit of the flavour and characteristics of the loaves I enjoyed for my breakfast on a visit to Paris back in March. Torn in half, with unsalted butter and jam and a big mug of coffee, I challenge you to find a better everyday breakfast.

Of course, you can bake these loaves without the sourdough starter – you’ll be baking something like Paul Hollywood’s original recipe, and it’s not bad, but it’s just not the same!

To make these semi-sourdough baguettes, you will require –

  • Ingredients200g of 100% hydration white sourdough starter (that is, made up of 100g of flour and 100g of water), which has been ‘fed’ within the last 24hours. You’ll need to adjust the quantities of ingredients if your starter is balanced differently.
  • 400g of French bread flour (you can use British-style strong white bread flour, but the texture and flavour aren’t quite right; you’re going to a fair bit of trouble for these loaves, so it’s worth tracking down the good stuff!)
  • 200ml of water at room temperature (or gently lukewarm on a cold day or when short of time)
  • 1tsp or a 7g sachet of dried instant yeast
  • 1tsp salt (this is my personal preference – recipes often double this quantity)
  • 50g of softened unsalted butter
  • Oil for kneading, and
  • Semolina for dusting the baking sheet

Make up the overnight spongeIdeally the night before, combine the 200g of starter with 100g of flour and 200ml of water, add the spoonful of instant yeast, and combine to create a thin batter. A whisk can be helpful. Cover with cling-film and set aside overnight, or, if you’re not that organised, for at least an hour and more if possible.

The overnight sponge after mixingThe loaves will work fine with the shorter resting period but you’re inevitably sacrificing some flavour from the longer, slower fermentation. After resting, there should be some bubbles rising to the surface of your batter (more if you’ve left it overnight).

Roughly mix the dough and allow to restNow add the remaining 300g of flour, the salt and the softened (melted is fine) butter, and combine to make what will be a very soft, wet dough. Before kneading, just let it sit in the bowl for about half an hour to allow the flour grains to absorb as much as possible of the moisture and help the gluten start to set up.

Dough during kneadingTip the dough onto a well oiled worktop, scraping out any that sticks to the bowl, and knead it for at least 10 minutes. It will be very sticky to start with, but this will improve to some extent with working. Try to resist adding extra flour unless absolutely essential, and if you do, add a very little at a time. This is never going to be an easy dough to work, you’re aiming to get it just on the right side of ‘impossible’. Working it with plenty of oil will reduce its tendency to stick to things other than itself, and avoids changing the hydration with flour from surfaces being incorporated into the dough.

Form a ball and allow to riseOnce the dough is well kneaded, form a ball and set aside in a well oiled bowl, loosely covered with plastic or a tea towel to retain moisture, until it has at least doubled in size.

Divide risen dough into threeNow, turn the dough out onto a well-oiled worktop and divide it into three as evenly as you can, but without faffing about (no grabbing a bit from here and sticking it onto there). You’ll see recipes instructing you to ‘roll the dough out into a baguette shape’, but don’t, ok? What you’ll get it you do that is a stodgy, even-textured dough shaped like a baguette (much as you get from most UK supermarkets, sadly). If you want the stretched curst and almost concentric-structured crumb of a genuine baguette, you need to form the shape properly. I got the clue I needed, oddly, from a TV travel show about Paris, where they popped into a boulangerie, and there in the background, when I paused and re-wound the programme, was a guy making baguettes. This way is rather fiddly, but it works!

First, find your widest, shallowest-sided baking sheet, and dust it generously with semolina. This will stop the dough sticking, and provides the characteristic ‘crunch’ to the base.

Shaped loaves on baking sheetTake each piece of dough, and fold two edges towards the centre. Without turning the dough, do this again and again in the same direction until you have quite a tight ‘cylinder’ with a centre seam on top, which will be about a third or half the length it needs to be. Now stretch out the cylinder lengthwise, gently, trying to keep the diameter even all the way along. Turn the baguette over so that it’s seam-side down, and tidy in the ends by tucking under into the traditional point if you can, though don’t worry if the ends are a bit dumpy. Tuck the sides under along the length of the loaf using a dough scraper, if you have one, and then, quickly so that it doesn’t sag, transfer the loaf to the baking sheet.

This takes some practice and your first baguettes will probably be rather funny shapes. But don’t worry – it’s not at all important! The process is a bit tricky to describe (I wonder if I should try and get a video of me shaping a loaf?) but hopefully should make sense once you’re doing it.

You could just as easily quarter your dough and make four shorter baguettes; arrange them across the baking sheet rather than along, if you prefer littler loaves. The smaller loaves are obviously easier to handle, so it may make sense to start that way.

Cook-shops will sell you shaped baking sheets with rounded bottoms for baking baguettes on, and that will give you the characteristic rounded base – baking on a flat sheet will obviously give you a flat bottom, though as the dough springs up in the oven it’s often less obvious than you might expect. I’ve tried quite hard to avoid acquiring clutter and kitchen gadgets during my home baking experiments, and actually I find most of the time you can do perfectly well without them!

Cover and allow to riseCover your shaped loaves (I have a large sheet of polythene that I use to form a tent over them) and leave to rise for at least an hour or until at least doubled in size. Now set your oven to pre-heat at its highest temperature.

Slash the risen loaves along their lengthOnce the oven is up to temperature, uncover your loaves, and very quickly using your sharpest knife, slash diagonally along the length. I find two slashes per loaf works best, overlapping over the centre third to half of the loaf. If you hesitate at this stage, your loaves will deflate a lot, so be quick and decisive, and get the loaves straight into the oven.

Turn the baking sheet at least once to help the loaves bake evenly. You may find they need as little as 20 minutes in all – they’re done once the crust is a lovely deep golden to mid brown colour and the loaves feel crispy and sound hollow underneath. Remove them from the oven then and set to cool on a wire rack.

Tear & enjoy

Once they’re (almost!) cool, rip into one. I love to tear rather than slicing my baguette, it makes the most of the wonderful texture of the crust and crumb. Enjoy as the Parisiens do, with unsalted butter and jam for breakfast, or as the ultimate versatile sandwich loaf. Who wants one of those nasty stodgy ‘subs’?

Enjoy with unsalted butter

I would really love to know how you get on with this recipe, so please please come and tell me how it works out for you, by leaving a comment here or tweeting me @CountrySkills!

Read all the posts in the Sourdough Saga >>

Read more from the Country Skills blog >>

No Weigh! – the bake-anywhere, traveller’s loaf

On holiday in self catering accommodation, staying in hostels, on a campsite, or even visiting family or friends, have you ever felt the urge to bake a lovely fresh loaf of bread only to discover that a key piece of equipment – usually a set of scales, or a measuring jug – is missing? I may be a bit odd, but I’ve even been known to go out and buy the missing piece of kit just to get my loaf baked! Since then, I’ve given the question some thought, done a few experiments, and so today I’m going to share with you my ‘no weigh’, measurement free, (nearly!) foolproof loaf recipe that you can bake very nearly anywhere, with almost no kitchen equipment.

Sliced, warm from the oven.

To make this loaf, the bare minimum equipment you require is –

  • A flat work surface or large chopping board
  • A teaspoon
  • Some sort of a liquid container (a pint glass or mug is ideal)
  • Something to bake your loaf on or in (a roasting tray, a pie tin, or whatever)
  • An oven (if you’re camping, you can even bake bread in a dutch oven, though you’ll need to adapt the process a little)

If you can also lay your hands on any of the following, it will make things a little easier –

  • A mixing bowl
  • Spatula or dough scraper
  • A plastic bag or tea towel
  • A sharp knife

And now the ingredients –

  • IngredientsStrong white bread flour
  • Dried instant yeast (a sachet, or from a pot)
  • Table salt
  • Water
  • Cooking oil (a light-flavoured olive oil is ideal, but whatever comes to hand)

Just a quick note first on difficulty – because this recipe depends, essentially, on judging the ‘feel’ of the dough to get the proportions right, complete novice bakers may struggle with this approach; but you don’t need to be an expert baker – if you’ve made a few loaves before, and have a sense of what a good dough should feel like, this technique will hopefully work well for you!

So, time to begin.

Make a well in the flourCheck how much flour is in your packet (standard packs of UK flour are usually 1.5kg but can be 1kg or even 3kg) and tip your best guess at 500g into your bowl or on to the work surface. Make a well in the centre, and add a heaped teaspoon of instant yeast (or a whole 7g sachet) and a teaspoon of salt. I tend to add the yeast to the well and the salt to the side.

It’s useful if you have an approximate idea of the volume of your liquid container. (You’re likely to need about half a pint of water, or a little over.) Fill your glass or mug with lukewarm water and add it a little at a time to the well in your flour, mixing as you go. If you’re using a work surface rather than a bowl you are, I’m afraid, likely to make rather a mess, so do use a mixing bowl if you have access to one. Salad bowls or other serving bowls can make a good substitute.

Form a sticky doughKeep adding water until all the flour is incorporated into your dough and the texture is a bit stickier than you really think it ought to be. The dough at this stage ought to be a bit tricky to work with and glue itself to everything. The reason for getting it to this stage is to make sure that the dough isn’t under-hydrated, as this is is the main cause of stodgy, disappointing loaves which don’t rise properly.

Dough after kneadingPour a generous glug of oil over your dough and work surface and start to knead the dough in the oil. Add more oil every if the dough gets sticky again. The process of kneading will mix the moisture evenly through your dough and you may well find the dough stops being excessively sticky just through the kneading process. But if you’ve been kneading for ten minutes or so and the dough is still too sticky, add an extra sprinkle of flour. Go gently with the flour, though, as I find it always needs less than it seems to get the texture of the dough nice and silky.

Cover with whatever you have to handOnce you’re happy with your dough, and it’s well kneaded, form it into a ball, oil it well, and set it aside in an oiled bowl if you have one (or leave it on the worktop). Cover the dough loosely – a supermarket plastic bag is ideal, or use cling film if you have it, or a tea towel, or anything else that comes to hand! Set aside to rise until the dough at least doubles in size.

Doubled doughOnce the dough has doubled (which may take as little as an hour, but could take quite a bit longer in cold conditions – be patient and don’t rush this bit!) turn the dough out onto an oiled surface.

Turn dough outNow, very gently, form it into a bloomer shape. I’m going to stress the ‘gently’ bit again, because it’s very tempting to get stuck in and almost re-knead the dough at this stage, and that’s not what you want to do at all. You’ll hear a lot of talk of ‘knocking back’ dough, but you’ll lose a lot of the air in the dough just in the shaping process.

Formed bloomerTo form a bloomer (the shape you want for a bread tin is very similar), I fold both long ends towards the middle, then rotate the dough 90 degrees and do the same from the side. Then I turn the dough seam-side down and tuck the sides and ends under neatly. That’s it. No kneading, no bashing, just some gentle folding. You can form a round cob loaf by bringing the edges into the centre until you form make a general round, before turning the loaf over seam-down and tucking the bottom under neatly.

Dust your baking sheet well with flour and place the bloomer in the centre of it. If you’re using a tin (or tin-substitute) I would oil or butter it first before dusting well with flour. Dust the top of your loaf with flour too, and put it back under loose cover somewhere warm for another hour or so.

Well-risen bloomerWhen the loaf is well risen, pre-heat your oven as hot as it will go. Take the cover off your loaf, and cut a straight slash down the centre with a sharp knife if you have one (or a more creative pattern, if you fancy!) and pop it straight into the centre of the oven.

The loaf will probably take around 30 minutes to bake, but this will depend on the quirks of the oven, which you probably aren’t familiar with, so take a first look around 20 minutes and then keep your eye on things pretty closely. If you happen to have access to a wood fired pizza oven, you can even use this – just remember that these tend to run very hot so baking times will be quite a lot shorter! Turn the loaf once or twice to avoid any hot spots in the oven baking the loaf unevenly, or even burning it.

The loaf is ready when the top is dark golden and crispy, and the base sounds hollow when tapped. If in doubt, put it back for 5 minutes – over-baking a loaf a a little is never a disaster – it just increases the thickness and crispiness of the crust – whereas an under-cooked stodgy middle is decidedly disappointing. If you have an oven rack to hand, set it to cool on this.

Fresh from the oven

There you go – a no-weigh, no-measure, home made, very tasty rustic white loaf, that you really can make almost anywhere you can get your hands on a few very basic ingredients & equipment. No excuse for rubbish bread this summer, then. Enjoy!

What did I do with mine?

Cucumber sandwich time!

Well, it was late lunch when it came out of the oven, so I sliced it, still warm (I know, but it’s irresistible, right?) and made an old-fashionned but wonderful cucumber sandwich with one of our home-grown cucumbers, harvested yesterday evening from the polytunnel. A little taste of summer heaven!

Read more from the Country Skills blog >>