A Basket of Adorables – the chicks have hatched!

It’s surprising how long three weeks can seem, when you’re waiting for eggs to hatch! But by day 18, it definitely feels like you’re getting there. It’s time to go into ‘lockdown’, switch off any automatic turning devices, and increase the humidity in the incubator for hatching. Then, you just have to wait for the longest three days you can imagine.

As it happens, a couple of our chicks seemed in a bit of a hurry to get hatched, and we had our first external pip – the crack in the eggshell the chick makes to help it breathe before the real hatching effort takes place – on the morning of day 20.

eggscapade-3_1  eggscapade-3_2

You can imagine, I was checking the eggs every five or ten minutes! The excitement and anticipation was better than a childhood Christmas. The first cheeping sound from an as-yet unhatched egg was a magical noise. It suddenly seems plausible that, inside an egg which three weeks ago would have made a perfectly good omelette, there might be a tiny, perfect little creature. The hatching process from external pip to the chick finally emerging from the egg will commonly take 12-18 hours. An eternity! But by that evening, the very first chick – a Light Sussex – had hatched. We were on our way!

eggscapade-3_3

It is advised to leave newly hatched chicks in the incubator – which after all is perfectly warm and comfortable for them – for around 24 hours after hatching. This allows them to get all nice and dry and fluffed up, from their rather bedraggled initial state. They don’t immediately require food and water, as their internal egg sac continues to supply their needs for around 48 hours after hatching. The less often you open the incubator during hatching, the higher the humidity stays, which is important because if the egg membranes dry out during hatching they become stiff and crispy and can effectively ‘shrink wrap’ the chick and prevent it hatching, a tragic fate so late in the process.

Somehow, despite the excitement and anticipation, we managed to get some sleep that night. By the next morning, we had a second egg hatched, and a third making real progress. Day 21 – ‘hatch day’ – had begun.

We had 21 eggs in the incubator at ‘lockdown’, from the 24 we had started incubating – three eggs appeared infertile when we candled them at 10 days, so these were removed at that stage. By mid-morning on day 21, things had really got going.

eggscapade-3_4  eggscapade-3_5

At various points I was rather confused about how many chicks were hatched or actively hatching, and eventually the incubator became so full of chicks that it was impossible to keep track. A quick dive into the incubator to remove the first batch of fluffy chicks made a bit of space – and revealed a problem. One egg, which I had noticed pipping on the evening of day 20, over 18 hours ago, wasn’t making progress. I could see the chick moving inside, but there was only quite a small hole rather than the progressive line of chipped open shell that develops during an active hatch, and the membranes I could see appeared worryingly dry.

I had a decision to make. Most of the advice on hatching chicks will tell you not to intervene, and for good reason. Fiddling about with the incubator reduces the humidity and will increase the risk of hatching problems. Not only that, but hatching chicks are very fragile little creatures and the risk of causing catastrophic injury by interference is significant. Assisting a chick which isn’t quite ready to hatch is likely to lead to potentially life threatening bleeding from an umbilicus and from the blood vessels lining the shell which have not properly shut down yet, something that happens in the final hours before hatching. These are all extremely good reasons to leave well alone.

Another reason is also often given – that chicks which are not hatching correctly are probably ‘wrong’ in some way, and are as a result better left to die. This reason, I’m not buying. Animals of all sort can struggle to be born normally for all sorts of reasons, but many of those reasons are just plain bad luck – they find themselves positioned wrong (in the case of chicks, they fail to wriggle themselves around in the egg so that they can get their beak into the air cell, and start to breathe before hatching), or get tangled up somehow (with littler-mates, cords, or membranes). After speedy but considered soul-searching, I decided that this little chick needed my help, and that I was willing to go against the advice and try to assist the hatching.

Very gently, using my fingertips and a cotton bud damped with warm water, I enlarged the little hole the chick had made, until the cap – the bit of the shell overlying the air cell – was completely removed. I could see the little chick – a russety-coloured Rhode Island Red – tangled up tight in a rigid dried egg membrane, which had stuck to its downy feathers. Let me tell you, I was terrified of hurting the poor little thing and even tearing its skin as I eased the membrane away with my wet cotton bud. But very slowly, I was able to tease the membrane away without any damage to the little chick, releasing it from its entanglement. Having seen what was going on inside the egg, I have no regrets about helping – I can’t see how the chick could have got out on its own, it was well and truly welded to the membranes, had no way to rotate around to remove enough egg shell to complete its hatching, and would rapidly have been running out of the energy it needed to keep struggling. But I can also see quite how delicate, and risky, the process could be – and I might have been wrong, and taken those risks unnecessarily.

The rescued chick was popped back into the incubator. Meanwhile, we transferred the first batch of hatched chicks to the brooder cage which was set up in the corner of the living room.

eggscapade-3_9

The brooder set-up is a bit ‘make do and mend’. I had bought a second hand Brinsea Eco-glow ‘electric hen’ style brooder, rather than use the more traditional hanging heat lamp, both because it has far lower energy consumption than a lamp, and because it seemed to me a more natural thing from a behavioural point of view – chicks would likely feel more comfortable and reassured by a dark warm place to snuggle under than a mysterious warm light in the sky. The brooder cage is Dave the dog’s old puppy crate, wrapped around with cling film to prevent drafts at chick height, with cardboard baffles around the edges, and bedded with newspaper and a thin layer of clean dust extracted wood shavings.

Hatching continued at great pace. By bedtime on day 21, we had 15 hatched, with six eggs still in the incubator showing no sign of activity. While I was delighted by the little fluffy bundles, if I’m honest I was feeling a little disappointed with these numbers – which would have given us a total hatch percentage only just over 62% from the starting 24.

eggscapade-3_7  eggscapade-3_6

Patience is a virtue, and I was planning to give the eggs at least 48hrs after ‘due’ just to make sure no one was running behind. The following day (day 22) two more eggs had pipped, one hatched but the second failed to progress. We noticed that the water reservoir had run dry, which made me worry that perhaps it was another ‘shrink wrapped’ chick. After watching for a while, it looked like we were getting nowhere. I decided to intervene again, and carefully peeled this final chick out of the shell. The membranes were a bit dry but not quite as crispy as the little Rhode Island. This little chick had a visible umbilicus which seems to be some sort of a congenital abnormality. Maybe it isn’t quite ‘right’, but we’re giving it the benefit of the doubt for now.

With a total of 17 eggs hatched, there was no further activity in the final four, despite leaving them another couple of days. I candled the remaining eggs and three had clearly stopped developing at some point in the last week or so. The final one seemed to be absolutely packed full of chick, as you’d expect from a fully developed egg. But there was no sign of a little beak pushing into the air sac, and no sound from within the egg. Perhaps this was the unlucky one – positioned wrong and not able to get a breath to start the hatching process.

Our final statistics, by breed, for those of you who are curious about the nerdy details –

Our eggs originated from two batches, a dozen Buff Orpington eggs from one source, and dozen mixed breeds (RIR, Light Sussex, Vorwerk and Barnevelder) from a second. Both sets of eggs arrived in the post, he mixed breed eggs came about four days earlier than the Orpingtons and had probably been stored longer.

Breed – Initial (Removed – infertile) Hatched – %

  • Buff Orpington – 12 (0) 10 – 83%
  • RIR – 3 (1) 1 – 33%
  • Light Sussex – 4 (1) 3 – 75%
  • Vorwerk – 4 (1) 2 – 50%
  • Barnevelder – 1 (0) 1 – 100%
  • Mixed breed overall – 12 (3) 7 – 58%

Considering both batches of eggs went through the post, the significant difference between the two batches goes to show the value of obtaining the freshest possible eggs for incubation.

Two days after hatching, the little treasures look like this.

eggscapade-3_10

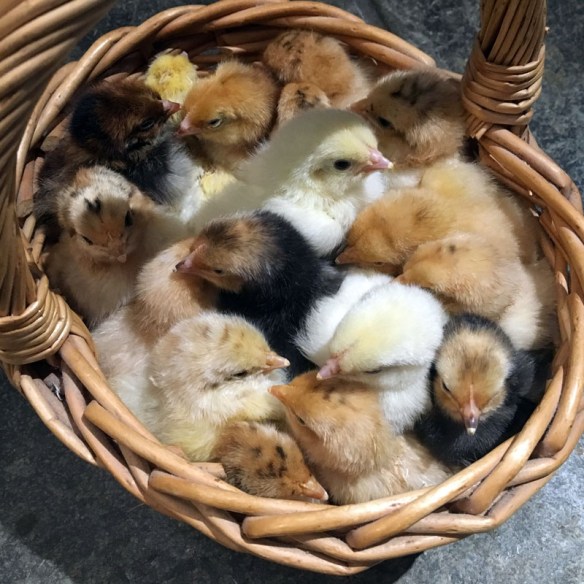
And they’re developing at a remarkable pace. After three days it’s quit clear you couldn’t cram them back into the egg, no matter how hard you tried. Wing feathers started to become visible within a couple of days, and the chicken behaviours are all coming along, eating and drinking, pecking and scratching, preening, dust bathing, and even bickering for pecking order.

eggscapade-3_12

Ten days after hatching, all 17 chicks continue to do well, including the weaker little final chick. Fingers crossed!

Read more from the Country Skills blog >


Don’t Count your Chickens – incubation, day 10

On January 5th, I put my first ever batch of eggs into my incubator, after each one was weighed, numbered, and recorded. The instructions I’ve read all recommended candling after 7 days to check for evidence of development, which would have been this past Thursday.

Unfortunately, at short notice, I had to go away for a few days on Wednesday morning. Not knowing quite when I’d be back, I couldn’t resist sneaking a quick peek with the candling lamp on Tuesday night, at only 5 days incubation. I quickly picked four eggs at random from the 24 in the incubator and was delighted to see clear evidence of developing blood vessels in every one of them. Now, four was a small sample of the total, but it was a reassuring result!

I asked my husband to check all the eggs on Thursday, and let me know his findings. He emailed me his list, with ‘question marks’ over six eggs and definitely nothing in two. For a batch of eggs that had been through the post, these weren’t too bad, amounting to a failure to develop of 1/3rd of the total batch. But it was his first time candling and he wasn’t that confident, so we decided to leave all the eggs in the incubator, and I would double-check when I got back, whenever that happened to be.

A word or two about egg candling – this is a really simple technique which quite literally allows you to see inside the egg, by shining a very bright light through the shell while sitting in a darkened room. I’m afraid I haven’t got any photos from my candling session – I was far more concerned about getting it done carefully and quickly than about documenting the process – but there are plenty of good guides online, and any book about the hatching process should also be a good resource.

Fertile egg during candling [Creative Commons licensed image by Graibeard]

This photo gives an idea of what the developing embryo looks like within the egg at around 7 days. You can see the developing blood vessels inside the shell, the dark shadow of the embryo, and the bright air cell at the pointy end of the egg. Unfertilised eggs just look bright, with a bit of a shadow from the yolk. Darker-shelled eggs are harder to see detail in.

When I got home yesterday, I couldn’t wait to double check the eggs. To my delight, while I agreed with Hubby on his two ‘definite’ infertile eggs, only one of his six ‘question mark’ eggs appeared not to be developing. That means that, as of yesterday, I have 21 of my original 24 eggs still in play.

While I had them out for candling, I also weighed all my eggs. Tracking the weight loss of the eggs through incubation is really important because eggs need to loose around 14% of their total weight by evaporation during incubation. That way, the air cell is the right size at hatching so the chick is able to breathe without drowning during the hatch process. If the incubator has been too humid, there will be too little evaporation; if it has been too dry, then too much moisture can be lost, resulting in weak, undersized chicks. There are reported ‘target’ humidity ranges for hatching eggs of different species, but only really expensive incubators directly control and monitor humidity. What’s more, cheap electronic humidity meters (hygrometers – not the same thing as a hydrometer, which measures the density of a fluid) are notoriously unreliable, particularly outside normal room temperature ranges.

Egg recording spreadsheet 2

In most cases, then, we’re making a best guess at the humidity levels in the incubator. My incubator has two water channels in the base, and the instructions recommend filling one of them during incubation. (The second is filled later, at the 18 day mark, when we want to ramp the humidity of the incubator right up to help with hatching.) But the resulting humidity in the incubator has as much to do with the ambient, climatic temperature and humidity levels. The colder the outside air, the less moisture it can hold within it, resulting in lower humidity levels inside the warmed incubator. So how do we know we’re getting it right? Well, if we can compare the weight loss from the eggs with the target of 14% over 21days, by graphing, we can get a good idea if we’re in the right area.

This is what my weight loss data looks like.

Egg hatching weight loss graph

The long lines are the upper, middle, and lower bound of my expected weighs and weight losses. The shorter lines each represent one of the eggs in my incubator. As you can see, they aren’t quite all neatly parallel but all of them are within a reasonable variation of the target weight loss. One or two are more steeply angled down than the target. When I looked to see which eggs these were, they tended to be the ones located more centrally in the incubator. This makes a certain sense, as my incubator is a ‘forced air’ style incubator with a fan which circulates the air around. The fan is in the centre of the incubator lid, so while all the eggs in the incubator should be broadly at the same temperature, the ones in the centre are getting more of a draft, and that air movement will increase the evaporation from those eggs.

Bearing this in mind, I have ‘reshuffled’ the eggs in the incubator today to bring the eggs from the corners and sides in to the middle, and from the middle out to the edges, making sure to keep them pointy-end down at all times. This should hopefully equalise the water loss from the eggs during the second half of the incubation process.

At 10 days, now, we’re approximately half way there. A lot of things can still go wrong, and I’m certainly not counting my chickens just yet! But the excitement is definitely increasing…

Read more from the Country Skills blog >

Ready, Set, Go – incubation has begun!

Last Thursday, I set 24 eggs in my incubator. We ran the incubator for 24 hours to check and stabilise the temperature before-hand. I think we have it all set up right – fingers crossed!

Eggs loaded into incubator

The eggs are made up of 12 Buff Orpingtons (I’ve been wanting a little breeding group of Orps for some time), sent to me by a very kind friend, along with a little ‘lucky dip’ selection including Rhode Island Reds, Light Sussex, and Vorwerk. All of the eggs have been through the post, which is reported to reduce their hatchability. So I have no idea at all how many little fluffy chicks we might actually be expecting at the end of the process!

Before being put into the incubator, I numbered and weighed each egg and dipped them in warm egg disinfectant, which is meant to reduce the risk of contamination causing infection which would kill the developing embryo. I have a spreadsheet (which will come as no surprise to those of you who know me) where I will be tracking the weight loss of the eggs and recording fertility and candling outcomes.

Egg recording spreadsheet

Our first idea how things are going comes after 7 days, when we should be able to candle the eggs – shining a bright light inside them to see if anything inside is casting shadows –  to find out which eggs are fertile and developing, and which are not.

So, here goes. Wish us luck!

Read more from the Country Skills blog >

Beginnings and Endings – hopes of new life for a new year

The time around New Year is always a rather liminal time. A time of real and imaginary ends and beginnings. This year has been a particularly difficult one for me – and for a lot of people, I think. So, for the end of the year, I thought I would tell you a story. It’s a perfectly true story, as far as stories remembered from deep childhood ever can be. It’s a small story, really. But like many long-remembered stories, you can still hear its echoes, its resonance, if you listen.

In this story, I’m a small girl of six or seven. We’re on our first long-haul overseas holiday. It’s the first time we have left Europe, and we’re visiting California. We’ve ridden the teacups and the runaway mining cart at Disney World, and acquired a family portrait in pioneer dress, leaning on the rail of a wagon, which is still in the family album today. We’ve petted the bottle nose dolphins at Sea World, and marvelled at the flying Orca (this is long before Free Willy, and a more sensitive approach to these things). And on this particular day, we are at the San Diego Zoo.

Now, San Diego Zoo is an amazing place. Even in the mid 1980s, when our story takes place, it was a bastion of conservation zoology, blazing the trail with wide open, naturalistic, enriched enclosures. But I can’t honestly tell you that I remember any of that. Actually, that’s not quite true – I do remember the goat in the petting farm who stole a billfold from the back pocket of a man’s trousers, and then ate it. But apart from the goat with a taste for greenbacks, what I remember is the chicks.

P1120859

You see, there was an exhibit of hatching eggs. In my memory, it’s been set up in the middle of some sort of amphitheatre get-up, round or hexagonal maybe, with benching around, and a roof over. But who knows. Anyway, in the middle, is a large tray of hatching eggs in a big glass box. Fifty or sixty eggs. A few little chicks are standing around looking a bit dazed, some all fluffed up, some still rather damp and dishevelled. But this one egg, just here, is hatching. By family story, I refused to be moved for the more than two hours it took the chick to finally emerge from its shell. In my recollection, there’s no sense of time; just complete fascination and rapture.

img_3124

I can trace to that moment my focused fascination with animals, with biology and zoology. It must go some way to explain my later decision to study veterinary medicine, and so account, at least in part, for my current life as a working veterinary surgeon, and developing smallholder.

Earlier this year, I was thinking about the chicks for some reason – I can’t remember why, now – and I was struck with a thought that had somehow eluded me for the best part of three decades. San Diego Zoo, I realised, is not noted for its poultry collection. It is, however, recognised as holding one of the finest reptile collections anywhere in the world.

Now, I’m not overly sentimental, by and large. But the realisation, years later, that my little chick probably became snake food shook me. Looking back now, it was a very 2016 moment.

*

Why am I telling you this? Well, I’ve been thinking about chicks quite a lot, the past few days. And this is why.

img_3107On Christmas morning, I unwrapped an incubator. It’s a Brinsea Octagon Eco 20, with an automatic turning cradle, and I can think of few occasions, going right back to six year old me – perhaps with the exception of the year I received the My Little Pony Castle – when I have been so excited to unwrap a gift and get to work on the contents.

So, watch this space! I plan to load the incubator with a “pick ‘n mix” selection of fertile eggs next week, to hatch into a clutch of little fluffy chicks – with a lot of good luck, given it’s my first ever hatching attempt – around the end of January.

After what has been a pretty dreadful 2016, I could not be more ‘eggcited’ for 2017!

P.S. On the subject of bird ‘flu (H5N8 avian influenza), and the current restrictions in the UK – because someone is bound to ask – we’re lucky to have outbuildings here where we can keep our birds completely indoors if that becomes necessary. So while I’m hoping that restrictions will have been lifted by the time our little chickies are ready to go outdoors – once they have feathers rather than fluff, around the start of March – we’re in a really good position hopefully to take care of them while this awkwardness continues.

Read more from the Country Skills blog >