Seeds of Change – this year’s garden plan begins

Daffodils are hereWelcome to March, and spring is (or at least should be!) just around the corner. Last night, the first ‘Gardeners’ World’ of the year aired on BBC2: you might say that the official ‘starting gun’ of the gardening year has been fired.

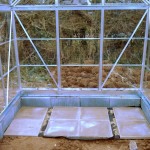
We’ve had some exciting weather here in Cornwall to start the month, with heavy snow and freezing temperatures, so much so that we actually got to go skiing on our field! I can’t help but wonder if we’re the first people ever to ski in this little corner of the county? But if the weather outside can’t make up its mind, inside, we’re making plans for the new growing season, and our first seeds – tomatoes and chillies – are sown and have already germinated.

Skiing in Cornwall!

This year, I’ve had a rethink of the approach to my veg growing. Out go the F1 hybrids, as you can’t save seed from them and they leave me dependent on buying seed from a progressively smaller number of commercial seed producers, most of which are divisions of the sort of large multinational agrochemical companies I would rather not be supporting – even in a small way – with my hard-earned cash. In their place, heirloom varieties with a good track record of performance in garden growing situations, which hopefully I can save seed from for future years, improving the sustainability of our growing while reducing my annual seed bill.

It begs the question, of course, of why F1 hybrids are so popular? As I see it it’s a combination of things – not least, I’m afraid, a cynical preference for what are effectively ‘copy-protected’ seeds on the part of the seed sellers, as the offspring of F1 hybird varieties will not come ‘true to type’ and will often have very inferior production characteristics. But besides that, F1 plants are often that bit more vigorous (so called ‘hybrid vigour’) and are very consistent in their growth. Want ten (or a hundred, or a thousand) identical tomato plants, which will germinate together, grow at very much the same pace, and produce identical-looking and consistently sized tomatoes? If so, you need hybrid plants, as there will always be a bit of variability from plant to plant in open-pollinated heritage varieties.

Who cares about that? Commercial growers, mostly – while I can see that it might have some benefits to the produce showing fraternity (as the judging at vegetable shows is obsessed with the consistency of the vegetables presented – three or five near-identical peas will always beat bigger or better inconsistent specimens), it’s actually the case that most keen vegetable showers are keen to maintain and improve their own varieties, keeping seed from the best producing plants to improve their performance from year to year, something which is impossible for F1 plants.

Also out are dwarf peas and beans – I’m sure they have their use, but darned if I can think of it? I have a feeling that, again, they were developed to allow commercial, field-scale growing of beans without the need for supports, which can then be harvested by machine. But for the individual gardener, what a waste of growing space they represent, if you can instead grow them upwards on a great big wigwam and get a far bigger harvest from each individual plant. They’ve become so prevalent in the seed catalogues these past few years that I keep finding I’ve bought dwarf bean seed by accident. This year, no more – if it can climb, it will climb!

Soil blocks for growingA few years ago I started experimenting with soil blocks for seed starting. The mix I developed then – 4 parts peat free multipurpose compost mixed with 1 part vermiculite and 1 part topsoil (harvested from our generous numbers of field molehills!) continues to serve me well. We’re as strictly peat-free here as we can be – though it can be hard to source reliably peat-free plants.

The blocks work extremely well for mid-sized seeds that are single-planted, or for little seeds planted in small clumps. The 2 inch blocks that I make are obviously little use for anything bigger – beans, peas, and pumpkins / squashes still get started in 3 inch pots. But they’re a great way of reducing the amount of plastic we use in the garden, as they fully replace module trays – and my experience is that seeds started in these blocks transplant outside really well, with almost no ‘check’ to their growth when relocated – probably due to the minimal handling and root disturbance, combined with the fact they are already accustomed, thanks to the soil component of the mix, to the soil conditions here.

This year my chilli varieties are Santa Fe Grande, Ring of Fire and Maule’s Red Hot – sourced from US-based heirloom seed supplier Baker Creek Seeds. I’ve chosen these three specifically because they’re short-season varieties – one of the problems I’ve had with chillies in the past, growing outdoors in the tunnel, is that I’ve grown fantastic plants but there just hasn’t been enough time for the chillies to ripen before winter. With a bit of luck, these should fruit and crop earlier. Having decided on these, sown and germinated them, I was introduced last night on Twitter to a traditional African variety called the Fish chilli and I’m caught – it’s a beautiful variegated plant that produces variegated chillies! – I ordered some seed last night, so let’s hope it arrives quickly and is able to catch up for the missing growing weeks.

Tomato and chilli seeds

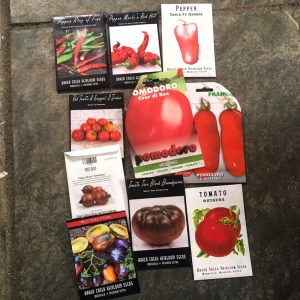
My tomatoes are Cuor Di Bue (Oxheart) and San Marzano, from Italian seed suppliers Franchi. The Cuor Di Bue packet, unusually, advised me to sow under a waxing crescent moon – which, as it happens, I did, however unintentionally! Joining them, from Baker Creek, Rutgers, A Grappoli D’Iverno (Italian winter grape), Brad’s Atomic Grape (a bizzare-looking, streaked, technicolour variety), True Black Brandywine and Black Vernisage. That makes seven varieties, which is three too many. Last year I only grew four (Oxheart and San Marzano, along with Golden Sunrise and my Grandma’s old favourite, Moneymaker) and decided firmly that it was a good plan and I’d be strict with myself in future and not over plant… What can I say, I’m a sucker for a seed catalogue!

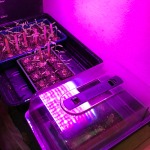
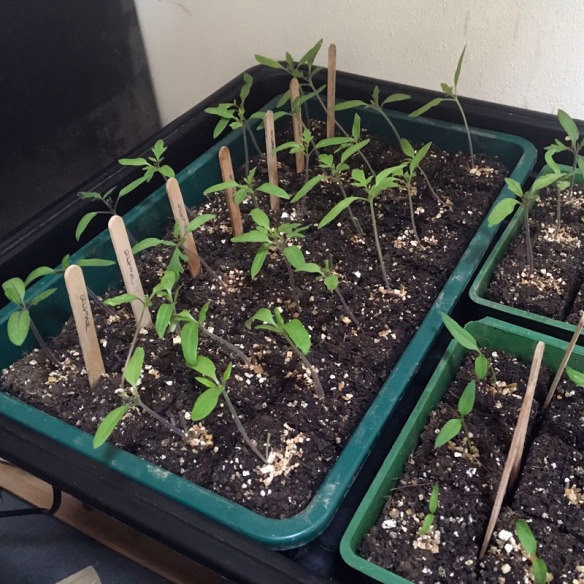
I’ve had great, quick, strong germination this year – the tomatoes were almost all up on day 4, and the chillies broke the surface between days 10 and 14, really brisk germination and better than I’ve had in the past. I put this down in large part to my new gardening gadget purchase of the year: I’ve invested in an LED grow lamp for my germination set-up, to add to the two cheap heated propagators that have been my dependable friend for years now.

Strong growing seedlings

The cost of LED lamps has crashed recently, and my panel cost me less than £20, with very little electrical running cost, either – LED lights are very efficient. When previous grey springs have produced weak, leggy, lanky seedlings, this year’s plants seem strong, are growing vigorously, and are a lovely dark green colour. I’m particularly impressed with the effect on germination, which I hadn’t anticipated. Better still, my baby plants are no longer jammed into window sills all over the house, but instead can sit on a bench in the back hallway, where the temperature is more stable and they’re not so at risk from low overnight temperatures. It also feels less like I’ve transformed my entire home into a grow-house. At this rate, I’ll need to buy a second panel to cover more of my growing bench!

I’ll be back to keep you posted soon!

P.S. Those of you who are long-time followers of the blog will remember Dave the dog, our wonderful Rough Collie, who made regular cameo appearances here. I’m sorry to have to tell you that we lost Dave last year, he was thirteen, not a bad age, and unfortunately his legs eventually let him down. We miss him very much. 

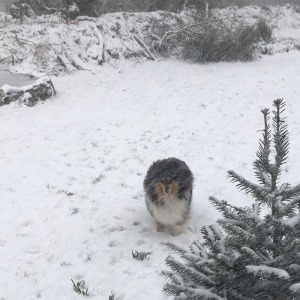
But all clouds have a silver lining – and this is ours: she’s called Rosheen, has rampaged into our lives like a little tricolour whirlwind, and I’m sure you’ll all be very familiar with her antics soon!

Rosheen in snowstorm

Read more from the Country Skills blog >

Banner320-260

And Now For Something Completely Different – are you an aspiring smallholder?

One of the nice things about writing a blog is that people email you out of the blue from time to time to say nice things about it. Often they want to sell you something, of course, but isn’t that the Internet all over? Anyway, today I got a message from Eve White, who works in programme development at the BBC; as well as being ever so nice about the blog, she wondered if I knew anyone who might be able to help them out finding a family to participate in a programme they’re making.

Now, this isn’t really the kind of blog where I’d normally post this sort of request, but I just have sneaky suspicion that this might suit some of my lovely readers here down to the ground – so, if you’re considering taking on a smallholding or wanting to take bigger steps towards a self sufficient lifestyle, listen up, this may be for you!

Copied below is Eve’s email to me and her contact details. Please contact her directly, if you’re interested in participating, as she won’t be checking comments here!


My name is Eve and I work in the programme development team in BBC Bristol. We’re looking at a new daytime programme idea featuring Paul Martin (antiques expert who presents the BBC1 show ‘Flog It!’ – but also happens to be a smallholder) whereby families thinking of leaving behind the urban life for a new one in the countryside try their hand at smallholding challenges at Paul’s home.

It might be that you and your family have always dreamt of giving everything up to move to your own piece of land in the countryside, or that you’ve climbed the career ladder for long enough and want the chance to become self-sufficient, or that being a smallholder has always been pushed aside in the face of the reality of your day-to-day lives.

We are looking to film what’s known as a taster tape – a short preview film to give a flavour of how the programme might look and feel – with Paul and a family who are considering this change of lifestyle in around two weeks time. This isn’t for broadcast, but will help show our commissioners the potential for a brand new series for BBC1. This will involve a bit of filming with you to find out more about why you’d like to leave the rat race and move to the country, and some hands-on practical smallholding challenges at Paul’s farm in the south west.

We’re looking to film in about two weeks time on the 21st September, so you’d need to be available then.

If you think you and your family might be up for the challenge, or have somebody in mind who you would recommend, please get in touch via my email address eve.white@bbc.co.uk and I will respond as promptly as possible.


So, if that sounds like you, and you fancy the experience of TV without the stress of actually ending up on the box, why not drop Eve a line?

Read more from the Country Skills blog >>

Blocking Up – experimenting with peat-free soil blocks

I can’t quite remember where I first came across the idea of soil blocks for seed sowing, but they’re a rather neat idea. Compacted cubes of growing medium are used instead of pots or modules, freestanding seed trays with narrow air gaps between the blocks.

Big claims are made about the benefits of soil blocks for raising young plants in terms of reduced root disturbance and how ‘air-pruning’ of the roots prevents root binding of seedlings, all of which may well be true – I haven’t really got the horticultural background to say! But actually the thing that really attracted me to soil blocks was practicality.

Sowing seeds into soil blocks

I really don’t like module trays – they’re a pain to wash and re-use, if nothing else, they tend to degrade badly and crack up so that they only last two or three seasons, and are expensive and enormously wasteful if you’re using them only once. While it makes sense  to start certain seeds directly into 3″ pots, that takes up an awful lot of window sill space – something that’s definitely at a premium in my house at this time of year. And as we’re aiming to be completely peat free in the new garden, those little peat jiffy pots are right out (and the cost adds up quickly). A useful compromise has been home-made newspaper pots, but there’s quite a lot of effort involved in making these and I don’t always have time (also, my paper potter tool seems to have gone astray in the house move)! I’d more or less settled to using plain seed trays and pricking out seedlings at a small size, but that’s quite a lot of work and it can be rather traumatising for the seedlings, and has to be done at just the right time when inevitably I have too much else to do. So, no perfect solution.

Half trays of soil blocks in heated propagatorSoil blocks combine the convenience of the plain seed tray with the ‘modularisation’ provided by plastic module trays or individual paper pots – so could they be the best of both worlds?

Despite a real lack of cash just now, I decided to dig deep and find the twenty pounds for a four-block two inch cube soil block maker, which I bought from GreenGardener.co.uk. Only after diving in feet first with the purchase did I stop to consider the peat free problem; almost everything I read suggested that a peat-based seed compost was essential for making functional soil blocks. So had I just wasted my money?

Unwilling to compromise on our principles, I set about mining websites and gardening forums in search of a peat free recipe for soil blocks. None was quite right but some themes kept recurring. A base of peat free compost (fine textured seed compost ideally), something to help drainage (sand, perlite and vermiculite were variously mentioned) and loam or topsoil to help bind the mixture.

I’ve mentioned that money is a bit tight; going shopping for extra growing media is not on the cards, but I have a reasonable supply of New Horizon peat free organic multi-purpose compost and a rather soggy old bag of vermiculite (I generally use the New Horizon compost mixed 3:1 with vermiculite as my seed mix). We also have an almost inexhaustible supply of molehills, as the efforts of Mr Mole to create a ‘des-res’ for Mrs Mole are in full swing on our paddock!

So with a ‘make-do and mend’ attitude I did a few experiments and have come up with the following mix that seems, so far, to be working well for me. It will be the basis of my soil blocks for this season, while I get a handle on how things go germination-wise, and consists of –

  • Dry soil block mixture4 parts peat free multipurpose compost (you could sieve this to take out the biggest bits – but I’m fundamentally lazy and don’t own a garden sieve)
  • 1 part vermiculite, and
  • 1 part molehill (you should ideally sterilise this to get rid of weed seeds, I suppose, though it seems like faff) or substitute with bought topsoil (being careful it’s not been mixed with peat compost, as it often is!)

Wetted soil block mixMix the components thoroughly and then add water, a little at a time, until you reach a consistency that holds well together when you take a handful and give it a good squeeze. I find this is at the stage that you can just squeeze a tiny bit of water back out of the mix. Any wetter and the blocks slide straight out of the block maker – drier and the blocks tend to crumble. If you find you’ve over-wet the mix just add a bit more compost to dry it out again. A little trial and experimentation and you should get a good idea what you’re aiming for.

Filling the soil block makerTo make the blocks, level the wet compost mix about two and a half inches deep and as even as possible. Push the block maker down firmly into the compost until it hits the bottom, then push down on the handle without moving the press, to squeeze down on the blocks. You may squeeze a out a little water (if you’re seeing a lot, your mix is too wet). Then, release the handle and carefully pick up the block maker, tilting it on it’s side to reduce the risk of blocks falling out.

Making up soil blocks in seed trayPosition it where you want your blocks to go, and then press down on the handle again pulling the block maker up at the same time. If it’s all worked perfectly, you will have four even, neat little cubes each with a dimple in the middle. I find I can fit three rows of four blocks (12 blocks in total) into a half sized seed tray or seven rows of blocks (28 in all) in a full sized tray.

Half seed trays of soil blocksNow you’re ready to sow your seeds. Pop one seed into each dimple (or more than one if they’re small seeds and you plan to thin any extra seedlings) and cover loosely with a pinch of dry compost or vermiculite – or leave the seed uncovered if light is required for good germination. Then place the seed tray in your desired spot. I currently have two half trays of soil blocks in my heated propagator with tomato seeds in, and two full trays of salad leaves and brassicas in the unheated greenhouse.

Completed tray of soil blocksThe soil blocks are supposed to contain enough water to allow the seeds to germinate without further watering being required, but this depends on preventing excessive evaporation.

Covered seed trays in greenhouseI wrap the seed trays in the greenhouse with cling film (wetting the edge of the seed tray like a pie dish gives a good seal) and those in the heated propagator are under a closed lid. But if they do get a bit dry, don’t panic – mine held together fine when I watered them with a normal watering can and medium rose, just be gentle! Obviously you can’t use normal plant markers easily if you’re using cling film, so I label my trays using masking tape stuck to the seed tray. Keep your eyes open for signs of germination and remove the cling film before the seedlings reach it.

I’m waiting to see how things germinate in them now, and how they grow on, with no small degree of excitement!

Are you experimenting with soil blocks this year? How are you getting along?

Read more from the Country Skills blog >>

New Year, New Home – our plans for the garden

Crikey, we’re half way through January 2015 already – how did that happen?? It seems like only last week we arrived here, but it’s been over six months now since we moved, in the height of summer.

The house

It’s going to be an exciting year for us, and hopefully plenty of opportunities to showcase new skills and techniques here on the blog, too! Those of you who read here regularly will know that we were forced by the HS2 rail project to move from our lovely little cottage near Banbury. We decided to bite the bullet and make a big move – the move to the South West that Hubby and I had always told ourselves we would make ‘one day’, when the right opportunity arose. I have to say I’d always suspected the ‘right time’ might well have ended up being be 20 or 30 years from now, when we were thinking about retirement, so while it was a scary move, and stretches us financially, I’m delighted that we find ourselves here in Cornwall now, while we’re still young (well, relatively, hah!) and fit and able to work and build a life here and contribute to our local community. Even if it means we’re skint working-age folk rather than comparatively well-off retirees!

After an initial 6 months doing temporary contract work to keep our heads above water, I’ve started a new, permanent job for the new year, closer to home and with saner hours (occasional days off!) which will hopefully allow me to draw breath from time to time and spend a little more time making, doing and writing too!

So, as today is one such day, I thought I’d share a little about the projects we have coming up here at our beautiful new home in the course of the next year.

In the garden –

We’re amazingly lucky to have five acres of land with our new home, and in due course we hope to slowly build it up into a productive smallholding. For the time being we’re renting the pasture land to our neighbours for their sheep to graze, while we concentrate our time, effort, and resources around the house and gardens.

Dave dog on the paddock

Yes – gardens. I never thought I’d have gardens in the plural (well, if you ignore a scrap of front driveway!) but we have two, three if you count the old sheep fold where we’ve planted the orchard trees that we dug up and brought with us from our last home.

South gardenTo the south of the house, sloping away gently, we have a triangular garden with Cornish hedges on both sides which is going to be our ‘pretty’ garden. It has gorgeous views over Bodmin Moor and will be perfect for relaxing in on summer evenings if we ever get any time to rest!

The fish pondHubby has dug a pond here for our fish, who are settling in nicely, but otherwise this patch of land is likely to have to take a back seat for a while while we concentrate on more productive projects! With a bit of time and attention (ten years or so should do it!) I have high hopes for it being an even more beautiful place to be.

To the west side, we have an almost square, level garden with the house to one side and Cornish hedges to the other three sides, which essentially makes it a walled garden and the most protected growing space we have. This is an important factor as we’re nearly 900ft up on the edge of Bodmin Moor, and the winter weather and winds here can be a bit ferocious!

First raised bedsThis is going to be our kitchen garden, and as you can see the work has already started, the hens are settling in nicely, and the first three raised beds are planted with winter veggies.

We’re going to build a shed and a small seedling greenhouse here and add some more growing space as we go along. The soil is quite stony as we’re on granite and slate bedrock, but seems good and fertile so with a bit of luck and lots of patience and stone picking this should make for a lovely productive working garden. As long as we can keep the rabbits & mice at bay…

We plan to build a polytunnel outside the gardens to the side of the pasture paddock, to allow us to grow more tender plants like chillies, tomatoes, peppers and maybe even melons, and take even greater advantage of Cornwall’s lovely mild climate (well, by and large – it’s blummin’ chilly today!) and long growing season. The hens might even enjoy hanging out there in future winters, in the dry and out of the wind.

The hens nicely settledThe hens are doing OK now, after a disaster back in November when a stoat broke into the run and slaughtered three of the five girls we’d brought with us from Banbury. Of course, it killed my favourite, Midge, and I was completely heartbroken over the whole thing. We managed to find four new pullets to make up the numbers and all of them seem to be getting on really well now.

We’ve had far less trouble than on any previous hen introductions so we’re obviously getting the hang of this process. The new girls all have their own characters and temperaments and seem very chilled out around Dave dog, which is lovely.

There’s so much to do, but it’s so exciting! I’ve got some chillies in the heated window sill propagator (and rapidly realising I need a much bigger one!) and the first have germinated during the past few days. It won’t be long before every window sill in the house is full to bursting with seedlings – at least they’re nice thick walls, over two feet of solid granite for the most part, so I have plenty of ledge space.

Green shoots!

We missed out completely on last year’s growing season, which was torture. So even though we really should probably be focusing our time and efforts in other places, I refuse to let another whole growing year go by the wayside – it’s so very exciting to have seeds in compost again and to be seeing the very first green shoots of what should hopefully be our first great productive Cornish growing season!

Recycled cold frameIt’s a very conscious decision to concentrate our time and expenditure on the productive aspects of the gardens first – after all, the kitchen garden will go some way to feeding us. Landscaping and decorative planting, no matter how attractive, doesn’t help keep the larder stocked or reduce our food bills. We’re very much doing this on a budget, too – our rather lovely pair of cold frames are made from the glass out of the shower cubicle we had to replace when we got here.

Over the next few blog posts I’ll share with you some of our plans for the house – especially the kitchen – and for our outbuildings. Buckle up – it’s going to be a busy year!

Read more from the Country Skills blog >>

Growing and Healing – back after an unscheduled break from blogging

So the blog’s been quiet for a bit! Sorry about that! I feel like I owe you all a bit of an explanation, so here goes – 

Back at the end of March, Hubby and I set off for a well-earned holiday, our annual-if-we-can-manage it ski trip.  We left my lovely in-laws looking after the house, garden, Dave the dog and the gaggle of poultry. A few days into our holiday, news came that Dave wasn’t well.  We tried not to worry – after all, we were almost half-way around the world, and there wasn’t anything we could do from there – he was in good hands and had been to the vets.  The days went by and rather than getting better, he was getting sicker.  By Easter weekend, he was in the hospital on a drip, having refused food for most of a week. By the time we arrived home the following week, he’d been admitted to a specialist referral centre – they were concerned that his liver might be failing, and didn’t know why.

We both hate to leave Dave and had been looking forward to the joyous welcome-home he normally gives us.  Instead the house was silent. We went to visit him at the referral hospital and he barely had the strength to give us a squeak of greeting.  A few more days went by, and after a CT scan which yielded a few answers, perhaps – ruled out some really sinister possibilities anyway – and a plan, kind of, he was fitted with a feeding tube.  Meanwhile, in a silent house, we were both struggling to keep our heads above water.  Times like this, if there were ever any doubt, we know what these creatures we invite into our lives truly mean to us.  I wonder if they understand how much they’re loved.

Dave with his feeding tubeAfter five day with the specialists, still not eating for himself but being fed through a tube inserted through the skin of his neck and into his oesophagus, Dave came home for us to care for.  He was incredibly weak and I really feared we wouldn’t be able to bring him back to health.

But one pill at a time, one liquidised-feed at a time, his strength returned and he started to eat for us again.  A week and a half ago his feeding tube came out, and he has continued to do better in the days since.  He’s still taking a pharmacy full of medication, and looks like a patchwork dog with all the hair that was clipped off to allow investigation and treatment, but over the last few days I finally feel like we’re getting our wonderful, beloved dog back, and while there are never any guarantees in this life, we have hope, and real joy.

Dave enjoying the sunshine

Some of you have been following the saga of Dave dog’s illness on twitter, and I would like to thank you all from the very bottom of my heart for your kind words and thoughts over these past few very difficult weeks.  They’ve been an immense source of strength and comfort, and have meant the world to me.

Of course, it’s a truism that whatever our personal turmoil, time doesn’t stand still.

It’s spring! At last! It really did feel like the winter that would never end! And while the blog has been quiet, we’ve still been very busy.

Dave the dogThe greenhouse we built in March is now stuffed full of seed trays and little emerging seedlings.  It has been performing wonderfully, and the automatic opening vent – a birthday present for myself and admittedly a bit of an indulgence – has been working brilliantly and prevented it becoming a seedling-cooking device on sunny days when we’re not around!  Incidentally, the giant climbing triffid in the foreground is one of my hop plants, grown from a bare root rhizome this year. It’s quite something, isn’t it!

Vegetable bedsOutside, we’ve almost finished sorting out the vegetable beds, and the potatoes are planted.  Now I just need to get a bed prepared for the cutting flower patch I’m experimenting with this year!

My window ledges are packed with chillies, tomatoes, and other things too tender yet to survive in the unheated greenhouse.  I’m hoping we’ve now had the last of the really cold nights and they may be able to go into the greenhouse in the next few days.

Chilli seedlingsI’m especially pleased with my chilli plants, despite an initial disaster (top tip here – don’t take your beautiful heated-propagator-raised chilli seedings outside on even a lovely sunny early March afternoon to prick out and pot on), the survivors, and second sowing are now thriving. I’ve grown two varieties – ‘Vampire’ (the purple-leaved ones in this photo) and ‘Twilight’ this year.  What is it about naming chilli varieties, incidentally???

Seedlings for the cut flower patchStarting these seedlings, and waiting for them to grow, has been the most amazing therapy and displacement activity against the stresses and worries of the past few weeks.  Seeing them start to grow and thrive is always such a great source of faith and hope for the year to come, but this year it’s felt particularly poignant somehow!

Oh, and I seem to have accidentally taken up crochet… more of which, no doubt, another day!

Thanks for your patience in the hiatus, folks, and I’m hoping that more normal (and frequent) blogging service will now be resumed!

Read more from the Country Skills blog >>

Living in Glass Houses – DIY greenhouse build

I have to admit to having wanted a decent greenhouse for as long as I can remember. Growing up, my grandmother’s neighbours had a beautiful greenhouse and vegetable garden, which I used to admire from over the fence, and I suspect my life-long enthusiasm for the glass-house springs in part from this!

Dave, showing off his new greenhouse!

Apologies, incidentally, for the quality of the photography in this post – I made the mistake of thinking I had enough on my hands and that photos from my mobile phone would be ‘good enough’ rather than worrying about the SLR as well as everything else.  The photos took ages to tidy up and even now aren’t really up to my usual standard!

A little while after Christmas, while we were watching telly, I asked hubby whether we were really going to get on and build a greenhouse this year.  Yes, he agreed, we definitely were. So I did a bit of digging around, and had more or less decided that for what we required, a baby polytunnel was probably going to be more cost effective and sensible.  Then, deploying his superior (well, so he says) google skills, he turned up a 6ft x 10ft aluminium and polycarbonate greenhouse for about the sort of price I was finding for tunnels.  It seemed like a no brainer, so we got on and ordered it. It arrived a week or so later.

It’s been sat in the garden in two boxes since then, of course, because the weather we’ve had this winter can only be described as ‘not compatible with construction projects’.  As it happens, I’ve given up complaining about the weather for Lent (yes, it’s been that bad!), so I’ll spare you the details.  It finally started to dry out a little a couple of weeks ago, so we finally had a window to get going with the ground works.

The intended site for the greenhouse is on our ‘paddock’, which is a scrappy bit of ridge and furrow pasture land, most of which we planted for an orchard three years ago.  The grass is very established and the land isn’t level (the clue is in the ‘ridge and furrow’!). The only way we were ever going to get a level frame for the greenhouse was to dig a ‘slot’ for it out of the pasture grass to level it, and set a frame of breeze-blocks on which to rest the building.

You’ll need a good spade, a turf cutting tool and ideally, a mattock. We measured out the 6ft by 10ft rectangle and got to work.  Once we’d cleared the space, it occurred to us to consider in more detail the ‘6 x 10ft (aprox)’ size given on the greenhouse packaging.  It turned out the greenhouse was sized in something that could only be described as ‘metric feet’ by its German manufacturers.  Armed with the metric measurements, we enlarged the slot by a reasonably generous margin, and turned in for the evening, pleased with ourselves for having completely cleared the required space, and confident we could crack right on with building the greenhouse the following day.

The next day dawned cold.  Really cold – barely above freezing, in fact, despite being late February.  Undaunted, we put on our ski jackets and thick woollen socks, and headed back out to the greenhouse site. We’d gathered together enough lightweight breeze blocks to do the job – the sort that are made from a sort of concrete ‘froth’, a bit like an aero bar, and would float, if you let them.  Our sophisticated building and levelling tools were the spade and mattock from the previous day, a spirit level, and some string.  The blocks themselves were to act as ‘squaring’ guides, in due course.  And, as we hadn’t yet managed to pick up a bag of sharp sand, we had only the soil itself to use to pack the blocks straight and level.

Assembling the brake blocksThe first course of blocks assembled itself quite straightforwardly.  The mattock is a great help in cutting a clean trench, and then the blocks just go in one after another, with a check on level and height adjustment on each.  After setting the corner as square as we could using one of the blocks for reference, a couple of pegs and a length of string set the alignment for the next course.  Things were going well!

Two courses more or less complete, we wanted to make sure we had the right dimensions for the greenhouse, so we decided to get out the base from the kit and get that assembled for reference.  This done – and it was nice and straightforward (though it revealed that the assembly instructions were a ~50 page pictographic document, in the IKEA tradition) – we offered the frame to the greenhouse site, and discovered our slot was too narrow, given the width of the blocks.  In a stroke of good luck, we also discovered the base build could be bodged to use only whole blocks, which was a huge bonus.

Three courses placedCarrying on with the cut, measure, level, we had three courses installed.  We laid out, crudely, the blocks for the fourth course.  Inevitably, this is when you discover that, rather than a neat rectangle, and despite your most careful efforts, you’ve built some sort of trapezoid only theoretically known to mathematics. A bit of head-scratching and adjustments to the squaring, requiring a bit of extra turf cutting, and we put down the fourth course.

Greenhouse base, complete

It had been trying to snow all afternoon, and we’d been outside for five continuous hours laying the foundation blocks. It seemed apparent that one of the corners (the back one, in this photo) was lower than it should have been, but we were running out of energy, and light.  We tidied up and came back indoors, and gave up for the weekend.

Pro-tip: you know you’re really, properly, cold to the core when you *start* shivering several minutes after you get into a nice warm bath…

Skip ahead, then, through a working week to this weekend.  Finishing the greenhouse was our main order of business.  The weather, at least, is improving – no snow this weekend and even moments of sunshine!

Fixing the base down onto the blocksFirst up on Saturday, completing the levelling of the base.  Easy enough with the base frame sitting on top to confirm our suspicion that the back corner was ‘down’.  We’d got hold of a bag of sharp sand, so correcting this by lifting the two sides progressively was pretty straight forward.

Then, after placing the base as square as we could on top of the blocks, we marked the fixing holes, drilled these out with a hand drill, and then after placing rawlplugs, screwed the greenhouse frame down into place.  (Hint – mark carefully, and then *check* – it’s annoying when the holes aren’t quite in the right place!)  Skip any holes which are really close to an edge, as the block will just crumble away. Note that we’ve used no mortar at all in constructing this base.  You could, of course, if you wanted a more permanent foundation.

Out of the ground at lastThe sun was thinking about coming out, and we were ready, finally, to get the greenhouse build out of the ground.  The construction guide is purely pictorial, and weighing in at 51 pictographic pages, is something out of a flat-pack-furniture-phobe’s screaming nightmare. In the end, it’s just a question of following the instructions, as carefully as you can.

Our greenhouse was manufactured by ‘Palram’ and is a ‘crystal clear’ (read vaccuum-formed, single-ply) polycarbonate glazed aluminium framed greenhouse.  We bought it via B&Q but their greenhouses are stocked by lots of different retailers.  We’d built a tiny (6ft x 4ft) polycarbonate and aluminium greenhouse in our previous townhouse garden, and I was expecting the same, two-ply corrugated polycarbonate glazing that we’d had before, and which we were very pleased with.  I can only surmise that the insulation properties of this single-ply material won’t be as impressive as the other option.  And handling the glazing panels, which seemed alarmingly lightweight, was a bit hairy in places.  That said, once complete, the finished greenhouse does seem reassuringly ‘solid’. So, time will tell!

Side panels installedBut, back to the build.  Proceed carefully according to your pictograms.  Those on the cover informed me two people would be required, and that was certainly the case – at various times this build would have been completely impossible to perform single-handed. I was expecting to assemble the four walls individually and then combine them, but this wasn’t the case – the whole thing came vertically out of the base, acquiring glazing as it went, and then the build continued up into the gables and finally onto the roof.

We made one mistake (repeated at all four corners), which gave us some trouble until we noticed what we’d done wrong – fortunately our efforts at mitigation only involved some very slight trimming of some edges of the polycarbonate panels, nothing with any lasting consequences. Hint – if there’s more than one possible hole you could screw in, check, and check again before committing (and stop that giggling at the back!).

I gave a few small blood sacrifices on the sharp metal edges of the frame while threading the glazing panels.  The instructions tell you to wear gloves, of course, but it’s impossible to do this while fiddling with the 120 pairs of small metal nuts and bolts that hold this monstrous Meccano set together, and in the end I gave up, and suffered the consequences.  Overall we felt that, at least where it came to the glazing panels, the manufacturing tolerances were probably wider than the assembly ones, which made things a bit tricky from time to time.

Greenhouse roof installedGetting the roof apex installed did require a ladder (at least for us – though we’re both a little on the short side!), which isn’t on the list of required equipment.  It would have been a bit of a nuisance if we hadn’t had one conveniently available!  With the sun setting, and the roof on – missing only the final fitting of the window vent, and the door – and after seven hours solid work, we gave up and went to the pub for a well-earned steak dinner and a couple of pints of rather nice Ringwood bitter.

This morning, after a more sedate Sunday breakfast, we got on with the finishing-up tasks. The window went in quite straightforwardly.  The door was a bit fiddlier but posed no major challenges (and is very thoughtfully designed, in fact). By lunchtime, we had a completed greenhouse frame and glazing.

Hubby had work to do this afternoon, so after a whistle-stop trip to Wickes, he got on with that while I cracked on with the inside of the greenhouse.  I was hoping, rather ambitiously, to finish this evening with the hard-standing for the staging installed, as well as a paving slab path, the staging fitted, and the borders initially dug-over with a ceremonial planting – perhaps a row of early carrots, or something – completed.

Laying the slabsLevelling the ground and installing the slabs was probably, in fairness, a good worked example of why you shouldn’t let amateurs do hard-landscaping!  The soil at the back of the greenhouse, where the staging was going, produced a rich vein of solid clay, the kind that would probably have made a victorian brick-maker’s month.  Again, we wanted to avoid concrete or mortar, so the paving slabs are to be laid directly onto a layer of landscape fabric on top of the soil, using some ‘pads’ of sharp sand to help level them.

Hard standing installedThere are gaps between my slabs, which I’ll fill with some gravel once I’ve remembered to buy a bag.  Eight blocks across the back of the greenhouse provide a space for some shelving, and then a five-block path runs between the two greenhouse borders from the door.  I’m hoping that the slabs will also provide some useful heat-sink effect to hold warmth into the evenings as the temperature drops.

It’s around this stage in the process, when you’re raking the soil under the pathway to a fine tilth, while treading your precious borders harder and harder, that you remember that gardening is about pretty flowers in the same way that house-building is about paint colours for the hall.  In the end, it’s mostly hard labour!

Greenhouse staging 'installed'Just as I was ready to give myself a big pat on the back and congratulate myself on a job well done, I realised I had a small problem with my (great, cheap!) greenhouse staging.  The pack, describing itself as 2ft 11in (x2) greenhouse shelving (and I’d measured the gap!!) turned out to have the ‘aprox’ behaviour in the, compulsory, unhelpful direction.  They don’t fit!  Until I decide whether I want to take a hacksaw to eight lengths of steel tubing, they’re installed at a rather ‘jaunty’ angle…

No ceremonial carrots, but three big pots of compost with my newly-arrived hop rhizomes in them, pending the preparation of their final planting site.  There’ll also be a water butt to collect the run-off from the roof and reduce the distance I have to walk to fill the watering can.

Completed greenhouse

I think we’re both, it’s fair to say, seriously pleased with our efforts, even though it’s been physically very demanding and taken about twice as long as we had imagined it would.

To finish, and following Ross’s example in his excellent barn door guest blog post, some summaries:

Costings –

  • Greenhouse kit, including base & glazing – ~£350
  • Breezeblocks – £32
  • Paving slabs – £32
  • Sharp sand – £1.81
  • Landscape fabric – can’t remember, it was in the back of the shed

Time invested –

  • Ground clearance ~1 day, two people (or a bit longer for one)
  • Installing breeze-blocks ~1 day, two people
  • Greenhouse build ~ 1 day, two people (if you get up sharpish or have more hours of light than we did!) allowing extra if you want to do silly things with paving slabs inside.

Lessons learnt –

  • Measure, then measure again. Then have someone else measure too.  Don’t trust the measurements on packets, especially when they may be ‘metric’ feet-and-inches!
  • Wear gloves, unless you want to discover quite how sharp the sliced edges of extruded aluminium components can be.
  • Consider the weather forecast.  It can be really *really* cold in February! And finally,
  • If there is more than one possible hole… insert your own joke here.

I can’t wait to really get growing!

Read more from the Country Skills blog >>

Clucking Mayhem – introductions, is the worst over?

Five weeks ago, I drove a 200 mile round trip to bring home three new hens to add to my little backyard flock. Introducing new hens is always a difficult process, they can be remarkably opinionated creatures and don’t enjoy having new housemates!  The ‘pecking order’ is a very real, and sometimes rather violent thing.  For the sake of both my new and existing hens, I wanted to achieve as gentle and stress-free an introduction process as I possibly could, and made arrangements to take my time about it.  You can catch up with the story so far, from coming home, first introductions, and settling in together.

Reasonably settled?

The weekend before last, once the hens were reasonably settled living together, but sleeping mostly apart, I took the second henhouse out of the run, leaving a dodge-board for the small girls to get out of sight behind if necessary.  There was a bit of stress around bedtime the first couple of nights, but the girls are now all bedding down comfortably side by side on the perches, and during the day, apart from the odd scuffle, are mixing, feeding, preening and generally getting on with happy relaxed henny-things!  Egg production is down, but then it’s well into autumn and more dark than light these days so that’s hardly surprising.

Flora continues to wear her bit – her behaviour is the last remaining problem, it’s not really her fault, I suppose, but things would be really nice and settled without her disturbing influence on the flock.  I think – though it might be wishful thinking – that the frequency and savagery of her attempted attacks on the other girls are reducing a little.  With a bit of luck, in another month or so, the headgear can come off.  In the meantime it seems to be causing her very little difficulty, she’s eating well and laying better than anyone else at the moment, giving an egg almost every day.

Midge is growing up fast, with more comb and wattle than she had when she first arrived, and a hunger to match the growth rate.  I’d love to think we’d get some eggs from her soon, though I suppose it may not be until spring.

With a bit of luck – though I hate to put it in black and white and jinx it! – things are settling nicely now.  I had in mind that things would take about a month to bed down and we’re pretty much on that target.  I really hope the girls can get on with enjoying their seasonal treats (the Halloween pumpkins are going down rather well just now!) and lay me lots of nice tasty eggs for a long time to come!

Read more from the Country Skills blog >>

More Clucking Mayhem – the poultry palaver continues

Just over a week after we mixed the two groups of hens, it’s gone time for an update on progress!  Well, I still have six hens (hey, you’ve got to look on the bright side).

They’re all living together in the run during the day, though the three new girls have still been choosing to bunk in the temporary hen-house at night.  Tonight, for the first time, though, Agnes is asleep with the original trio in the ‘big house’, leaving only Doris and Midge in the temporary accommodation.  Doris is still using the temporary housing to lay, whereas Agnes has been laying in the main coop for a few days now.  The pecking order that established on that first morning out in the garden still appears to be in force, with the strange Agnes > Mabel > Flora > Agnes loop surviving for now.

Flora with Mabel

Speaking of Flora, she’s still wearing her bumper bit.  Flora has turned out to be the real problem – I suspect without her presence in the flock everyone would be living essentially in harmony by now.  Gertie and Mabel, the two other members of the ‘original’ trio are happy to be side-by-side with the new girls and only scuffle with them very occasionally.  Flora has a bad temper, a bad attitude, and seems to spend her life spoiling for a fight.  It doesn’t help that she’s also unusually stupid, even by chicken standards.  Thick and bad tempered, what a winning combination!  Until she’s spending less time trying to thrash poor Doris and Midge into submission, the muzzle is going to have to stay on.

In terms of the effect the bit is having on Flora, it’s less marked than I’d anticipated.  She can eat and drink from the normal feeders and drinkers (we made sure of this before taking the additional open drinker out of the enclosure) and goes to bed every night with a bulging crop.  She seems to be able to graze to at least an extent, and remains (sadly!) able to bully the other hens, though less so than if she could pull feathers too!  The only obvious consequence is in her ability to preen herself.

I suppose it stands to reason that a device primarily designed to stop hens pulling feathers out of other hens would also impair their ability to closely comb their own.  Flora is looking really quite tatty, but it’s something she’s going to have to live with for now.  Despite her muzzle, she still has the girls terrified, chases them to cower behind the hen house, and if they don’t get away fast enough she’ll leap on their backs while they cower and try to pull neck feathers.  I don’t doubt that given the opportunity she’d be doing them real damage, there’s a genuine ferocity to her attacks and I don’t know how long it’s going to take for that to settle down.  Soon, I hope, for her sake as well as everyone else’s!

The next bridge to cross is removing the temporary coop so that all six girls are bunking together.  They could do with the space back in the extension run, and the nights are getting colder, the open-doored temporary house is no place for any of the girls to be sleeping on a cold winter’s night.  We’ve had our first frost here now, so it won’t be long before they’ll really want to be tucked up warm at night!

Still, only just two and a half weeks after I brought the three new girls home in a carrier, overall things are going pretty well.  After the experience of introductions last time, I’d reckoned it would take a month to get things settled and so far I think we’re pretty much on target for that, with a bit of luck.  How long Flora is going to have to be muzzled, though, I don’t want to guess at this point!

Stay tuned for more, folks, from the ongoing poultry palaver!

Read more from the Country Skills blog >>

Clucking Mayhem – chicken introductions, poultry politics and a bit on the side

I’m blogging from the garden right now, because I’m on hen watch. For the last four hours, my three new hens, and three existing birds, have been free ranging together.  After just over a week of living in adjoining but separate runs, I’m hoping this is the next stage in getting them to co-exist happily as a group of six.

Gertie and Midge

Mixing groups of hens is difficult.  Yes, they look sweet and innocent, don’t they?  But hens’ social structures are complex, and established and enforced by drawing blood (or worse!) if necessary.  That pecking order you’ve heard thrown about as a metaphor?  Well, it’s real.  And nasty.  It’s at times like this that you don’t get to forget than hens really are little dinosaurs at heart.  Genuine pint-sized feathery little T-Rexes.  Next time you get to spend some time watching hens, have a look in their faintly-reptilian eyes and tell me it isn’t so!

Home advantage is a big thing, so I expect the new girls to come off worse, and end up at the bottom of the new pecking order.  It’s more complicated than it might be, though, because Agnes and Doris are adult hens – the same age as Flora from the original trio.  To be honest, I was expecting the whole thing to degenerate into an explosion of swearing and flying feathers as soon as the six were out together.  It didn’t, much to my surprise!

My existing three, as far as I can tell, are ranked with Gertie (the white hen) at the top of the pile, Mabel the Isa Brown in the middle, and speckeldy-grey Flora at the bottom of the stack.  Flora was introduced to the flock last year, and got a bit of a nasty kicking in the process, mostly from Mabel who seemed to declare herself ‘enforcer’.  She still gets the sharp end of Mabel and Gertie’s short temper sometimes, particularly when there’s a tasty morsel or two they don’t want to share.

Midge and DorisThe new girls have established with Agnes, the Welsummer (and biggest of the bunch) at the top, Doris the small but adult Legbar in the middle, and Midge, the New Hampshire Red pullet at the bottom.  Agnes flexes her muscles, on occasion, though things have settled nicely.  Midge and Doris are pretty much inseparable, but Doris does occasionally remind Midge who’s in charge.

What’s really interesting to me at the moment is that Gertie and Agnes seem to have settled on what can only be described as an armed truce.  Neither has taken beak or claw to the other (well, if you ingnore Gertie pitching Agnes out of her favorite dust bath – Gertie is *very* protective of her dust bath), and they’ve been very much in each others strike range without hackles up or much in the way of posturing.  Agnes seems to have yielded subtly – she will give over to Gertie, but only just as much as necessary.  I don’t know what Gertie’s secret is, she just seems to exude natural authority!  It gets odder still.  Agnes seems to have established above Mabel (who runs for cover when she sees Agnes coming) but below Flora (who has a similar effect on the otherwise unflappable Agnes).  No doubt this is going to take some sorting out down the line, since I’m not sure pecking orders permit loops!

Flora is a fascinating character.  I suspect it’s the same cycle of abuse that’s described in humans.  She was the hen who reacted most violently to the arrival of the newcomers last week – lunging at them through the bars and even drawing blood on Agnes’ comb on the first day.  She’s declared herself ‘enforcer’ this time around, and thrown herself into the role with gusto, lunging straight at Agnes the first opportunity she got, landing on her back and really viciously pulling out neck feathers.  I’m not surprised Agnes is afraid of her!

Flora's bitThere’s a substantive difference between Flora’s attacks and those of the other bids.  The other hens will peck, will grab and pull feathers, even fly at each other feet first, but generally speaking, just enough to make their point.  Flora’s attacks are really aggressive, no-holds barred, with malice aforethought.  It became clear over the first half hour or so that if left to her own devices, Flora was going to injure one or more of the new birds, possibly seriously, so we decided to catch her and fit her with a bumper bit.

Bumper bit & pliersThis is a little plastic device which sits with a pair of prongs in the nostrils (a bit like the earpieces of a stethoscope), and has a flat bar across the mouth between the top and bottom beak and a ‘bumper’ type bar which wraps outside the mouth around the front of the beak.  By stopping the upper and lower beak coming together normally, it’s designed to prevent feather and skin pulling, and the ‘roll-bar’ in front of the point of the beak should stop her using this as a sharp weapon!

Flora wearing her bitIt’s the first time I’ve used a bit and it wasn’t a decision I made lightly.  While Flora can drink, and eat with the bit in, it does restrict her choices.  She can munch down on pellets and corn just as well as always, but grazing and preening are more difficult. Immediately after it was fitted, she was obviously aware of it and rather unhappy, she rubbed her beak on the floor and scratched at it with her feet.  But she’s settled with it now, and is foraging around the garden normally.

It hasn’t entirely disarmed her (or improved her temper!) – she’s still throwing her weight around – but the damage she’s able to inflict has been greatly reduced, as has the general level of anxiety amongst the other bids.  I’m hoping we can restrict the use of the bit to the shortest period of time we can – ideally a few days to a week or so – though we’ll have to see how the rest of the politics settle down.

Doris and Midge are going to be at the bottom of the new pecking order, but apart from the initial attacks from Flora, and the odd ‘establishment peck’ from the other hens, seem to have been mostly left alone for now.  I’ll be watching these two with particular concern when we house the girls this evening, as they may well get a rougher time when they haven’t got so many options for getting out of the way.

All the hens have been in and out of the open, now combined houses-and-runs.  Gertie seems particularly entranced by the new contraption-house!  We have two feeding stations and three drinkers in place at the moment to reduce unpleasantries associated with competition for resources.  The second house will be staying for now, as an option for any hens who don’t fancy running the gauntlet of the main coop!

Agnes enjoys a dust bath

Over all, mostly so far I’m startled by how well things have gone today.  It’s been a huge improvement on the last set of introductions – but then I learned a lot from that experience! I don’t for a minute believe that things will continue to go this smoothly, but it’s a really nice place to be starting from!

Stay tuned, folks, as the ‘clucking mayhem’ continues!

Read more from the Country Skills blog >>

Getting Clucky – welcome the new hens!

Three of my hens!I’ve kept hens for about three years now.  Until this week I still had three of my original four hybrid hens, but sadly on Monday Spot, my beautiful Rhode Rock (the black hen in this trio), passed away.  This was sad in itself, but also left me with three hens, one of whom (Gertie) hasn’t laid for some time, and the other two (Mabel, and younger hen Flora who came into the flock as a pullet last year) are moulting and won’t lay me anything for a few weeks at best – at worst they won’t think about it again until the days start to lengthen again.

Since my first four pullets came into lay, I haven’t bought a single box of commercial eggs (admittedly hen-keeping neighbours and colleagues have provided the occasional half dozen when my needs have exceeded my supply!).  So, I had an egg supply problem, and one that I didn’t want to solve by going back to retail eggs.  We thought about this for a while, and decided it was time to bring in a few more hens.

This wasn’t a decision we made lightly – last year, after losing Hazel, the first of my four original girls, we introduced two new pullets to our flock. The process was hugely stressful – hens can be vicious creatures, and it’s when when they turn nasty that you really see them for the tiny little feathered dinosaurs they are!  Flora and Daisy eventually settled well, but the introduction process was ghastly (and at times, brutal).  Sadly, we then lost Daisy tragically young last Christmas.

Dave welcomes the new girlsOn Thursday, I drove a 200 mile round trip to see a chicken supplier, Chris at Poultry Park in Newent, who I knew from our previous life in Gloucestershire.  I came home with three traditional breed birds – two hens, a Cream Legbar (Legbars lay blue eggs) and a Welsummer, both a year old and ‘retired’ breeding birds, and an 18 week old New Hampshire Red pullet.  Dave, our collie, was immediately intrigued by the new arrivals, and came very sweetly to say hello!

The new girlsThe new girls have moved into a run extension at the bottom of the old girls’ run.  The idea is to allow them some time to get used to the sight, sound, and smell of each other before introducing them to the same living space.  I tried the ‘short, sharp shock’ introduction approach last time, and wished I hadn’t, so it’s slowly-slowly this time.

The existing trio of hens were not impressed by the arrival of the new three girls, and Thursday afternoon was a chorus of sometimes angry chickeny-shouting in the garden.

First 'contraption' temporary hen-houseTheir first night, the new hens roosted in a ‘contraption’ of a henhouse we put together from an old cardboard box, a hedgerow stick, and a tarpaulin.  Necessity is the mother of invention, or so they say!  Anyway, the New Hampshire pullet (now called Midge) didn’t appreciate our efforts and decided to sleep out on the roof rather than inside the house with the other two!

Egg of brightest blueOn her very first afternoon with us, the Cream Legbar (now named Dorris) laid us an egg.  This egg.  A *blue* egg.  I’ve *always* coveted a hen that lays blue eggs.

If only it were all that simple, of course.  There’s a lot to do, yet, before the new girls can be settled in nicely with the existing trio.

New, improved 'contraption 2'On Friday evening, I got home to find my lovely husband half-way through building a new contraption out of the remains of an old laminate-chipboard office desk. I would have taken photographs, but it was getting late and we had to get the job done!  The new house is a huge improvement, much more robust and seems appreciated by all three girls, who are happily sleeping and (in the case of the adult hens) laying eggs inside it.

The three new girls are new to each other, too, of course – and with two of them being adult hens, there’s been some politics to work out.  Agnes, the Welsummer, is the biggest of the batch, and has decided to assert her authority.  This was all getting a bit nasty on Friday and by Saturday Dorris and Midge were looking a bit cowed, hiding away in the house with Agnes strutting about outside, or worse, guarding the pop-hole to the henhouse.

We resorted to applying some anti-peck spray to the neck and shoulder feathers of the two smaller hens.  They’ve also had several spells of free ranging time this weekend, and whether it’s that, or the slight re-arrangements we’ve also made to the space and the feeding arrangements, or just time passing, relationships seem a bit better and less stressed. By this evening with everyone was out in the run, eating and drinking and scratching around together and only occasional outbreaks of pecking-order politics.  Gertie, Mabel and Flora seem less on edge and more settled back in their normal daily routine, too. They’re even giving the odd egg!

Egg skelter

All seems relatively settled for now, and with Agnes also laying some gorgeous chocolate-brown eggs, after three years of hen keeping, finally, I’ve got the egg basket (well, egg-skelter) of my long-held dreams.  Yes, I know they all taste the same, but aren’t they beautiful?

I expect the next few weeks to involve more than their usual share of stresses and difficult moments – never a dull moment with pets and livestock!  I’ll keep you posted!

Read more from the Country Skills blog >>