Milk Loaf, from ‘How To Bake’ by Paul Hollywood – Cooking the Books, week 14

This bread, I have to tell you, is a revelation – a genuine flavour of my continental childhood. The first taste was one of those ‘madelaine’ moments, where time peels away and you’re no more than five or six years old again, standing in your childhood kitchen with a slice of bread and butter in your hand. Heaven.

Of course, milk bread may not have the same associations for you as it does for me. Still, I would suggest you give this bread a go, because, childhood memories or not, it’s marvellous.

For one large loaf, I used –

  • Milk loaf ingredients500g strong white bread flour
  • 30g unsalted butter (softened before use, if you keep it in the fridge)
  • 25g caster sugar
  • 320ml semi-skimmed milk
  • a 7g sachet of instant yeast
  • 1 tsp salt
  • Olive oil
  • Some extra milk for a milk wash before baking

In a large mixing bowl, rub the butter roughly through the flour until no large lumps remain. Then add the sugar, salt and yeast to the bowl, keeping the yeast and salt on opposite sides of the bowl. Add about two thirds of the milk, and mix gently using your fingers.

The recipe calls for the addition of warmed milk. To save on wastage, I warmed 250ml of milk to blood heat in the microwave, and used this for the initial addition. The rest of the milk, I added straight from the bottle. Add it a little at a time until you form a nice soft dough. My favourite way of judging this is to add the milk (or water, in a traditional bread recipe) until the dough is *just* getting a bit too wet, then add back a sprinkle of extra flour to compensate. That way, you know your dough is as well hydrated as it can be.

Before proving
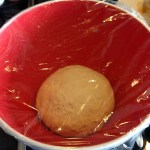
Oil your work surface and knead the dough until it is soft, smooth, silky, and elastic. I love kneading bread, there’s something deeply therapeutic and – dare I say it? – sensual about it. Then return your dough to an oiled mixing bowl and cover loosely with cling film, and leave it to rise for a couple of hours.

Risen dough
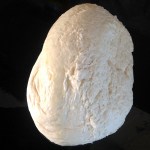
I find that this dough goes off like a rocket – it must be the sugar in the mix, the little yeasty beasties really set to and it rises like a balloon being inflated. Still, give it time (which develops flavour, too) and let it tripple or more in size.

For me, milk bread has to be in the form of a plaited loaf. It’s just traditional. This dough is remarkable, elastic stuff, something I learned to my cost the first time I made it. If you work it too much during knocking back, before trying to form your loaf, you will end up with tight springy little balls of dough that resist stubbornly any attempt to shape them into the long sausage-shapes you need to make your plait.

So, turn the risen dough out onto an oiled work surface, and divide it by eye into three even portions (they won’t end up even, but don’t worry about this too much!). Taking each one, knock it back gently and then immediately start folding the sides towards the centre to form your sausages. You may need to roll these a little, using your hands as if the dough is a rolling pin, to get the length you need.

Turn out your dough  Divide into three  Form into sausage shapes

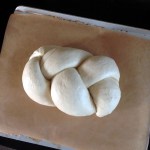
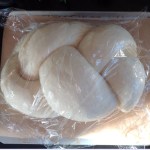
Once you have your three pieces, join them together at one end, make a plait, and turn both ends under to make it tidy. Place your plaited loaf on a lined baking sheet, cover loosely again (I prefer oiled cling film), and set it aside to rise. Allow it to at least double, just be careful it doesn’t rise so fast it tries to escape from your baking sheet!

Place the plait on baking sheet  Cover loosely with oiled cling-film  And allow to rise!

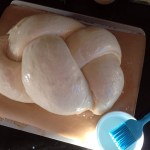
Once it’s well risen, pre-heat your oven to 210 C. Brush the loaf gently all over with a little extra milk, and then slide it straight into the oven and bake it for 25 minutes until the crust is quite a dark brown colour and the loaf sounds hollow when tapped underneath. Cool on a wire rack (or on a cold oven shelf, which used to serve me perfectly well for cooling loaves and cakes before I bought a ‘proper’ one).

Brush with milk  Fresh from the oven!

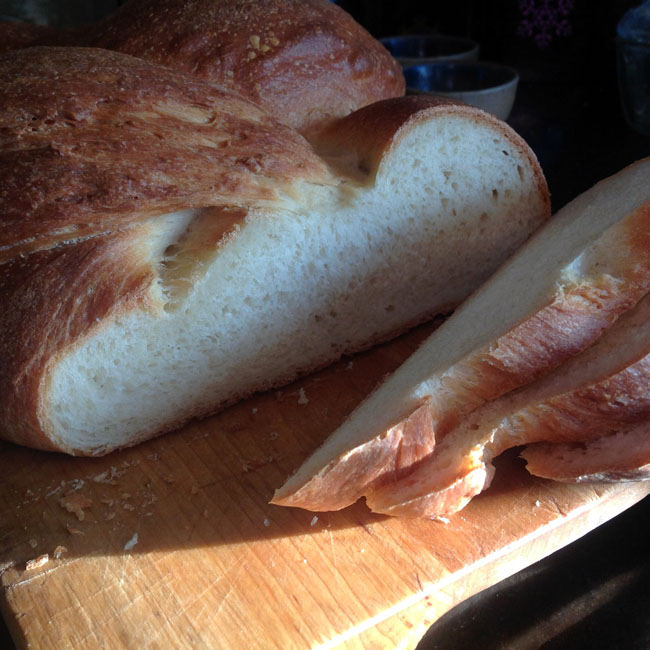
What can I say about this loaf that isn’t unbearably mawkish? Well, it’s pretty perfect. That dark, shiny crust conceals a wonderful soft even white crumb. It’s not sweet, despite the sugar addition, but has a rich smoothness from the milk. It’s wonderful on its own, with butter and jam, but also makes a quite marvellous soft bacon sandwich. I commend this loaf heartily to you.

Slice, and enjoy!


**
How to Bake - cover
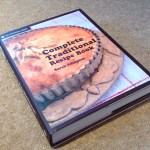
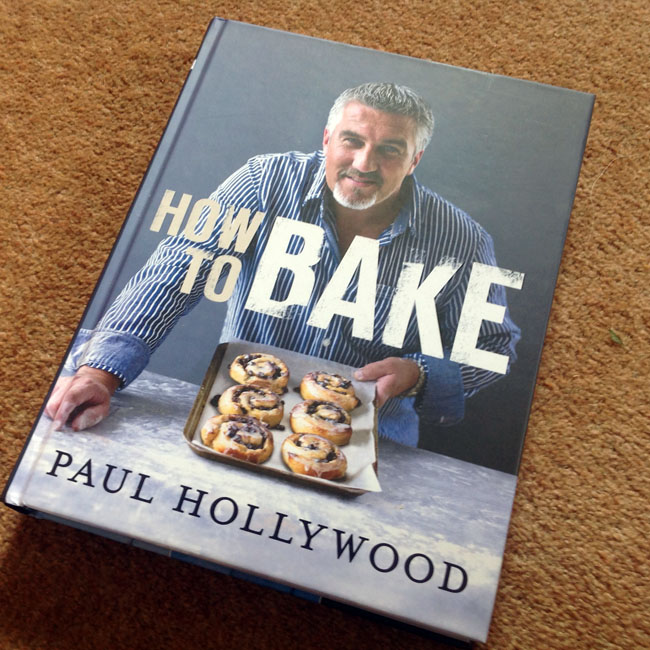
‘How To Bake’, by Paul Hollywood
Bloomsbury Publishing PLC, 2012
ISBN 978-1-4088-1949-4
Hardcover, 304 pages, full colour. RRP £20.

[Full disclosure: This is my book, which was a lovely recent birthday gift! I have received no payment or sponsorship for this post, nor have I accepted a review copy. I do not have an amazon affiliate account and do not profit from any links provided.]

I reviewed ‘Paul Hollywood’s Bread’ earlier in this series, and this book is it’s immediate predecessor, on the same imprint. As you’d expect, then, pretty much everything I said then also applies here – with lavish illustration throughout and good ‘step by step’ photography of the basic processes.

How to Bake - inner page viewThe scope of this book is a little wider than ‘Bread’, with chapters on basic and flavoured breads, an extensive section on sourdough baking, as well as good coverage of enriched doughs (croissants, pastries and brioche), and a decent selection of cakes, biscuits, puddings, pies and tarts, too. This additional breadth may or may not be a benefit, depending on your specific interests! This book lacks the accompanying ‘serving-suggestion’ recipe for each of the loaves that was a feature of ‘Bread’.

Overall I would definitely consider adding this book to your library if you’re at all interested in expanding your home baking repertoire. I can see myself experimenting with a lot more of these recipes in the future, and this milk loaf has jumped straight onto the ‘house standards’ list.

‘Cooking the Books’ is my self-imposed blog challenge for 2014 – I’ll be trying to cook a new recipe from one of my (rather extensive!) collection of cookbooks once a week, write it up and review it. Wish me luck!

Read more from the Country Skills blog >>

Banner320-260

Microwave ‘Roast’ Garlic – and a gorgeous roast garlic and rosemary bread

I was looking for a garlic flatbread recipe yesterday (as you do!) and came across a very intriguing suggestion… that it was possible to ‘roast’ garlic in the microwave, in just a few minutes. Could it be true? If it was, it would save quite significantly on the time and energy involved in roasting in the oven – typically 45 minutes to an hour, fine if you’re organised and remember to put your little tinfoil parcels in with something else, but irritating and inefficient if you find yourself wanting some right now!

The instructions I’d found were only a tantalising hint, unfortunately – vague on both the technique and on power and timings. So I had a little google, and discovered that apparently lots of people were doing very similar things. Convinced now that I was reinventing the wheel, and that everyone else already knew about this trick and just hadn’t bothered to tell me, I tweeted to this effect. What was said in response surprised me – apparently, no one else had heard about it, either. So, I promised to investigate and then blog my findings. True to my word then, here goes!

Obviously, you’re not really roasting the garlic, since this requires the application of direct heat. Consequently you won’t get the caramelisation which true oven-roasted garlic gains (well, you can, but more of this later!). The process is closer to steaming, but produces a soft, sweet, cooked garlic very suitable for using as a substitute for true roasted garlic if you’re short on time and organisation – and there are ways to cheat the last mile and get that caramelisation, too.

For your microwave ‘roast’ garlic, you require –

  • Ready to 'roast'One or more garlic bulbs (I suggest you start with one, until you’re happy with the process),
  • A splash of water and olive oil,
  • A microwave proof dish with suitable loose-fitting lid (or some cling film), and
  • A microwave, obviously.

Slice the top off your bulb of garlic, at a level where you’re just ‘scalping’ all of the cloves of garlic inside.

Add 2 or 3 tablespoons of water to the bottom of your bowl (enough to cover the bottom about 5mm deep), add your clove of garlic cut side up, and drizzle over some olive oil. Cover loosely – don’t seal, and if you’re using cling film, leave a small opening on one side. Pop the whole lot in your microwave.

Now – all of these directions are for *my* microwave, which is a very standard UK-type category E (800W) device. Your microwave may be slightly (or very!) different – even if it claims to be the same – so a little experimentation is going to be required!

Softened and changed colourStart by heating the garlic for 1 minute on full power. Then take it out of the microwave, remove the cover (carefully, as there will be a lot of steam!) and give the cut surface of the garlic a speculative prod with the point of your knife. It should give very slightly, and have changed colour subtly from white to a slightly translucent creamy shade.

It probably isn’t convincingly soft yet, though, so pop it back in the microwave and this time give it 30 seconds on full. Take it back out and repeat the poking process. Depending on the size of the cloves in your garlic, it may well be ready by now. If the surface of the garlic seems reasonably soft (it won’t be pulpy), and the cloves are coming away from their inner skin, then it’s worth popping a clove out to test.

If you can crush the clove easily with the handle of a spoon, then it’s done. If not then give it a little longer. My bulb had a couple of quite big juicy cloves, so I put it back in, but only for a final 15s. So total time in the microwave, for me, of 1 minute and 45 seconds.

Crush a clove to test

After letting it cool for a few minutes, I popped out one of the bigger cloves, and it squashed really easily. Job done.

Taste a little piece – it has become quite unlike raw garlic, instead mild, sweet and aromatic, just like roast garlic. Yes, it lacks a little note of caramelisation – but we’ll get to that!

Here’s the really important thing. ONCE THE GARLIC IS SOFT, STOP!

Burnt garlic bulbBecause, these photos aren’t from my first attempt. The first attempt I made turned out like this. I gave it two initial 1 minute blasts in the microwave, and so pleased was I with the progress it got another 30 seconds. A nice toasted smell started to develop, and a golden colour on the edge of the garlic. I was delighted. Right up until I gave it a poke and it was rock hard. So let my mistake stand for all of you, and we won’t have to sacrifice too many perfectly innocent garlic bulbs!

What do you do with it now? Well, if you want something closer to ‘real’ roasted garlic, heat up your oven, wrap up your garlic in a little tinfoil parcel with an extra drizzle of olive oil, and bake it for 10 – 15 minutes at 180C until it takes a little colour. Much quicker! An even ‘cheatier’ approach might be to heat a little olive oil in a frying pan and just brown off the cut surface gently until golden. No one will ever know!

But most of the time, roast garlic is going into something else, anyway. As I said, all of this came about because I wanted to make some garlic bread to go with pasta for dinner. The one I chose to make is based on this recipe from BBC food.

To make one roast garlic and rosemary bread (serves four generously as a side dish) –

  • Dough ingredients250g strong white bread flour
  • 150ml warm water
  • 1 (7g) sachet of dried yeast
  • 1 tbsp olive oil
  • 1/2 tsp sugar
  • 1 bulb of garlic, ‘roasted’ as above
  • 75g unsalted butter
  • 3 or 4 sprigs of fresh rosemary
  • A generous pinch each of salt and freshly ground pepper

Kneaded dough before rising

Weigh your flour into a bowl, and make a well in the centre. In a measuring jug, combine the water, oil, sugar and yeast, and stir in gently. Now pour the liquid, a little at a time, into the flour, and combine into a dough.

Knead the dough for about 5 minutes, until it becomes silky and elastic, and set aside to rise at room temperature in an oiled bowl until well risen about tripled in size is ideal). This will take an hour or so, more if your room temperature is low!

Crush your garlicIn the meantime, you can prepare your microwave ‘roast’ garlic as described earlier, and allow it to cool. Once you can handle the garlic comfortably, pop all the cloves out of the bulb and crush them with the flat blade of a knife, leaving a little texture (you’re not making garlic puree).

Chop rosemaryFinely chop your rosemary (stalks removed), and mix this, the garlic, salt & pepper into your softened butter. My butter lives at room temperature, but if yours is coming out of the fridge, a 10s blast in the microwave (with foil wrapper removed!) will soften it up and make it easier to work with. You’re pretty much all set, so go and do something else while the bread dough rises.

Well risen dough and herb butterOnce your dough is well risen, find a baking sheet or shallow-sided baking tray and line it with baking parchment. Tip the dough out onto a well oiled work-surface, and knock it back gently, shaping it to the size and shape of your baking sheet. It will be quite a thin layer, probably about 1cm thick. It doesn’t need to be perfect and I certainly wouldn’t use a rolling pin, you should be able to stretch and shape it with your hands just fine. Transfer carefully to the baking sheet – it doesn’t matter if it gets a bit ‘crumpled’ looking!

Shaped dough with butterNow spread your flavoured butter over the surface. Again, use your fingers, blobs and knobs are fine, you’re not aiming for an effect like icing a cake, but try and share the butter around reasonably evenly. Finally, stab the bread all over with a fork, and leave to prove for another 30 minutes or so until the dough is looking a little puffed up again.

When you’re happy, heat your oven to 230C and once it’s up to temperature, slide in the baking sheet. You’ll want to watch this bread reasonably carefully, because it’s quite thin and will bake reasonably quickly, and there’s a risk of the garlic burning and taking on a bitter flavour if your oven has nasty hot-spots (mine does, sadly!). Turn the bread if you notice it starting to brown unevenly. Don’t hesitate to turn the oven down to ~190C if the surface seems to be browning too fast. It should take about 15 minutes to be lovely and golden brown all over.

Bread fresh from the oven

This was a glorious accompaniment to a pasta supper. The garlic acquires all of that sweet caramelised flavour during the baking of the bread, so there’s no loss at all from the microwave roasting process compared to a more traditional approach. After baking, the garlic is sweet and aromatic with none of the raw hot flavour you get have from raw garlic in garlic bread. I will definitely be making this one again.

And serve!There are some obvious variations, which I think would work very well with this bread. Adding some finely chopped, caramelised red onions to the butter would work very well, I think. You could also throw a handful of grated parmesan into the butter mix, which would melt beautifully into the surface. You’re really in pizza-bread territory here, and the world is your oyster! Experiment!

The microwave garlic roasting technique is the real star of this show, for me, though. One of those accidental discoveries which really will change the way I cook. I recommend you give it a try!

Read more from the Country Skills blog >>

Apple and Carrot Dumplings, from ‘Doggie Biscuits’ by Ingeborg Pils – Cooking the Books, week 10

We’ve been eating very well this year – with a new dish at least once a week, a wonderful side-effect of this blog series! So it was undoubtedly Dave the dog’s turn.

Today’s recipe is from ‘Doggie Biscuits – healthy homemade treats seasoned with affection’, which we were given a few years ago. Dave can be a fussy little chap, and has some dietary restrictions as a result of his serious illness last year (in particular, his diet has to be very low in fat), but a flick through the book turned up a couple of possible candidate recipes which looked like they should suit him.

I settled on the apple and carrot dumplings, because he loves eating carrots (I know, it’s a little strange!). Whether he’d like them, of course, was anyone’s guess!

To make a batch of these dumplings (~20), you will need –

  • Ingredients - apple carrot dumplingsOne small apple (or half a medium to large one)
  • Two very small carrots (one small carrot or half a large carrot)
  • One egg
  • 75g rolled oats
  • 75g mixed dark rye and wholemeal wheat flour (this substitutes for the spelt flour in the recipe)
  • Large tablespoon of black treacle

Mix ingredientsGrate the apple (I left the skin on) and the carrots (well scrubbed or peeled). Then combine all the ingredients and mix well.

Spoon out onto baking sheetPreheat the oven to 180C. Using a teaspoon, spoon out the mixture onto a lined or non-stick baking sheet.

After bakingBake for 30 minutes (turning during cooking if your oven has hot spots). After 30 minutes, turn off the oven but allow the dumplings to cool slowly in the oven. They should come out looking a little like this.

But what will Dave think?

Taste test!

Well, he seems quite pleased with them! (Frankly, I’m delighted he agreed to eat them at all – he’s like that!) They’re quite firm in texture, and seem to take a little bit of chewing, which is good as it adds to the feeding interest.

Dave's cookie jar!I tried one (well, I had to really, didn’t I?) and what can I say… There’s a good firm texture to the outside, but they retain a little softness in the centre. The dominant flavour is molasses, from the black treacle, but it’s not overhwelming. They’re not sweet, but the molasses prevents them seeming savoury. There’s an oaty back-note and a good chewiness. They’re really not unpleasant – I finished a whole one!

Tucking in!

Actually, they remind me of the sort of thing a really ‘right-on’ hippy whole-food parent might feed small children as a healthy snack!

But they’re not for me, and Dave’s verdict is a firm ‘Yes, thank you!’ and who am I to argue?


Doggie Biscuits cover

**
Doggie Biscuits, by Ingeborg Pils
Parragon Books Ltd, 2009.
ISBN 978-1-4075-5236-1
Hardcover, 80 pages, full colour. RRP £7.99.

[Full disclosure: This is my book, which was a gift. I have received no payment or sponsorship for this post, nor have I accepted a review copy. I do not have an amazon affiliate account and do not profit from any links provided.]

Doggie Biscuits page view

This slightly odd little books contains 30 recipes for dog biscuits of one kind and another (but no cake recipes, despite what the cover image might lead you to believe). From a nutritional point of view they seem pretty sound, and don’t contain anything I would regard as ‘problem’ ingredients – there’s a bit of a fad at the moment for cereal-free dog foods, to my mind it’s just that and not relevant for the vast majority of dogs, but if you’ve been sucked into it, then this isn’t a book for you.

It gives the impression of having been carelessly ‘localised’ for UK publication – several of the recipes call for ‘quark’ for instance (here I was, I thought that was a subatomic particle or a desktop publishing tool – but wikipedia tells me it’s a Germanic sort of cottage cheese). Internet reviews suggest some testing / proofing problems with some of the recipes, too, though I didn’t find a problem with this one.

Appreciative Dave!Overall, there are a few cute ideas here but I probably wouldn’t have bought it myself – it may be a novelty cookbook but that doesn’t excuse poor proofing (the recipe for ground beef biscuits, for example, doesn’t appear to contain any ground beef!). Many of the recipes use quite expensive ingredients, too! It’s an interesting concept, but the reality is a little disappointing. I wouldn’t suggest you rush out and buy it.

Dave’s pleased, though, which is what matters, surely?

‘Cooking the Books’ is my self-imposed blog challenge for 2014 – I’ll be trying to cook a new recipe from one of my (rather extensive!) collection of cookbooks once a week, write it up and review it. Wish me luck!

Read more from the Country Skills blog >>

Oat Biscuits, from ‘The Complete Traditional Recipe Book’ by Sarah Edington – Cooking the Books, week 8

I wanted to bake something yesterday to bring with me on a elevenses visit today – it had to be quick and simple, and I didn’t want to go shopping for ingredients.

Now, I’m not that much of a ‘sweet treats’ baker, so my standard store cupboard ingredients collection is a bit basic – plain and self-raising flour, a few different sorts of sugar (but no icing sugar), unsalted butter (but no lard or margarine), golden syrup and treacle, eggs of course, and some baking powder and bicarb of uncertain vintage.  Add to that a few leftover part bags of dried fruits and nuts, some rolled oats and wheat bran, and that, really, is about it. We’re a bit low on fresh fruit, there’s no cream in the fridge, and I haven’t got any cooking chocolate. So, what to make?

This took a good bit of cookbook mining. I had in mind making muffins, but struggled to find an interesting recipe to make with the ingredients to hand. I didn’t really want to make a cake which would require icing, and struggled to find an interesting tea loaf that matched my baking supplies. Finally, I came across this rather lovely simple little recipe for oat biscuits (these are sweet biscuits, very much like cookies, and not to be confused with the savoury oat cakes eaten with cheese!), in this National Trust published book of over 300 traditional British recipes.

Set the oven to 200C before you start measuring your ingredients, as this recipe comes together very quickly.

To make 12 large biscuits –

  • 110g  unsalted butter
  • 2 tsp golden syrup
  • 110g granulated sugar
  • 100g rolled oats
  • 75g plain flour
  • bicarbonate of soda
  • salt (optional)

Melt the butter and golden syrup in a saucepan. Meanwhile, weigh out the dry ingredients and mix these together, adding a pinch of salt if you like. In a small ramekin or cruet, mix 1/4 teaspoon of bicarbonate of soda into a dessertspoon of hot water and dissolve. When the butter and syrup are melted and combined, take the pan off the heat and stir in the dissolved bicarb, and then add dry ingredients and mix fully.

oat biscuits - tile

Line a large baking sheet with greaseproof paper, and spoon the biscuit mix as evenly as you can onto the baking sheet. Using a heaped dessert spoon gave me 12 even sized measures. Then slide the baking sheet into your pre-heated oven, and don’t be tempted to wander away and forget about it. The recipe called for 10 minutes but mine were done in 7, so it’s worth staying put and watching carefully. If like mine, your oven has hot zones, turn the baking sheet around after about 5 minutes to even things out.

The biscuit mix will spread out a lot during cooking – mine essentially filled the baking sheet edge to edge. If you care about having perfect round biscuits, then spread out your mix over two cookie sheets leaving acres of space between them, but really, does it matter? Take them out of the oven when you see an even warm brown colour around the edges.

They will be very soft when you first remove them from the oven, so leave them on the baking sheet for a few minutes while they start to cool. Once they’re just cool enough to handle, carefully separate them and place on a wire rack to finish cooling. You probably won’t be able to resist tasting one though…

Biscuits on cooling rack

From start to cooling on the wire rack, these took about half an hour – they’re quick and straightforward, and taste as you’d expect – quite flapjacky, with a lovely texture and crunch. They went down well with their recipients this morning, but I did have to guard them quite enthusiastically against Hubby’s attentions to have any left to take with me!

**
The National Trust Complete Traditional Recipe Book, by Sarah Edington
National Trust Books, 2006 (there is a more recent, 2010 edition)
ISBN 978-1-905400423
Hardcover, 336 pages. Single colour printing with coloured plates. RRP £25.

[Full disclosure: This is my book, which I received as a gift a couple of years ago. I have received no payment or sponsorship for this post, nor have I accepted a review copy. I do not have an amazon affiliate account and do not profit from any links provided.]

National Trust Complete Traditional - coverThis is a slightly odd little book, with recipes assembled by the author from National Trust properties and collections, as well as historic recipe books and more recent publications. I’m not sure these oat biscuits are particularly representative, but then again I’m not sure what would be – the recipes run the gamut from historic entertaining dishes to regional stews, cakes and puddings, soups and salads.

Some of these recipes, inevitably, are for well-worn family favourites, and while I may not be about to give up my tried and tested cauliflower cheese for the one in this book, I may just borrow the suggestion of adding a little pinch of cayenne pepper! These are (as it says on the cover) very traditional recipes, but thoughtfully and respectfully presented without excessive re-invention, and I will definitely be coming back to it to try some of the savoury dishes soon – the recipe for Fidget Pie looked particularly tempting.

National Trust Complete Traditional - inner pageIt makes an interesting counterpoint to the Ginette Mathiot book I reviewed a few weeks ago, packed with traditional French dishes –  a useful reminder that we have a wide and diverse traditional food culture in the UK of which we should be justly proud.

This book would make a good primer for cooks from a different food culture who want to get to grips with traditional British food, but there are enough regional and historical goodies here that even if you’re British born and raised, and still have your grandmother’s kitchen notebooks, you’re bound to find something new to try.

‘Cooking the Books’ is my self-imposed blog challenge for 2014 – I’ll be trying to cook a new recipe from one of my (rather extensive!) collection of cookbooks once a week, write it up and review it. Wish me luck!

Read more from the Country Skills blog >>

Pain de Savoie, from Paul Hollywood’s ‘Bread’ – Cooking the Books, week 2

We seem to have ended the Christmas season with rather a lot of lovely cheese in the fridge! So today’s challenge was to find a recipe in my cookbook collection which would let me use some of it to make something absolutely scrummy. I haven’t baked any bread for a couple of weeks and remembered that Paul Hollywood might have something that would suit… So I dug out ‘Paul Hollywood’s Bread’, which accompanied last year’s popular BBC TV series.

Bread inner page view

And there it was – Pain de Savoie – a lovely looking loaf stuffed with cheese (yes!) and bacon (even better!). Savoie is an alpine region, and as everyone knows, mountain folk have all the best gorgeous stodgy winter comfort food. I had high hopes!

To make this loaf, I used –

  • White & rye flour400g of strong white bread flour
  • 100g of organic rye flour
  • 1 small tsp of sea salt (I can’t bring myself to put more than this into a loaf)
  • 7g pack of fast action dried yeast (oddly, the recipe wanted 8g)
  • 150g of home-cured smoked streaky bacon, rind removed, and cut into lardons
  • 200g of wonderful aged Gruyère
  • Olive oil
  • 330ml of tepid water

Start by weighing your flours and combining in a large mixing bowl, add the salt, yeast, a generous tablespoon of olive oil, and then mix in about two thirds of the water, using your fingers.

Roughly mixed ingredientsThis should roughly combine the dry ingredients but leave them a little dry, so add the remaining water progressively until all the dry ingredients come together as a ball, leaving the sides of the bowl reasonably clean. I found I had just over 50ml left over, but this will depend on the characteristics of your flours. The dough should look a little like this before kneading.

Now knead for 5-10 minutes until it becomes smooth and elastic. You’ll notice the difference – it may take longer than this if you’re not accustomed to kneading, but you’ll get there! I have wholeheartedly adopted Paul’s recommendation of kneading dough on an oiled surface, after a lifetime of using flour – I don’t think it makes very much difference to the dough, but it doesn’t half reduce the mess you make of your kitchen!

After kneadingOnce you’re done, the dough ball will look like this. [You’re supposed to add the fried & cooled lardons at this stage. I suffered an unfortunate spot of reading comprehension fail, and didn’t.] Oil the mixing bowl and put the dough ball back inside, cover with a piece of oiled PVC-free cling film, and set aside for a couple of hours until it’s doubled or more in size.

Ignore anything you might have heard about putting dough to rise somewhere warm like an airing cupboard, just sitting out on the kitchen counter should be fine, unless it’s very very cold, in which case I’ve done well with putting the bowl in the oven with just the oven light turned on. Letting bread rise in a warm environment certainly will speed the process up, but at the expense of the flavour that develops with a slower, lower temperature rise – and if you wanted tasteless bread, you’d just eat the junk from the supermarket.

Fried bacon lardonsIf like me you’ve forgotten to include your lardons, now is the time to fry them until golden. I used my home-cured black pepper bacon, which is lightly smoked. Incidentally, this is what really good dry-cured bacon should look like, when you’re frying it. See that lovely, clear bacon fat in the pan? That’s all that should ever leak out. And because it’s not wet, and doesn’t leach phosphate water, it fries to a beautiful golden caramelised surface. Fabulous. Once it’s cooked, set aside to cool. And try not to sample too many pieces in the name of ‘quality control, eh?

Combine with baconI turned the dough out onto the work surface, knocked it back into a rough rectangle, and sprinkled over the cooled bacon pieces before rolling it up into a rough sausage and cutting it into three (very roughly) equal sized pieces. Each of these pieces I kneaded a little to get the bacon well combined and formed into balls. [If you had already added the bacon before the dough proved for the first time, you could just cut the dough into thirds, knock them back gently and form into balls, and go straight ahead to assembling the loaf in the loaf tin. But I hadn’t, so…]

Dough balls and cheese cubesAfter kneading the little dough balls, they were a bit tight, so I gave them a little time to relax before moving on to the next stage. About half an hour did the trick. In the meantime, cut your cheese up into ~1cm cubes. The original recipe calls for Comté, which would be glorious. This Gruyère, which happened to be what I had in the fridge, and will be a pretty good match, but really any good firm well flavoured cheese will do very nicely – I think a decent mature cheddar would work a treat!

Assemble the breadOil your tin – the recipe calls for a 20cm ‘springform’ tin. I haven’t got one of those, but I do have an 8″ loose-bottomed cake tin I usually use for Christmas cake. Paul says to roll out the dough with a rolling pin into tin-sized rounds. I just pushed it out with my fingertips, which seemed to work fine. After putting the first circle of dough in the bottom of the oiled tin, spread out half the cheese cubes over the surface, repeat with the second ball of dough, and then finally press the third circle of dough over the top. Sprinkle the top with a little bit of rye flour, and cover with the clingfilm for another hour or so until it’s nicely risen.

Before rising  Nicely risen  Fresh from the oven

Once you’re happy, pre-heat your oven to 220 and, once it’s up to temperature, slide the tin into the oven and bake for half an hour. It should come out a lovely rich mid-brown colour on top.

Rest in the tin for 10 minutes before turning out onto a wire rack to cool for as long as you can bear it, before carving off a thick slice, adding a bit of lovely unsalted butter, and cramming it in your mouth.

Cooling

This is really really good bread. The rye flour gives it a lovely nutty flavour without making it heavy. The cheese has melted during baking to leave quite striking square holes in the dough. Hubby compared it to a really good cheese and bacon sandwich, and I suppose that’s it, really. It’s a thing of great simplicity, but simple things can be fabulous and this really is. But of course the simpler the dish, the more it depends on the quality of the ingredients. So, make it! But be sure to use really good cheese and bacon, m’kay?

Share and enjoy!

Technically, it’s not difficult, though having a ‘feel’ for bread dough will obviously be helpful. Not much equipment required and relatively minimal washing up – kitchen scales, a large mixing bowl, and a deep round cake tin are essential. A dough scraper is useful but not actually necessary. If you don’t have a wire cooling rack, it’s perfectly reasonable to use a (cold!) oven rack

**
Bread cover shot‘Paul Hollywood’s Bread’
Bloomsbury Publishing PLC, 2013. ISBN 978-14088-4069-6
Hardcover, full colour, 224 pages. RRP £20.

[Full disclosure: This is my book, which I bought in the traditional way! I have received no payment or sponsorship for this post, nor have I accepted a review copy. I do not have an amazon affiliate account and do not profit from any links provided.]

This is a really great book for anyone interested in bread baking, whether you’ve never baked a loaf before and just want to know how to get started, or have a fair amount of baking experience, there’s something for you here. I would definitely recommend it to any keen but inexperienced home-bakers, as the techniques are well explained and the book is quite lavishly illustrated with step-by-step photography.

Sourdough baking is even covered a little, though after my experiences with getting a sourdough starter going a couple of years ago, I think the process given for this may be a tad on the optimistically simple side! (Incidentally, if you’re just taking up baking, and particularly if you’re interested in sourdough, I would also recommend ‘River Cottage Handbook No. 3 – Bread’ by Daniel Stevens)

There are some lovely unusual bread recipes, such as this one, and one or two ‘extras’ to accompany them, and there should be something new to try here even if you’re already a confident baker!

‘Cooking the Books’ is my self-imposed blog challenge for 2014 – I’ll be trying to cook a new recipe from one of my (rather extensive!) collection of cookbooks once a week, write it up and review it. Wish me luck!

Read more from the Country Skills blog >>

Very Cheesy – baked camembert with garlic and thyme

My local co-op has had those little wooden boxed camembert cheeses on special offer recently.  I bought one a couple of weeks ago, planning to bake it, but of course life intervened and it was only this week that I finally got around to it.  This is no problem, of course, as it just gave the cheese a chance to mature and ripen nicely.

I think it’s probably a side effect of my early upbringing in Switzerland, but I have to admit to being a teeny bit obsessed with melted cheese. And this is one of the quickest, simplest, and most self-indulgent melted cheese suppers of them all.

Baked camembert with bread & chutney

Who could ask for more after a long day at work? You will need –

  • Unwrapped camembertA whole camembert, in a wooden box. The cheaper ones tend to have cardboard bottoms. This isn’t a problem as long as at least one half of the box has wooden top and sides.
  • A clove of garlic, minced.
  • A few sprigs of fresh thyme (dried, at a push).
  • A tot of dry white wine.
  • To serve, a fresh crispy baguette (or other bread if you prefer – some home-made sourdough would be wonderful, of course!) and some chutney (I chose my spiced plum chutney, but choose whatever you like!).

Open the box and unwrap the cheese, taking off any plastic or paper surrounding the cheese itself. Return it to half of the wooden box, and place the box on a baking tray. Set the oven to heat at 180C.

Prepared camembert with garlic and thymeCut four our five parallel slices through the top skin of the cheese. I’ve seen some recipes call for cutting this off entirely, but I really can’t see the point. Mince up your clove of garlic, and rub it into the top of the cheese, making sure you get some into the slices you’ve made. Strip the leaves from the fresh thyme sprigs, and sprinkle these over. Finally, pour over a tot of wine (about a single spirit measure, or a good ‘glug’).

Tuck in!That’s it, really. Could it be simpler? Slide the prepared cheese into the oven, and pour yourself a well-deserved glass of that nice dry white wine. After about 10-15 minutes, put the bread in alongside it to warm through and get all crispy and gorgeous and leave it all for another five minutes.

Then serve, with some chutney on the side. Go ahead and dig straight into the silken melted heart of the cheese with a big piece of crispy baguette.

I think it would be great served with a crisp green salad with a nice sharp vinaigrette, perhaps using some gorgeous chive flower vinegar, but it had been a long day at work, so I just settled for totally indulgent bread and cheese!

All gone!

As you can see, it went down a treat. Make this, you won’t be disappointed!

Read more from the Country Skills blog >>

Don’t be Sour – a dalliance with yeasted ‘quick’ bread

Regular readers of the blog (and those familiar with the intermittent Sourdough Saga series of posts) will know that I *love* my sourdough starter. It’s fair to say I love it like another pet, like a member of the family.  I feed it and care for it (and, admittedly, stash it in the fridge for a fortnight at the time – please note that this is not generally advisable treatment of household pets!) and in return it rewards me and feeds me with some of the very best bread I’ve ever eaten, anywhere in the world.  It seems a more than fair exchange for my time and effort!

Sourdough loaf selection

The beauty of a sourdough loaf, its rich deep flavours and developed texture, are the result of the long, slow, patient process of fermenting, kneading and raising, followed by a blistering hot (and preferably steamy!) baking oven.  My ‘big batch’ of sourdough bread makes two large loaves, or two smaller loaves plus some rolls or a pizza, uses 1.25kg of flour, and lasts us about 10 – 14 days, freezing the second loaf.  But making it takes about 24 hours, starting the night before baking with the creation of the sponge, followed by a whole day during which the dough has to be kneaded and shaped periodically, finally baking around dinner time.  It’s not a chore – to me at least! – but it does require a whole day at home, and of course I don’t always have that pleasure!  The trouble with getting used to really fabulous home-baked bread is that nothing that you can get in the shops comes anywhere close.

So, obviously, I needed a solution for good, home-baked, ’emergency bread’.  The sort that, if I needed to, I could start in the evening after I get home from work, and have baked and out of the oven before I go to bed – about a 3 hour window.  Yes, you could use a bread machine in that time frame (and we have done, in the past), but I find the bread too sugared and salty when made according to the instructions, and highly ‘unpredictable’ in its behaviour if you start deviating from the recommended formulae!

Sourdough loaves keep basically forever (she says, without a scrap of exaggeration!), in that they don’t go off the same way as yeasted loaves (they’re protected from mould growth, it turns out, by one of the fermentation products of linoleic acid – you can read the paper, in the Journal of Environmental Microbiology, here).  Sure, they go stale and dry with time and exposure to air, but they don’t go furry – and once they’re too dry to eat, you can turn them into breadcrumbs, so there’s no waste, either!  My emergency loaf needs to be a yeasted loaf, and obviously needs a smaller batch size, so that we’ll get a chance to finish eating it while it’s still at its best!

I asked around on Twitter (what did we do before Twitter, folks?) and the lovely Lisa (@Cookwitch) offered me her version of a recipe for Pain D’Epi, which looked like it might well fit the bill.  I was pretty pleased with my first attempt at it a couple of weeks ago, but didn’t think to take photos at the time (bad food blogger, no biscuit!).  We’re out of bread again, I was working this morning, and I fancied something nice to go with breakfast tomorrow, so I’m making it again right now.

As I make it, you want the following –

  • 275g of strong bread flour (white flour is traditional, and it won’t be a ‘Pain D’Epi’ otherwise, obviously, but use whatever you like – or a mix, if you have ‘rag-tag’ ends hanging around like I usually do)
  • 175ml of warm water
  • 7g sachet of fast-action bread yeast (the sort that comes in the little double-sachets of small yeast pellets, that you can buy everywhere)
  • A scant half-teaspoon of sea salt
  • A good ‘glug’ of olive oil

Start by combining all the dry ingredients in a bowl and mix together – you could use a whisk, but I’d use my fingers!  Now add the 175ml of warm water, and combine to form a dough.  Add a little bit more flour or water if you need to get the consistency right, just not ‘sticky’ but not too dry as a dry dough will make too dense a loaf.

Kneading your doughNow give your dough a really good knead on a floured work surface.  Set aside 10 minutes to do this, and really give it the time and effort.  This is a single-levened bread, so this is the one and only chance that you get to develop the gluten in the flour and consequently the texture in your final loaf.  Once the dough is starting to develop a silky, elastic texture, rather than just feeling like play-dough, add a generous glug of olive oil and continue to work this in.

Shaped loaf in tinOnce you’re happy with the texture, shape your loaf, and either put it in an oiled and floured 1lb loaf tin, or shape it as required and place it on a sheet of oiled baking parchment on a good thin metal baking sheet.

I would guess that this batch could also make about 8 reasonable-sized dinner rolls, though I haven’t tried this myself.  The traditional form of the Pain D’Epi, as you might infer from the name if you’re francophone, is in the shape of an ear of corn – you can see the finished effect, and how you achieve it (surprisingly straightforwardly, using scissors!) here.  It’s a great tear-and-share shape and I really must try it some day!

Covered with oiled cling filmBut back to my loaf, which is sitting in its much more traditional British loaf tin.  Cover the tin loosely with oiled cling-film (PVC-free, please, especially if you’re using it with oily food), and put it somewhere warm.  Mine is going by the fire this evening – because yes, we have the fire going in what, really, is mid-March. Isn’t that depressing?

Allow it to rise for an hour or two, depending on temperature, until it has at least doubled in size (and filled the tin nicely, if you’re using one).  The initial preparation and kneading takes about 15 minutes, which means that I can usually squeeze it in while dinner’s cooking.

Risen loafOnce the loaf is nicely raised, score the surface with a sharp knife in a pretty pattern of your preference (or construct ears of corn, if you’re feeling flash!) and put it into a pre-heated oven at 200 degrees centigrade for about half an hour – it will rise some more in the oven, if you’re lucky (though not anywhere like so much as I’m used to with the well-developed sourdough) and is done when it’s a lovely golden colour all over and the base sounds hollow when you tap it.  I tend to take tin loaves out of their tins and return them to the oven for a final few minutes to get a nice crispy crust all over.  Free-formed loaves may benefit from being taken off their baking sheets and placed straight on the oven rack, in the same way, to make sure they’re not at all soggy-bottomed!

Baked loaf, coolingOnce your loaf is baked, take it out of the oven and allow to cool on a wire cake-cooling type rack if you have one – I only bought mine very recently, and always used to use a cold oven rack I’d taken out before starting to bake the bread, which unsurprisingly works just fine!  Revel in the lovely smell of fresh bread that now permeates your house, and look forwards to the morning!

Overall, this is a really quick, useful, ’emergency bread’ recipe, that seems to work very nicely with all sorts of flours (today’s loaf was made with some malted granary bread flour I had sitting around at the back of the baking ingredients shelf).  It’s streets ahead of anything you can buy from the supermarket or corner shop, though it doesn’t quite stack up in terms of flavour and texture against slower-fermented yeasted loaves that you might make at home, or buy from a good artisan bakery.  Texture wise it does tend to be a bit ‘cakey’ and edges towards being a little on the heavy side, which I ascribe to the single kneading and rising cycle and lack of opportunity for gluten development.  Still, these are knit-picky complaints when you consider how quick and convenient it is to make, and how much nicer it is than any of the commercial alternatives!

Finished loaf

I wrote, back in June of last year, after my first successful sourdough loaf, that “the bar for ‘good bread’ has just shot skywards in our household, and I suspect things may never be quite the same again.”  I was right.  I’m such a bread-snob now!  But this is good, quick, simple bread, and definitely earns a place at our table.

Read all the posts in the Sourdough Saga >>

Read more from the Country Skills blog >>

The Icing On The Cake – how I decorate my Christmas cake – Blog Advent (17)

Christmas cake is a real ‘anchor’ for me, one of those food experiences that connects back, right through my life and my family history.  I wrote a bit last year about how baking the cake takes me back, every year.  I learned my cake from my grandmother – she learned it from Delia! – and I’ve only ever baked it and decorated it this one way.

The Icing On The Cake

After it’s been baked, usually some time in early November, I wrap it up in a few layers of greaseproof paper and stash it away in a tin. To keep it happy, it gets a tot of booze every week or so.  For the last few years I’ve baked it with, and then fed it on calvados (French apple brandy), because I think it adds an extra lovely fruity note compared to the traditional sort.

Before dressingOnce it’s nicely sozzled, and in time for Christmas, it’s time to get it all dressed up in its party frock!  More years than I can count, I’ve ended up decorating the cake on Christmas Eve – but I’ve been a bit better organised this year (well, OK, I wanted to make sure it was all ready in case someone fancied a slice this weekend!).

Brushing on the jamI ice my cake in two layers, first a nice thick layer of marzipan, and then a layer of royal icing.  Finally, the cake gets a decorative marzipan poinsettia to top it off.

First, to make sure the marzipan sticks down securely, I brush the cake with melted apricot jam, slightly loosened with some water and warmed in a pan on the hob.  A desert spoon of jam or so is plenty.  Brush it on generously with a pastry brush.  This is home-made jam, so has some big chunks of apricot in it, which isn’t a problem, just work around them and leave them in the pan!

Rolled out marzipanNow roll out your marzipan.  Mine was bought (sorry!) nice golden marzipan.  There’s about a kilo here. When working with marzipan, use icing sugar to dust down your surfaces and rolling pin, the same way you’d use flour when working with bread or pastry. Roll the marzipan out to the thickness you prefer, and make sure that it’s plenty bigger than the cake and sides in all directions.

Lay the marzipan overI know the baking aficionados on telly would have you apply your marzipan in two pieces – a round piece for the top of the cake, and a long thin band around the side.  I can’t see any reason to do this, for this cake at least – if you’re careful it’s possible to get a perfect layer with a one-piece approach.  In fact, the only merit I can see to the two-piece approach would be if you’re trying to get a sharp, 90 degree edge between the top and sides of your cake – in which case you’ve already started by cutting the top off – what a waste!  Gently place the big, rolled out piece of marzipan straight over the centre of the cake.

With sides flushNow, very gently, using the palms of your hands (dusted with icing sugar as required) push the ‘skirts’ inwards, towards the sides of the cake.  As you can see, I managed to get it all to sit snugly against the side of the cake.  But if you muck it up and get folds?  Just trim off the excess marzipan from the fold with a sharp knife, and stick the edges back together using a little bit of tap water.  The icing will conceal a multitude of sins!

Marzipan - doneTrim off the excess marzipan. I used the edge of the board as a cutting guide.  This sounds a bit generous, but it’s about the distance you want to leave.  I’ve over-trimmed in the past, and had to add extra marzipan back, so I now subscribe to the adage that you can always cut more later!  Once cut, gently nudge the marzipan in towards the base of the cake all around.  Anywhere you have an excess of marzipan, trim a bit more at this stage. You’ll be surprised how little there is, though.  Wrap up any extra marzipan you have left over tightly in cling film, and store in the fridge.

Ideally, let the marzipan dry out for a couple of days before applying the icing, though I’ve done it all in one night from time to time when necessary!  This gap is supposed to reduce the oiliness in the marzipan to reduce the risk of this ‘striking through’ and discolouring the icing.  I’m not sure how or whether this works, to be honest, and I’d love to say I’ve noticed a difference.  But I had time this year, so I gave it the 48 hours.

Royal icing ingredientsMy royal icing is made up of 3 large egg whites (I weigh my home-produced eggs and compare them to the egg size guide for this sort of cooking, since obviously they don’t come out of the hens graded!) 500g of icing sugar, and a teaspoon of glycerine.  I have forgotten the glycerine once or twice – it’s not a disaster if you can’t get any, but doing so does mean the icing sets very hard, so mind your dentures!

Whisk icingStart by spooning your icing sugar into your egg whites a bit at a time, stirring as you go.  It will look horrible and lumpy until right at the end, so don’t despair. Once it’s all incorporated, and you have a heavy gloppy-sort of consistency, start beating the mix with an electric whisk.  You really do want the electric whisk for this job – trust me, I’ve made royal icing with just a hand whisk one year, it’s *incredibly* hard work! – and ideally, if you have one, use your stand mixer.

Stiff peaksEven with an electric whisk it will take about ten minutes to get to the consistency you want, and I found that even with a handheld whisk I tended to get to the ‘I’m bored, sod it, that’ll do’ stage before the mix was really done!

Stir through glycerineYou’re after ‘stiff peaks’, which roughly means that the icing stays in whatever shape you place it in.  If you stop the whisk, you’ll get an idea pretty quickly by watching what happens to the ripples in the icing, which should be very stable.  You can test this by raising some peaks with the point of a knife, or your spatula.  If they stay there, you’re done.  Add your spoon of glycerine and stir this through the mix.  It adds a lovely shine to the icing.

Now, start slapping it onto the cake.

Apply the icing 1  Apply the icing 2  Apply the icing 3

Rough is good – you’re after a ‘snow scene’ effect, though I’ll be honest and say I’ve never seen a snow scene quite like this!

Store extra icingStill, it’s what my grandmother’s cake looked like, so it is with mine!  Once you’re happy you have a good covering, spoon any extra icing into a small plastic bag, and tie this off securely, excluding all air, and stick this bag in the fridge for later.  The icing now needs to set for at least 24 hours.  Then, it’s time for the final flourish.  For me, it has to be a poinsettia pattern in marzipan, but you could just as easily add holly leaves & berries, or even a Christmas tree, using a very similar approach.

Colouring your marzipanDig out the surplus marzipan from the fridge, and divide it into uneven thirds (two larger, one smaller).  Dye the two larger portions red and green using food colouring.  I find putting a sheet of cling film down on the kitchen counter when playing with food dye seriously simplifies the clean-up.  Also use plenty of icing sugar to stop things sticking.

Coloured marzipanIt was around this point that I remembered that last year, I’d made a mental note to try to find some better food colouring – I’m sure the food colouring my grandmother had only ever took a couple of drops, I seemed to have to ladle this stuff in by the spoonful!   Mind you, it was probably full of nasty artificial colours we’re not allowed to use these days…   You’ll get there eventually, even if your food dye is as wimpy as mine, and have the building blocks of your final decoration.

Prepare your leavesRoll out your green marzipan, and cut out a first set of six poinsettia leaves (or however many holly leaves, whatever you fancy).  I do this freehand, but you could easily cut make yourself a paper or card template.  Snip the corner off the bag of royal icing, and you have a little prepared piping bag.  Blob a little onto the centre of the cake and use it to glue down your leaves.  Then carry on with the red leaves, in much the same way. Finally, finish with some plain yellow berries in the centre.

Add green leaves  ... then red...  and finish with berries

Dab the marzipan with a damp piece of kitchen paper to remove any loose icing sugar, and finish with a ribbon, if you like.

That’s it, all done!  Round about now, I get to feel quite proud, very Christmassy, and revel in the connection to decades of family Christmas tradition.

Advent - day 17

I’m trying to write a post a day during Advent, so, please come along with me while I try to Blog Advent – the Country Skills Way – and forgive me if I don’t quite manage it!

Read more from the Country Skills blog >>

Oh, Crumbs! – homemade breadcrumbs for your Christmas cooking – Blog Advent (12)

I hate wasting my home-baked sourdough.  Of course, I try to make sure it all gets eaten when it’s at its best, but sometimes life interferes with your best laid plans, and you’re going away for the weekend with a third of a loaf still sat on the side, or the last roll in the batch is looking a bit dry to be appetising.  So when it looks like there’s some good bread about to go to waste, I chuck it in a bag in the freezer.

Lovely golden breadcrumbsBreadcrumbs are such a useful store cupboard staple.  At Christmas especially, they go into stuffings, and Christmas puddings, as a crunchy topping for fish pie…  I’m going to need some in a few days when I make my batch of Christmas sausages.  And the shop bought kind contain all sorts of preservatives, stabilisers, and even, believe it or not, yellow food dye for that ‘golden’ crumb!  Yuck!

It’s so easy to make your own.  Slice up your bread into normal-thickness slices (about 1cm / half an inch) before you put it in the freezer.  Once you have enough for a batch, get them out of the freezer and lay them out on a baking sheet.  Put them in a low oven at about 125 – 150 C.  After about an hour, get them out and carefully break them up as much as you can (don’t burn your fingers!), before returning them to the oven until they’re thoroughly dry and crispy.

Bread after dryingThey’ll take on a little colour around the edges, but don’t let them burn!  I’ve seen advice to cut the crusts off and not use end pieces for breadcrumbs, because they’ll tend to take on more colour during the drying process and you don’t want this.  Since that’s most of what I usually have left over, I’ve just ignored this advice, with no ill-effect that I can detect!  Once they’re completely dry, take them out of the oven and wait for them to cool fully.

Breaking up the crumbI’ve made the mistake of trying to put these straight in my food processor – they’re really quite hard and it doesn’t work very well!  You might be able to get away with it if your breadcrumbs are being made from ‘white fluff’ commercial sliced bread, but with real sourdough there’s quite a lot of substance to your bread, and the pieces just seem to bounce around the bowl.  Start by transferring the crusty chunks in batches into a large freezer bag, and crunching them up with a heavy rolling pin (a heavy skillet or saucepan would work well, too!).

In the food processorYou could just keep crushing the crumbs by hand until you get the finish you want, but if you’re lazy, like me, and have access to a food processor, then you can transfer the chunks to that once they’re all well under a cm in size, and then process them until they’re the texture you’re after.  I’ve left some bigger pieces in here for texture (if I want finer crumbs later I can always sift them through a collander before use), but you can keep going until it’s the consistency of sand if you prefer.

Now just transfer your breadcrumbs to an airtight container, where they should happily store at room temperature for at least a couple of weeks – this is assuming you’ve dried them properly – moisture is your enemy!  If you want to keep them longer, put them into to a sealed bag and store in the freezer, where they should be fine for 2 – 3 months.  If in doubt, watch out for any signs of mould or musty smells.  If they do start to go off, Hubby – who was my glamorous assistant this evening – asked me to remind you that they’ll still do fine for ground bait for any fisherman or woman in your family!

It’s the 12th of December today, which means we’re now half way through my Blog Advent challenge!  I’m exhausted, but really enjoying it too!  Thank you all so much for reading along so far – I hope I can come up with another dozen days worth!

Advent - day 12

I’m trying to write a post a day during Advent, so, please come along with me while I try to Blog Advent – the Country Skills Way – and forgive me if I don’t quite manage it!

Read more from the Country Skills blog >>

Brilliant Bangers – in praise of the full English breakfast

Those of you who come here regularly will know this isn’t the sort of food blog (if it’s even a food blog, really?) where I regularly post photos of my meals.  This time, though, I’m making an exception.

This was my Sunday breakfast –

Full English breakfast

What’s so special about that, you might wonder?  Well, everything on that plate was made here, by us.  I’m not going to claim to have grown the mushrooms or the tomato, or churned the butter, but the bacon was home-cured and smoked, the bread was my own sourdough, the eggs were laid in the garden by our hens, and, most excitingly for me, the sausages were made here, in my very own kitchen.  Even the ketchup is homemade.

This blog started with bacon, over a year ago, and curing and smoking have been among the recurring themes as the months have gone by.  The trouble with sausages is that they’re so often so disappointing, so much less than they ought to be, a disposal route for otherwise less than tempting ingredients and fillers.  Of course, the more lovely the rest of your breakfast – the fresher and richer your eggs, the tastier your home-cured bacon – the more obvious the deficiencies of your bangers become.

The Porkert PP88I’ve wanted to make sausages for a very long time – so long, in fact, that we received a sausage press (the rather wonderful chromed cast-iron, sparsely named Czech ‘Porkert PP88’) as a wedding gift over six years ago.  I regret that, until last weekend, it hadn’t yet managed to have an outing!  I finally decided that enough was enough, and ordered some sausage skins from Weschenfelder, which arrived very promptly last week.  A trip to our friendly local farm shop butcher provided us with 1kg of minced pork shoulder, and we were ready to rock!

Sausage mixTo the kilo of minced pork, we added a bit short of the recommended 200g of breadcrumbs (I didn’t have enough – they were a mix anyway of shop-bought breadcrumbs I had in the cupboard, and a couple of slices of dried and crushed homemade sourdough), 200ml of water (this, along with the breadcrumb, is essential for getting the mix to a consistency where it will pass through the sausage press), a teaspoon of salt and a half a teaspoon of crushed black pepper.

Soaking sausage casingsThe sausage skins were already soaking in warm water – we had bought the ready spooled sheep’s casing as Hubby’s preference runs to smaller bangers.  Sausage skins are not pleasant smelling things!  So, don’t sniff them, would be my advice.  A lot of the odour disappears once they’ve been soaked, so I’d recommend trying not to think about it too much in the meantime!

Ours probably hadn’t been soaked for as long as they ought to, since when I loaded the first length, they were very tricky to feed onto the nozzle of the sausage stuffer – I put it down to inexperience, but the second length, which had had about half an hour longer to soak, went on much more easily.  As they can soak for 12 hours or so without harm, get started with the soaking early!

Feed your skins onto the nozzleOK, so there’s no polite way of saying this – there’s something unavoidably prepucial about sausage skins!  Feed your skins onto the nozzle of the sausage stuffer (ours were quite a snug fit on the 20mm nozzle), leaving a couple of inches, untied, dangling free from the tip.  And try not to contemplate the resemblance to condoms too closely!

Don’t overfill your sausage stuffing press, especially if it’s manually powered like ours!  Add a couple of hand-fulls to the barrel and start to push down steadily.  We discovered around this time that we didn’t have the mechanical advantage at counter height to operate the lever usefully, and moved the whole sausage pressing rig down onto the kitchen floor. Really, we should have had mounting bolts to allow us to seat the press firmly in position, but we had to make do without.  Something to add to my ‘fantasy kitchen’ wish-list, I guess!

Filling sausagesPut a nice shallow tray (a baking sheet is ideal) under the sausage press to catch the sausages as they’re filled.  Once you get the sausage meat flowing, you want to kind of let it fill the casing and pull it off the nozzle itself as it goes.  This is definitely a two man job with any kind of manual press, I’m afraid!  Don’t pull the skin away from the nozzle unless it seems to be getting stuck, but equally don’t let the skin be over-filled, as you’re going to need a bit of ‘freedom’ when you come to twist and link the sausages.

The skins will split in places – you might have weakened them when you were incompetently loading them! – but don’t worry, it’s not a disaster. Carry on until you run out of sausage meat, or skins!

Linked sausagesNow it’s time to link your sausages.  I looked at various diagrams and instructions in books and on the web, but in the end I just fiddled with them until they did what I wanted – one of these days I’ll try to take photos but it never made much sense to me at the time!  Still, by the end of the process I had two strings of traditionally linked sausages.  The first  – on the left – are noticeably ‘scrappier’ than the second, but I’m really thrilled with all of them.

It’s advised to hang them to dry for a while – the cabinet doors were useful here – and then let them rest overnight before eating them.  We refrigerated one breakfast’s worth and put the rest in the freezer.

They’re great sausages.  They cooked well under the grill, but I’ll admit the first mouthful was almost underwhelming, I worried they were bland but then realised that they were, by any commercial standard, just seriously ‘under-seasonned’ compared to what my taste-buds were expecting.  I have to say I’m now rather worried about how much salt must be in shop-bought bangers!  But on the second bite, the lovely sweet pork flavour came through beautifully.  I’m looking forward to experimenting with some herbs, spices, and other flavours in future batches – we intentionally kept this batch quite plain as a ‘baseline’!

Finished sausages

So, homemade sausages – the last part of the Holy Trinity of the great Full English breakfast of sausage, bacon and eggs.  Go on, try it!  And no doubt, there will be more sausage making posts in the future!

Read more from the Country Skills blog >>