Pick a Peck of Pickled Peppers – home-grown pickled chillies

The blog has been a bit neglected the past month! There’s been a lot going on just recently – most of it good, but which I can’t really talk about at the moment (The mystery! The suspense!).

two-candlesA few weeks ago, the blog’s second birthday passed entirely un-marked, a fact which will come as no surprise at all to my close friends and family, who are all well used to their birthdays and significant anniversaries passing equally without notice! Anyway, a huge thank you to all of you who read and comment, thank you for taking the time and bearing with us though this quiet interlude!

Right oh, back to the hot and spicy business at hand!

Last weekend, we admitted the arrival of the colder weather and stripped the greenhouse chilli plants of all their fruit.  The result was almost exactly 1 kg of mixed home-grown chillies, mostly ‘Vampire’, a mild flavoured mid-sized dark purple to red variety with beautiful purple-green foliage and purple flowers, and ‘twilight’, a fiendishly-hot small chilli which ripens from purple to red via white & yellow on a small-leafed plant.

The home-grown chilli harvest!

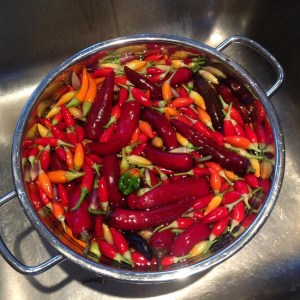
Aren’t they gorgeous? Even I can’t eat that many fresh chillies before they go off, though.  I considered making chilli sauce, but in the end settled on pickled chillies as more versatile to use down the line. And with all these gorgeous colours and varieties, it would have seemed a bit of a crime to put them in a food processor!

This recipe is based on one attributed to Michael Symon, from Michael Ruhlman’s blog, with a few modifications to suit the ingredients I had available. It’s really straightforward, and the results *look* stunningly pretty – it’s too early to say how they taste yet!

Pack chillies in jarsWash your chillies carefully, inspect them and set aside any which are damaged or imperfect (you can always cook with these fresh, or process them and freeze in small batches) and then pack them into cold sterilised jars. Then fill each jar full of water, before tipping the water back out into a bowl or jug. Measure this volume – this will give you a good accurate estimate of the volume of pickling liquid required. In my case, using eight small jars and one large one, the volume was a bit over a litre.

For the brine, I combined –

  • 700ml white wine vinegar
  • 500ml water
  • 2 1/2 tbsp sea salt
  • 2 1/2 tbsp golden caster sugar (any sugar will do)

Obviously these volumes can be adjusted depending on how much pickling liquid you need! Mix these in a saucepan and start to warm, dissolving the sugar and salt, then add the following herbs and spices and bring to a good rolling boil –

  • Herbs and spices
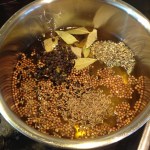
Two bay leaves – you can leave these whole if only making one or two jars, but I broke them up into smaller pieces
  • Three cloves of garlic, sliced up likewise
  • 2 tbsp whole coriander seed
  • 2 tbsp whole black peppercorns
  • 1 tsp whole cumin seed
  • 1 tsp dried oregano

Boiling brineOnce the brine is boiling, turn the heat down and simmer for 10 minutes.

Then, if you’re making a single large kilner-type jar of pickled chillies, you could just pour the whole volume of brine, spices and herbs over the top and seal up the jar.

I wanted to make sure the spices were evenly distributed between my eight small and one large jar, so I first strained the solids out and returned the brine to the saucepan to keep simmering.

Strained-out spices Share spices between jars Fill to the brim with boiling liquor

This made it easy go share the spices and garlic out evenly between the jars with a spoon. Then just ladle the boiling hot brine into the jars, filling them all the way to the brim before sealing tightly with plastic-lined lids.

Filled jars of pickled chillies

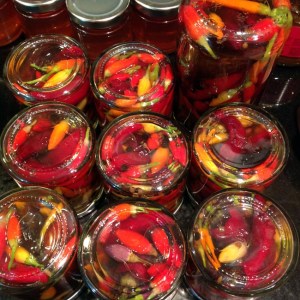
Once cool, refrigerate until use, or at this time of year in Northern climes you should be fine to store them in an unheated outbuilding, garage or shed. They’re ready to eat within a day or two but a few weeks in the pickle will only help develop the flavours. When you’re ready to use them, just slice or mince the chillies and use in cooking as you would fresh – obviously only in dishes that will tolerate a little bit of added acidity from the vinegar, most will – but beware, these are going to be an unpredictable bunch, and the little ones bite!

Read more from the Country Skills blog >>

Taming the Tomato Glut – Part 4: fresh tomato passata

Passata is a great, versatile store-cupboard ingredient. In bottles or cartons, stashed at the back of the shelf, it comes out to save the day in soups, sauces, anywhere you want lovely fresh tomato flavour but without the texture of seeds and flesh that accompanies tinned tomatoes.  Until this year, I’d never made any of my own. And then, along came the tomato glut…

This is a really really simple passata process, but does require a couple of slightly unusual bits of kitchen equipment. If you haven’t got them, though, you can work around without them – they will just save you quite a lot of time and trouble.

To make this fresh tomato passata, you will require –

  • Fresh, ripe, home-grown tomatoesA quantity of perfectly ripe tomatoes (this batch was about 2kg)
  • A few fresh basil leaves
  • A saucepan, a colander, and a slotted spoon
  • A mouli* (hand-cranked mincer / puree mill) with the fine puree plate installed, and a bowl to go under
  • Beer bottles, cleaned & dried, a crown capping tool and enough new crown caps to seal all your bottles**. (To give you a sense of the storage capacity you’ll need, 2kg of tomatoes produced about 1.7l of passata. I bottled 1.5l and used the extra fresh.)
  • A large stock-pot, big enough to contain your bottles or jars.

* If you haven’t got a mouli, you can get the skin and seeds out by pushing it through a fine-ish metal sieve, by hand. You can easily make enough for one meal, but it’s not a useful technique if you’re making in any quantity, unless you have helpful kitchen-slaves to hand!

** If you’re not a home-brewer like me and haven’t got bottles, crown caps and a capping device, you can always store your passata in jam jars. As with the bottles, no need to sterilise, just make sure they’re clean and dry, and the lids are in perfect condition. When you come to process them later (we’ll get to that bit), keep them upright in the water.

Simmer tomatoes to split skinsWash your tomatoes carefully. Now, in the saucepan, get a couple of inches of water simmering gently. A handful at a time, add your tomatoes into the simmering pan. Watch them carefully – as soon as the skins split, fish them out again straight away, into your colander. This will probably take between 30s and a minute, but will depend on your tomatoes. Watch carefully – you’re not trying to cook them!

With skins split, drainingAllow them a couple of minutes resting in the colander to drain away any excess water. Now put them into the mouli, a few at a time, and process them through. The seeds (most of them, anyway!) will be retained on the top-side of the puree plate, along with the skins, while the beautiful fresh tomato pulp passes through into the bowl below.

Pass through the mouliI should say, I *adore* my mouli. It’s a new kitchen gadget for me this year, bought with our home-grown veggies in mind, and I already can’t imagine how I did without it. I’d love to say it was my Grandma’s (in fact, I don’t remember her having one), but it’s exactly the same design as much older ones I’ve seen – if it ain’t broke, don’t fix it, eh?

Rinse and repeat until you’ve processed all of your tomatoes through this very simple two-step chain. You may find you need to disassemble your mouli every so often to wash off the plate if it gets clogged with tomato skin – you could of course peel your tomatoes by hand before you start, to avoid this problem, but really, life’s too short. Just be careful, when you’re doing this, that you don’t waste any beautiful puree or drop skins or seeds into the bowl underneath.

Passata produced, along with 'waste'By the end of the process, you’ll have a surprisingly good yield, as you can see from this picture, the total ‘waste’ in seeds and skins amounted to about half a pint, with the rest of the tomatoes processed very efficiently into gorgeous fresh tomato passata. It’s orangey in colour, compared to what you might expect from a commercial tomato product, but that’s because it hasn’t been cooked down at all, or coloured artificially! Taste some, it’s beautiful, fresh, fragrant tomato nectar. You could drink this stuff.

Fill your bottlesSo now you have some lovely fresh passata you could certainly use to make bolognese or lasagne this evening. The final step is bottling & pasteurisation to allow it to be stored for a considerable time in a cool dark place. Using a funnel and ladle – or a jug, or whatever suits you really! – transfer your passata into your beer bottles, leaving about 5cm airspace in the bottle necks. Into each bottle, also add a single, carefully washed fresh basil leaf.

Seal the bottles carefully with your crown caps, using a capping tool. If you’re using jam jars, ensure they’re in perfect condition with no cracks, chips, or faults in the lids (consider buying new lids, if necessary) and seal them carefully.

Seal bottles with crown caps

Fill your big saucepan or stock pot half to two-thirds full of cold tap water. Place a tea towel in the bottom, and then put in your bottles, in layers, lying on their sides. If you’re using jars, they can sit ‘upright’.

Bottles in the stock potMake sure the water completely covers the bottles or jars. Now get some heat under the pot, and slowly it to a gentle boil, bottles / jars and all, and keep it boiling for 30 minutes before turning off the heat. Leave the bottles in the pot until everything has cooled back down to room temperature. This boiling process essentially sterilises the contents of the sealed bottle or jar, rendering it shelf-stable. Once cool, you can fish out your bottles, dry, label them, and stash them in your pantry until needed.

[I based my passata process, in great part, on this lovely blog about traditional family passata-making by Italian-Australian cooks – it’s well worth a read!]

Read more from the Country Skills blog >>

Taming the Tomato Glut – Part 3: ‘sun’ dried tomatoes

Today we decided to call ‘time’ on the tomato growing season, and clear out the greenhouse. As a result, I have a kitchen quite literally overflowing with tomatoes. Don’t believe me? Here they are!

Now that's what you call a glut!

But, sun-dried tomatoes? In the UK? In *October*? Some kind of witchcraft, surely?

A couple of weeks ago, I finally caved in and bought a dehydrator.  Some of those little beauties you can see there will be making their way into it very soon. I’ve made two batches already, and I’m extremely pleased with the results. The process is a little time-consuming, and slightly faffy in the preparation, but the final product is amazing, and hugely rewarding.

To make these ‘sun’ dried beauties, you will require –

  • Some lovely ripe tomatoesA glut of home-grown tomatoes, perfectly ripe but not over-ripe and going soft. I used cherry-sized tomatoes and above, since they’ll shrink anyway.
  • Sea salt
  • Mixed dried Italian herbs
  • Citric acid
  • A large bowl, colander, slotted spoon, measuring jug, and a sharp paring knife
  • A dehydrator. I selected mine on the basis of extensive background research. Erm,  hang on, no, that’s not right. I bought the cheapest one on Amazon.

Halved tomatoesWash all your tomatoes carefully and remove their little ‘top-hats’. Now, get a really sharp little paring knife, and slice the tomatoes in half. Honestly, this is my single important top tip here, if you’re slicing tomatoes, you want a really really sharp knife. Otherwise it’s all nasty hard work, and if you’re unlucky the knife will slip on the tomato skin and you’ll lose a finger. Don’t say I didn’t warn you!

Tomatoes soaking in acidulated waterIn your large bowl, put a litre of fresh cold tap water and add a teaspoon measure of citric acid, and dissolve by stirring energetically. The citric acid improves the preservation of the tomatoes, and enhances their colour retention as they dry. If you don’t have any, you can sometimes get it from pharmacies, and always from home-brew suppliers.

Acidulated tomatoes, dryingPlace your halved tomatoes in this acidulated water and leave them for ten minutes (you can get on with chopping the next lot meanwhile) and then remove them with the slotted spoon and place them in the colander to drip for a bit.

Arrange halved tomatoes on traysOnce you’re happy they’ve stopped dripping, arrange them on the dehydrator tray, with the skin sides down. Just touching is fine but don’t overcrowd them or let them overlap.  This takes a bit of time first time and is really fiddly, but once you’ve done it a few times you’ll find a technique which makes it a lot faster. Carry on until all your dehydrator trays are filled. Mine seems to take about 2-3kg of fresh tomatoes.

Sprinkle with salt & herb mixBefore ‘firing her up’, sprinkle a mix of sea salt and dried herbs sparingly over the cut surfaces of your tomatoes. I used a half-and-half mix, and just an ordinary dried herb mix from the shops, but if you have gorgeous fresh herbs then by all means chop those up finely and use them! Sprinkle over sparingly, but do try to make sure each piece of tomato has at least a flake of salt and a piece of herb on it.

Stacked up in dehydratorNow stack the trays up in the dehydrator, set your temperature if your dehydrator has a thermostat – I used 55C, but consult any instructions that come with your machine. While the dehydrator is running, rotate the position of the trays every few hours so that they dry evenly (the bottom of my machine, where the warm air comes out, was about 20C hotter than the top, when I checked it with a temperature probe, so this is a real factor).

As they dry, the house will fill with a beautiful sweet tomato smell. (Hubby dislikes this because he says it makes him think of pizza. Takes all sorts!) You’ll notice the tomato pieces shrinking, wrinkling, and darkening in colour.

At the end of the drying processMy tomatoes were dry after about 36 hours, but this will vary hugely depending on the temperature you use, the characteristics of your machine, size of your tomatoes… You get the idea!  Aim for the smaller pieces being really, plasticky-dry, the larger pieces will still have a bit of flex in the flesh but shouldn’t have any wetness (check for this in the middle, under the seeds).

Now remove your greatly-shrunken tomatoes and put them in a large Kilner jar, or something similar. Whether you’re planning to keep your tomatoes as they are, freeze them for longer storage, or store them in oil, you’ll still want to put them in a jar for a few days, as this helps them ‘condition’ – effectively, it allows the less-dry pieces to donate their excess moisture to the more dried out ones, so that the humidity of the dried tomatoes evens out.  Give the jar a shake a few times a day for three or four days. Of course, you’re not going to be able to resist having a taste, so dig in.  They’re amazing, sweet, little flavour-bombs. I’ve been munching on them like sweeties!

Finished 'sun' dried tomatoes


From a glut-busting point of view, you’ve transformed a massive bowl of fresh tomatoes 2 – 3 kg in weight, into less than a litre volume of dried tomatoes, *and*  they’re going to keep. Really, what’s not to like?

That’s it, simple, no? Of course, there’s so much else you can do with the dehydrator, too..!

Read more from the Country Skills blog >>

Taming the Tomato Glut – Part 2: tomato and chilli chutney

The home-grown tomato glut continues apace, and after yesterday’s harvest, I had over 1.5kg (about 3lb) of lovely ripe tomatoes in bowls on my kitchen counter. Obviously even the most energetic eater of fried tomatoes couldn’t make much of a dent in that with their full English breakfast (though, believe me, I tried!). I wasn’t planning to do any preserving today, but the idea of them going to waste was more than I could bear – so I decided to whip up a batch of tomato chutney, with chillies, since I have a few of those from the greenhouse, too!

This is a bit of a chutney of opportunity / necessity, made out of what I had in the fridge and cupboard, loosely based on this recipe for ‘sweet chilli and tomato chutney‘ from the Pink Whisk blog.

To make this chutney, you’ll need to get together:

  • Fresh ingredients1.5kg of fresh, ripe (home-grown) tomatoes – all shapes and sizes are fine
  • 5 onions (varying sizes)
  • 2 red peppers
  • 4 cloves of garlic (I used half smoked, half fresh)
  • 1 rather over-grown courgette (optional – I had one that had ‘got away’ a bit in the vegetable garden)
  • A few fresh chillies. I chose four large mild red ones (variety ‘Vampire’) and two small-but-fiesty ones (variety ‘Twilight’) which I’ve been growing this year. If you’re in doubt about the properties of a particular chilli, for goodness sake slice off a very small piece and taste it before cooking with them!
  • 800ml of malt vinegar (I used what I had in the cupboard, which was about 400ml dark malt vinegar, 200ml of white malt vinegar and 200ml of spiced preserving vinegar left-over from pickling beetroot – use whatever you have / fancy. Wine or cider vinegar would also be fine, but probably a bit of a waste of money.)
  • Variety of sugars600g of dark sugar (again, this was a cupboard-clearing effort, I used a mixture of demerera, soft dark sugar and golden caster sugar)
  • 4 tsp of whole yellow mustard seeds
  • 1 tsp cayenne pepper
  • 1 tsp paprika
  • 2 tsp sea salt
  • A chopping board, good sharp knife, large stainless steel cooking pot and enough jars to contain your chutney. Also helpful, a ladle and a bottling funnel.

Now, there are a few strongly held beliefs that I try to live by, and not least of these, I’m afraid, is the view that life is far to short to spend it peeling tomatoes – particularly when there’s 1.5kg of them, and many of them are tiny, sub-cherry size. I looked up my grandmother’s green tomato chutney recipe this afternoon, just to check (more on which later, with a little luck!), and it turns out she didn’t peel her tomatoes either. Well, if it was good enough for Grandma, it’s good enough for me! Of course, if you find the idea of tomato skin in your chutney offensive, do feel free to blanch and peel them before you start.

Wash your tomatoes and chop them into roughly even pieces (halves, quarters, or smaller portions depending on the size of the tomato). I left the tiniest toms – those smaller than 1cm – whole. Chuck these into the pan, then chop your onions and peppers (deseeded, and with the white pith removed) into smallish pieces and add them, too.

Peel the courgette and slice it up as finely as you can – I chopped mine pretty roughly, expecting that it would break down to a nice soft pulp during cooking, but it didn’t – probably because the sugar and vinegar in the mix firmed it up nicely! – and I ended up fishing the bigger bits back out to chop them up more finely towards the end of cooking, which is a task I’m sure you can all live without!

Chillies and spicesChop up your fresh chillies very finely (you may want to remove the pith and seeds, where some of the heat is hiding!) and remember to wash your hands very carefully afterwards, including under your fingernails!

Add your chopped chillies to the pan with the sugar, vinegar, crushed garlic and dry spices. Get some heat under it and bring it to a good rolling boil before turning it down a little. Leave it simmering gently, uncovered, and stir occasionally.

Chutney at start of cookingNow, you have time to sort out your jam jars and lids. Wash them carefully in hot soapy water, dry them, then lay them out in a cold oven and set it to 150 degrees C. Make sure that the lids you’re planning to use are plastic-coated, as the vinegar in the chutney will corrode exposed metal. I tend to turn the oven off once it’s been up to temperature for about 20 minutes, and just leave the door closed until I need the jars.

It will take about an hour and a half to cook the chutney – mine took a bit longer than that, so follow your judgement. It’s ready when you can catch a glimpse of the shiny bottom of the pan when you stir the mixture. It will have lost a fair bit of volume (perhaps up to half) and darkened to a rich dark red colour, with no watery liquid left. Once you’re happy it’s done, bottle directly into your hot sterilised jars. These quantities made a little under 2 litres for me, but this will vary depending on your precise ingredients – how watery your tomatoes are and so on. And please, don’t be too hung-up on the details of the recipe – be creative and use what you have, or vary it to your own taste!

My quantities filled whole jars just perfectly (six small ones, and three larger ones), so I haven’t got any ‘left overs’ to enjoy in the next few days from the fridge – a bit of a shame, as I was looking forward to some with a nice cheese sandwich! But this will just heighten the anticipation as the flavours develop over the next month or so. The sneaky tastes I took during cooking (quality control, right?) certainly promise very good things – a lovely sweet-sour background with a gentle chilli heat.

Lovely jars of chutney

Chutney will keep in a cool dark place for ages (I’ve opened – and eaten, and lived to tell the tale – jars of home-made chutney with dates that would make some people’s eyes come out on stalks!). It’s probably best, though, to aim to let it mature it for a month, and then eat it at it’s best within a year. As with all home-made preserves, it’s best to keep it in the fridge after opening. And of course, like any home-made jam or preserve, they will make great gifts!

Read more from the Country Skills blog >>

Taming the Tomato Glut – Part 1: roasted tomatoes with chicken and pasta

The tomato glut has started!  I picked all these gorgeous red beauties in a single session a few days ago. I’m growing that old stalwart, ‘Gardener’s Delight’, along with ‘San Marzanno’, the traditional Italian cooking-type large plum tomato, and two small bush cherry tomato varieties, ‘Lizzano’ and ‘100s and 1000s’.

The tomato glut is here!

Nothing beats a freshly picked home-grown tomato – the sweet flavour, and the delicate perfume so completely lost in fruits picked green half way around the world and ripened artificially in a dark warehouse full of ethylene gas – and up ’till now we’ve been getting through all of them lovely and fresh. We’ve eaten a lot of tomato salads the last few weeks! But with this sudden upsurge in ripening fruit, we’re not keeping up any more.

There are the classics of glut-busting – preserving recipes like passata, chutney, and ketchup – and of course they have their place. Depending on how the fruit output keeps up, I may well make some or all of them in the next few days and weeks. But while preserving allows us to capture a taste of summer in the depths of winter, nothing really beats enjoying fresh, home-grown, seasonal produce at the peak of it’s freshness. Which is why, as well as preserving recipes, every good glut-busting effort needs a few great meals in it, too.

This is my very favourite way of enjoying lots of gorgeous, fresh, ripe tomatoes, simply cooked. You could make this recipe with shop-bought tomatoes, but they’re unlikely to be really lovely and ripe, and you’ll need a lot of them – a decent sized punnet of cherry tomatoes at least for two people. But if you have a local market, you may be able to get hold of lovely ripe tomatoes at this time of year for not much money, so it’s definitely well worth a look.

To make this great chicken dish for two people, you will need –

  • Fresh ingredientsLots of lovely ripe home-grown tomatoes – about a bowl-full
  • Chicken breasts, skin on, one per person if you’re hungry, half per person is fine if you’re not so ravenous. If you’re buying packed chicken breasts, it’s well worth learning the simple skill of butchering a whole chicken into portions – you’ll get much nicer meat, and save money in the process!
  • One small or half a large white onion
  • A nice large clove of garlic or two small ones, (smoked, if possible)
  • A good handful of fresh basil (if you’re growing enough tomatoes to have a glut, and not growing your own basil, you’re doing something wrong!)
  • Hard cheese of your choice. I used mature cheddar because it was what I had, but almost anything would work just fine, I think.
  • Olive oil & balsamic vinegar (or even better, elderberry vinegar)
  • Salt and pepper

Optionally, for the pasta side-dish:

  • Enough good quality Italian dried pasta for two people – linguini would be great, I had spaghetti so that’s what I used. I used to buy supermarket own-brand dry pasta, but the decent Italian stuff is barely more expensive and is streets ahead in terms of cooking quality.
  • A couple of spoonfuls of fresh homemade green pesto, or alternately a generous glug of good spicy olive oil.

Chicken breasts, after fryingSlice up all your tomatoes so they’re about even sized pieces. Tiny ones can be left whole. While you’re doing this, heat a little bit of olive oil in a frying pan. Season the chicken breasts lightly with salt & pepper (be more generous on the skin side) and fry quickly until slightly coloured. Then place the chicken breasts in an oven dish big enough to contain them reasonably snugly with a small gap around.

Prepared fresh ingredientsAdd the onion, garlic and shredded basil to your chopped tomatoes in a bowl, and toss to mix. Season lightly with salt and more generously with pepper, and add a generous glug of oilve oil and a drizzle of balsamic or elderberry vinegar, as if dressing a tomato salad. To give a sense of scale & quantity, this is a large wide bowl of the kind often used to serve pasta.

Ready to go in the ovenSpread the tomatoes around and over the chicken breasts in the oven dish, and grate about a handful of cheese over the top. Now wrap the dish tightly with tin-foil (or put on the lid, if it has one) and snuggle it into an oven at 180 degrees for about an hour.

After an hour has passed, take the lid or foil off your dish and return it to the oven. I love to serve this with pasta, so now’s the time to get a big pan of water to a rolling boil, with a generous pinch of salt and a glug of olive oil, and get your pasta cooking.

When the pasta’s done to a nice ‘al dente’, strain it and stir in a small amount of pesto, if you like, or just toss it generously in good peppery olive oil. You’re not aiming for ‘pasta in pesto’, here, just a very delicate sprinkling of basil and pine kernel pieces through your cooked spaghetti.

Out of the oven!Get your roasted tomatoes and chicken out of the oven. It should be a gorgeous golden caramelised colour on top, and will smell just amazing.

I served the chicken breasts whole, but you could just as easily pick them out at this point and slice them cross-ways into bite-sized pieces, which would make it easier to eat this as a traditional pasta dish with a spoon and fork!

Don’t waste a drop of what’s in this roasting dish – serve up a chicken breast per person, with all the tomatoes and any pan juices spooned over the top. The juice is pure, concentrated, tomato sweetness, and is the absolute highlight of the dish, in my opinion.

Ready to eat!

You’re all very lucky there *is* a photo of the finished dish, as Hubby was looking on as if I’d lost my mind when I got the camera out again. We were both starving after a very busy day, and just wanted to dig right in!

So, if you have a glut of home-grown tomatoes on your hands, please do give this recipe a try. It’s a fabulous taste of late summer, and I promise you wont’ be disappointed!

Read more from the Country Skills blog >>

Elderflorescence – it’s not too late for elderflower cordial, champagne, and how about vinegar?

The scent of an elder tree or shrub, in full flower on a hot sunny afternoon, is one of the heady, intoxicating, unmistakeable aromas of high summer.  This year the elders seem to be making up for last season’s poor showing – they’re simply smothered with elderflowers right now, dressed up from tip to toe in ivory flowers like a fairytale bride.

Elderflower buds, just breaking

Last year, we really struggled to harvest the elderflowers I needed to make my traditional annual batch of elderflower cordial and champagne. I blogged at the time about the ritual of gathering my elderflowers, and what it means for me. Well, this year, the elderflowers are in abundance – what took several hours and a five mile walk last year, we achieved in ten minutes on a short length of our country lane on Sunday. That’s one of the things about foraging – it’s never ever the same!

A chilled fizzy glass of summer!I adore elderflower ‘champagne’. My grandmother used to make it, and it was my gateway to home brewing, I suppose! My favourite recipe is here, with full instructions. It’s a great and rewarding introduction to home brewing, so even if you’ve never tried to brew before, do consider giving it a whirl. It’s not as scary as it seems, I promise, and the result is a fun summer tipple, fantastic for bbqs and parties, and which costs very little.

Under Pressure!Unfortunately for us, it’s really bad timing for starting a batch of elderflower champagne just now – but you most definitely should! Just be aware, it’s a lively beast, and I would under no circumstances advise trying to store it in glass bottles – even those tempting-looking pop top Grolsch-style ones. Just look what it did to the stout small plastic bottles I used last year!  With a little luck there will still be enough flowers around that I can get a late batch on the go in a few weeks time! Otherwise – and this would be nothing short of a minor tragedy – we’ll have to go without this year!

Elderflower cordial, steepingBut – thank goodness – I have found time to make my elderflower cordial, and it  is steeping in the kitchen as I write – I’ve made it this way for a few years now (full instructions & photos blogged last year), and the results are always amazing. If you’re not a brewer, or don’t want to use campden (sulphite) to stabilise the cordial for storage at room temperature, how about freezing it in carefully washed out milk bottles or juice cartons?

Filled marlalade jarsAnd don’t neglect the lemon and orange slices from the cordial once it’s finished – they make really great marmalade!

Those of you who read the blog regularly know that I’m always up for trying something different! So, considering the success of the chive blossom vinegar, I’ve started an experimental batch of elderflower vinegar.

Stripped elderflowersFor this, I’ve stripped the elderflowers off their stems – I finally found a technique that works for me, which is closer to rubbing the flowers and stamens off the green stems than it is to picking off the tips, and gives flowers almost entirely without green material.  Give the flower bunches a good sharp shake first, to dislodge any ‘passengers’ who might be hitching a ride.

You will probably find, despite this, there are some tiny little insects in amongst your flowers once you’ve picked them. Just ignore these (certainly don’t be tempted to wash the flowers as you’ll wash away much of the lovely flavour!). The vinegar will be filtered through fine muslin later, in any case, and if that still doesn’t reassure you, consider that you eat large numbers of insects and associated material every day already – just take a look at the US Food & Drug Administration’s pamphlet on allowable levels of insect and other contaminants in different foodstuffs if you don’t believe me!

Elderflowers steeping in vinegarI filled about half a 1 litre kilner jar with loose flowers, and then filled it up with cider vinegar. In retrospect, I may have used something with less aroma of its own, like rice wine vinegar, but cider vinegar was what I had, and hopefully the fruity note of the cider vinegar will complement the elderflowers beautifully. Put the filled jar somewhere warm to infuse – unlike the chive flower vinegar, there’s no need to keep it out of the light as there’s no problem with colour fading.  I expect to leave it for a couple of weeks before straining and bottling.

This vinegar smells beautiful after only 24 hours,  with a gorgeous fresh elderflower fragrance. So does the cordial, actually, so my kitchen is a sweetly-scented haven right now, and with my living room full of little posies of gorgeous sweet peas from the garden, the house smells nicer than a perfumery!

Elderflowers and citrus fruit

So, if you do nothing else this week, seize the opportunity to capture – even if just in a small batch of cordial or vinegar – one of the ephemeral scents and flavours of high summer.  During the long dark winter months, it’s amazing what a taste and smell of elderflower can do to lift my spirits!

And of course, with elderflowers so abundant this year, we can only hope for a great elderberry season to come!

Read more from the Country Skills blog >>

The Key, The Secret? – spicy pickled ash keys

I first came across the idea of pickled ash keys in Adele Nozedar’s lovely book ‘The Hedgerow Handbook, which I reviewed last year. I was intrigued at the time, but it was the wrong time of year to forage nice young ash keys (actually, I think I may have been a little late this year, too, but more of that later).

A lovely veteran ash treeAsh trees have been in the news lately, at least in the UK, with the arrival last year of ash dieback, a fungal disease now threatening some of the great, veteran trees of the British landscape. Historically, oak, elm and ash were the ‘big three’ trees in these parts, majestic and long-lived, our elms sadly disappeared for the most part several decades ago, succumbing to Dutch elm disease, and it seems now as if the ash, too, may be at risk of all but disappearing from our landscape.

Ash keysBefore too long, ash keys (the twisted seeds of the ash tree, which hang in luxurious bunches from the branches of some – but not all – ash trees at this time of year) may be a vanishing treat, the caviar of the forager’s larder. So why not try them now, before it’s too late? Incidentally, don’t confuse the common ash with the mountain ash, or rowan tree, which produces clusters of (also highly forageable!) bright orange or red berries in autumn.

So, you’ve found a local ash tree positively dripping with lovely young, green ash keys. What now?

After pickingWell, first, you’ll need to pick some, obviously. I made rather a large batch of pickled ash keys, starting with about 800g (approximately a mean couple of pounds). The older they get, the tougher and stringier they will become, so pick them as young and tender as you can.

As well as your ash keys, you will require –

  • 1.5l / 3 UK pints of white distilled malt vinegar (spirit vinegar)
  • 3 tbsp of paprika
  • 3 tbsp of curry powder (I used a medium madras powder, because it was what I had on the shelf)
  • 1.5 tbsp of cayenne pepper
  • 4 tbsp sea salt
  • a heaped teaspoon of whole mixed peppercorns
  • a level teaspoon of whole yellow mustard seed
  • 6 – 8 garlic cloves
  • 12 small hot dried red chillies (I used my own home-grown and dried little chillies left over from last year)
  • A large stainless steel or enamel saucepan or stockpot, a smaller pan (also non-reactive), large colander, a fine sieve and a piece of muslin, and enough jam jars for your batch.

Washed ash keysPick all the ash keys free from their bunches, and wash them carefully. The first part of the process involves gently simmering your ash keys for about an hour and a half, in all, in four changes of water.  This process, while irritatingly time consuming and faffy, reduces the bitterness of the ash keys which would otherwise make them rather unpleasant to eat.

Simmering the ash keysThe smell that this process generates is not very promising – it will smell rather like you’re boiling up a pot full of bits of tree, which you are, of course. But this abates each time you change the water, and after the fourth water change the colour of the ash keys is closer to olive green than to the bright green that you started with, and if you have a speculative nibble on one (I couldn’t resist), it’s quite stringy, not particularly strong tasting, but not noticeably bitter.

Spiced vinegar steepingWhile your keys are simmering away gently, you need to make your spiced vinegar. In your smaller saucepan, combine the spirit vinegar, paprika, cayenne pepper, and curry powder, bring to the boil and then take immediately off the heat.

Strain the spiced vinegarThis smells quite marvellous. Once it’s cooled a bit (you can help it along by sitting the saucepan in a sink full of cold water), strain it through the muslin in the sieve, and if you’re not quite ready to use it, you can use a funnel to put it back inside the vinegar bottles for safekeeping. Incidentally, I’d forgotten I had some muslin and initially tried to strain the vinegar through a paper coffee filter. I can report this was very frustrating and a huge waste of time, effort and coffee filters. So, now you know not to bother!

Ash keys mixed with saltOnce the ash keys have done their four turns around the simmer 20 minutes, strain, change water circuit, they’re an olive-green colour and ready to be stewed (yes, some more!). Add the 4 tbsp of sea salt, and plenty of fresh water, and bring to a brisk boil for a quarter of an hour, before turning the heat down, covering, and simmering for another 60 minutes before finally straining again.

At the end of this, they will have softened a fair bit, and have a gently salted taste, and you will probably be royally fed up of boiling up ash keys. Don’t worry, it’s nearly done!

Strained spiced vinegar, set aside  Chillies, peppercorns, garlic & mustard  Ash keys in spiced vinegar with garlic and chillies

Now, add to the strained ash keys the spiced vinegar, along with the whole dried chillies, peppercorns, mustard seeds and peeled whole garlic cloves. Bring to a brisk boil for 15 minutes, and take off the heat. That’s it, you’re (essentially!) done, and your house probably smells like a very strange hybrid of a chip shop and a curry house. Set the pickled ash keys aside to cool. I left mine overnight, because it was pretty late by the time I finished them, and my big stock pot holds its heat quite stubbornly.

Fill your jarsWash, dry and sterilise your jam jars in the oven, then allow to cool before filling. I used 13 little ‘dumpy’ jars and two 330ml pickle jars for my batch. Assume you need at least the volume of your vinegar, and probably a bit extra, in jar capacity. Pack the ash keys, along with the chillies, garlic, peppercorns and mustard seeds, evenly but quite tightly into your jars. Once you’ve done this, fill the jars right to the brim with the spiced vinegar, and seal.

Filled jars of pickled ash keys

Don’t they make a pretty little lot? They need to be matured now in a cool, dark place for at least 2 – 3 months. But I did have a taste, and the omens are really promising – there’s a long but gentle heat from the combination of the whole chillies and the spiced vinegar, a little garlic note, and out of nowhere a subtle but noticeably ‘olive’ flavour from the ash keys themselves.  The acidity is not at all harsh, which is unexpected, there’s an almost sweet character which must come from the keys themselves as there’s no sugar in the pickle. They are, though, still a bit stringy (though much less so than earlier in the cooking process) – I think if I’d picked in May rather than leaving it until June, this may have helped! I expect they’ll continue to soften while they steep in their jars of vinegar.

All in all, then, a bit of a revelation, these ash keys! I’m not sure what I was expecting, but I don’t think it was much like this! I can’t wait to see what they’re like in a couple of months time, but I think they’ll make a very nice substitute for olives or capers, and will probably go a treat with a nice mature cheddar.

Read more from the Country Skills blog >>

Chive Flower Vinegar – a liquid taste of summer – make this NOW!

If you have chives in your garden, and live in the northern hemisphere, it’s a good bet you’ve got chive flowers now. Please, if you do nothing else this weekend, don’t let all that beautiful chive blossom go to waste – seize the opportunity to make some chive flower vinegar!

Chive flowers growing in the garden

I made this for the first time last year, just a small batch in a 330ml jam jar, with white wine vinegar and about a dozen chive flowers from the garden. It was *glorious*.

The vinegar is somewhere between a slight blush pink and a brash almost pinky-purple, and has a lovely fresh onion flavour which complements salads and savoury dishes perfectly. I guarded my single bottle of 2012 vintage chive flower vinegar jealously, knowing it would be a year before I’d be able to make any more.

But this story, sadly, has a tragic end.  On Christmas Eve, while I was buzzing around the kitchen trying to do all of those last minute things, I opened an over-full kitchen cupboard and my precious bottle of chive flower vinegar tumbled off the shelf, bounced on the counter, and smashed into a million pieces on the slate floor. The kitchen was filled with the gorgeous fresh smell of chives. I could have cried. Instead, I mopped, not at all comforted by the fact that the floor came up absolutely *beautiful* from its vinegar rinse!

It’s fair to say that I’ve been waiting for chive flower season ever since. And now it’s here. Usually, I’d wait to blog a recipe or process like this until it was complete and I could show it to you all the way through. But you need to make this now – not in a few weeks time when the vinegar will be infused and ready to bottle – so here goes.

So, for your very own, glorious chive flower vinegar, you will need to get together the following –

  • Gather all your lovely, fresh, open chive flowers.  Even if you only have about a dozen, it’s worth making a small batch (I successfully made about a 330ml volume of vinegar in a large jam jar lat year). Pick them with as little stem as you can, and give them a good shake to dislodge any resident insect life.
  • I like to use white wine vinegar, though I know others use cider vinegar, rice wine vinegar, or even white malt vinegar. Champagne vinegar would be a ‘premium’ choice. Choose something light coloured to bring out the  lovely colour of the chive flowers.
  • A jar the right size to take all your chive flowers and vinegar. A kilner-type jar with a rubber gasket is ideal, but a large jam jar will do fine, as long as it has a plastic-lined lid. Wash and dry the jar carefully before use.
  • A colander to wash the flowers, and a salad spinner, if you have one (I don’t).

Wash and dry your chive flowersI’m going to come clean here, and admit that I didn’t grow all of these chive flowers. Hubby was able to scrounge them from a lovely kitchen garden!  After removing as much of the stalk as you can, give them a good wash to remove any bugs and insects – a few ants were all that seemed to come in on these ones – and give them a good shake to remove any water, or put them in a salad spinner for a few turns.

Put the flowers into your jarThen put all your flowers in your jar. Mine is a 2l kilner jar but use whatever you have conveniently to hand – probably not something quite this large! Mine happens to be filled but it doesn’t need to be, 1/4 to 1/3rd full will still give you a lovely infusion, though the colour won’t be so striking.

Top up with vinegarNow top up with your choice of vinegar. To give you an idea, the 2l jar filled with flowers took just over 1.5l of vinegar to fill it all the way to the top.

Keep the vinegar bottles – you can re-fill them with the infused vinegar later. As an extra bonus, the labels came off these bottles pleasingly easily!

Now, close your jar, and put it somewhere cool and dark for a couple of weeks.  I’m planning to infuse it for 3 – 4 weeks, but  keep an eye on it and have the occasional taste, as it may be that you’re happy with it earlier. Once you’re happy, strain the vinegar through a fine sieve or a muslin back into the vinegar bottles, label, and store in a kitchen cupboard or larder until you’re ready to use it.

Infusing in kilner jar

There you go – simplicity itself! It’s thrifty, too – just the price of some basic vinegar, and a little bit of time, give you this gorgeous very special condiment. Make some this weekend, I promise you won’t regret it. In a few weeks you’ll be enjoying this gorgeous, fresh, oniony-summery-savoury note with all your favourite salads and summer dishes.  But keep some back, too, for later in the year. Like elderflower cordial, it brings an amazing bottled aroma and taste of summer to your table in the colder, darker months!

Look at this amazing colour!

P.S. Just a quick update to give you an idea of the colour – this is my vinegar jar after just 48 hours infusing in the cupboard under the stairs. Gorgeous, isn’t it?

Read more from the Country Skills blog >>

The Eurovision Drinking Game – because in the country, you make your own fun!

Making your own entertainment is, most definitely, a country skill. Living out of town, you don’t have access to restaurants, bars and cinemas without resorting to the car or a rather expensive cab. There’s the pub, and village activities – a great sense of community, but necessarily limited in it’s options!

European FlagsIt’s been said that, while the rest of Europe may feel embarrassed or nonplussed, sometimes, by the cultural festival that is the annual Eurovision Song Contest, the British are the only ones who seem to think it’s a drinking game. [If you’re not European, then I’m sorry, the rest of this post is likely to be pretty confusing!].

There are many variations, of course, but this one one is *mine*. I started developing it when I was still a student, and a number of victims have ‘play-tested’ it for me over the years (you know who you are!). Some even remembered enough the next day to make suggestions for improvements, which have been incorporated over time.

So, revised and refreshed, in time for the 2013 Eurovision Song Contest, which this Saturday will come from Malmo, in Sweden, it’s time to offer it up as a game for the world to enjoy! Break out the home-brewed cider, and play along!

Introduction –

This game is based on the songs and performances that make up the Eurovision Song Contest. Features of songs and performances are identified, and carry drinking forfeits (usually ‘take a swig’ with a small number of exceptions).

Euro shot glassesEveryone at the party *could* play for every song, but that may be unwise! Better, probably, to divide up the performances between the party-goers, either by drawing lots before the contest starts, or drawing straws between the performances, which adds a more immediate sense of peril and means some people might end up amusingly and disproportionately ‘picked on’ (clustering in random distributions is a bitch!).

Obviously, if it’s a very small party, not all songs need to be allocated, and likewise, in a big group, more than one player can play for any given song. (Also see ‘variations’ suggested below.) Non-drinkers & children can still have fun by identifying and shouting out the trigger rules when they appear.

And now, the rules –

Begin any song that you’re playing with a fully-charged glass.

These are the ‘trigger’ features of songs and performances for which the player should drink. These features can appear more than once in a performance (and sadly, often do!), and ‘score’ each time they appear – so the famous ‘Bucks Fizz’ skirt removal would be a single costume change, because it happened in one go, but a song that repeatedly swaps languages or makes major-to-minor-and-back-again key transitions gets a drink on each switch.

Sheet MusicThe song itself –

  • Song is not in an official language of the country being represented
  • Change of language
  • Change of key
  • Change of tempo
  • Wordless lyrics (da dum da, mana mana mana, lalalala)

Military 'uniform'The performer, costume and performance –

  • Performer(s) not of nationality represented
  • Folk costume
  • Folk instrument
  • Folk dance
  • Weapons (with an extra-big swig if they’re ‘folk’ weapons – axes, pitchforks, flaming torches etc)
  • Uniforms – military & civil (including costume references to same – epaulettes, insignia, military-looking hats and suchlike)
  • Flags & banners
  • PyrotechnicsPyrotechnics
  • Costume change
  • Underwear as outerwear
  • Spandex, lurex, sequins
  • Leather, rubber, PVC, bondage wear
  • LEDs or other lighting incorporated into costumes
  • Fur, feathers, wings
  • Trapeze or wire-work
  • Magic, circus themes

and, last but not least

  • Performer does not appear to be human – note this rule applies whether the performer *is* human underneath or not! – This is the big forfeit. Down the remains of your drink.

Russian folk-dancersThe half-time performance (or the ‘Riverdance’ slot) –

Traditionally the host country puts on a performance on during the ‘voting gap’. Everyone plays for this one. Use the same forfeit list above, but all penalties are doubled.

Voting –

I haven’t got rules for the voting – in my experience the mood of the assembled party generally doesn’t require any further ‘lifting’ by that stage in the evening!

Variations –

Rather than allocating countries’ songs to players by ballot, the enthusiastic party host could assemble a trivia question for each country in the contest (as simple or as fiendish as they like!). Players getting it wrong would play that country’s song. Of course, this is less fun if the host was planning on playing too, as they’ll know all the answers.

Well, that’s it, folks! Have fun at all your Eurovision parties, and if you do decide to try these rules, do let me know how you found them, and any suggestions you might have for improving them in future years.

And remember, please drink responsibly (*ahem!*), and definitely don’t drink and drive, attempt DIY, deep fat frying, change important passwords or operate heavy machinery. Finally, your hangover is your problem, not mine, so don’t come crying to me in the morning!

Read more from the Country Skills blog >>

Growing and Healing – back after an unscheduled break from blogging

So the blog’s been quiet for a bit! Sorry about that! I feel like I owe you all a bit of an explanation, so here goes – 

Back at the end of March, Hubby and I set off for a well-earned holiday, our annual-if-we-can-manage it ski trip.  We left my lovely in-laws looking after the house, garden, Dave the dog and the gaggle of poultry. A few days into our holiday, news came that Dave wasn’t well.  We tried not to worry – after all, we were almost half-way around the world, and there wasn’t anything we could do from there – he was in good hands and had been to the vets.  The days went by and rather than getting better, he was getting sicker.  By Easter weekend, he was in the hospital on a drip, having refused food for most of a week. By the time we arrived home the following week, he’d been admitted to a specialist referral centre – they were concerned that his liver might be failing, and didn’t know why.

We both hate to leave Dave and had been looking forward to the joyous welcome-home he normally gives us.  Instead the house was silent. We went to visit him at the referral hospital and he barely had the strength to give us a squeak of greeting.  A few more days went by, and after a CT scan which yielded a few answers, perhaps – ruled out some really sinister possibilities anyway – and a plan, kind of, he was fitted with a feeding tube.  Meanwhile, in a silent house, we were both struggling to keep our heads above water.  Times like this, if there were ever any doubt, we know what these creatures we invite into our lives truly mean to us.  I wonder if they understand how much they’re loved.

Dave with his feeding tubeAfter five day with the specialists, still not eating for himself but being fed through a tube inserted through the skin of his neck and into his oesophagus, Dave came home for us to care for.  He was incredibly weak and I really feared we wouldn’t be able to bring him back to health.

But one pill at a time, one liquidised-feed at a time, his strength returned and he started to eat for us again.  A week and a half ago his feeding tube came out, and he has continued to do better in the days since.  He’s still taking a pharmacy full of medication, and looks like a patchwork dog with all the hair that was clipped off to allow investigation and treatment, but over the last few days I finally feel like we’re getting our wonderful, beloved dog back, and while there are never any guarantees in this life, we have hope, and real joy.

Dave enjoying the sunshine

Some of you have been following the saga of Dave dog’s illness on twitter, and I would like to thank you all from the very bottom of my heart for your kind words and thoughts over these past few very difficult weeks.  They’ve been an immense source of strength and comfort, and have meant the world to me.

Of course, it’s a truism that whatever our personal turmoil, time doesn’t stand still.

It’s spring! At last! It really did feel like the winter that would never end! And while the blog has been quiet, we’ve still been very busy.

Dave the dogThe greenhouse we built in March is now stuffed full of seed trays and little emerging seedlings.  It has been performing wonderfully, and the automatic opening vent – a birthday present for myself and admittedly a bit of an indulgence – has been working brilliantly and prevented it becoming a seedling-cooking device on sunny days when we’re not around!  Incidentally, the giant climbing triffid in the foreground is one of my hop plants, grown from a bare root rhizome this year. It’s quite something, isn’t it!

Vegetable bedsOutside, we’ve almost finished sorting out the vegetable beds, and the potatoes are planted.  Now I just need to get a bed prepared for the cutting flower patch I’m experimenting with this year!

My window ledges are packed with chillies, tomatoes, and other things too tender yet to survive in the unheated greenhouse.  I’m hoping we’ve now had the last of the really cold nights and they may be able to go into the greenhouse in the next few days.

Chilli seedlingsI’m especially pleased with my chilli plants, despite an initial disaster (top tip here – don’t take your beautiful heated-propagator-raised chilli seedings outside on even a lovely sunny early March afternoon to prick out and pot on), the survivors, and second sowing are now thriving. I’ve grown two varieties – ‘Vampire’ (the purple-leaved ones in this photo) and ‘Twilight’ this year.  What is it about naming chilli varieties, incidentally???

Seedlings for the cut flower patchStarting these seedlings, and waiting for them to grow, has been the most amazing therapy and displacement activity against the stresses and worries of the past few weeks.  Seeing them start to grow and thrive is always such a great source of faith and hope for the year to come, but this year it’s felt particularly poignant somehow!

Oh, and I seem to have accidentally taken up crochet… more of which, no doubt, another day!

Thanks for your patience in the hiatus, folks, and I’m hoping that more normal (and frequent) blogging service will now be resumed!

Read more from the Country Skills blog >>