
I have to admit to having wanted a decent greenhouse for as long as I can remember. Growing up, my grandmother’s neighbours had a beautiful greenhouse and vegetable garden, which I used to admire from over the fence, and I suspect my life-long enthusiasm for the glass-house springs in part from this!

Apologies, incidentally, for the quality of the photography in this post – I made the mistake of thinking I had enough on my hands and that photos from my mobile phone would be ‘good enough’ rather than worrying about the SLR as well as everything else. The photos took ages to tidy up and even now aren’t really up to my usual standard!
A little while after Christmas, while we were watching telly, I asked hubby whether we were really going to get on and build a greenhouse this year. Yes, he agreed, we definitely were. So I did a bit of digging around, and had more or less decided that for what we required, a baby polytunnel was probably going to be more cost effective and sensible. Then, deploying his superior (well, so he says) google skills, he turned up a 6ft x 10ft aluminium and polycarbonate greenhouse for about the sort of price I was finding for tunnels. It seemed like a no brainer, so we got on and ordered it. It arrived a week or so later.
It’s been sat in the garden in two boxes since then, of course, because the weather we’ve had this winter can only be described as ‘not compatible with construction projects’. As it happens, I’ve given up complaining about the weather for Lent (yes, it’s been that bad!), so I’ll spare you the details. It finally started to dry out a little a couple of weeks ago, so we finally had a window to get going with the ground works.
The intended site for the greenhouse is on our ‘paddock’, which is a scrappy bit of ridge and furrow pasture land, most of which we planted for an orchard three years ago. The grass is very established and the land isn’t level (the clue is in the ‘ridge and furrow’!). The only way we were ever going to get a level frame for the greenhouse was to dig a ‘slot’ for it out of the pasture grass to level it, and set a frame of breeze-blocks on which to rest the building.
You’ll need a good spade, a turf cutting tool and ideally, a mattock. We measured out the 6ft by 10ft rectangle and got to work. Once we’d cleared the space, it occurred to us to consider in more detail the ‘6 x 10ft (aprox)’ size given on the greenhouse packaging. It turned out the greenhouse was sized in something that could only be described as ‘metric feet’ by its German manufacturers. Armed with the metric measurements, we enlarged the slot by a reasonably generous margin, and turned in for the evening, pleased with ourselves for having completely cleared the required space, and confident we could crack right on with building the greenhouse the following day.
The next day dawned cold. Really cold – barely above freezing, in fact, despite being late February. Undaunted, we put on our ski jackets and thick woollen socks, and headed back out to the greenhouse site. We’d gathered together enough lightweight breeze blocks to do the job – the sort that are made from a sort of concrete ‘froth’, a bit like an aero bar, and would float, if you let them. Our sophisticated building and levelling tools were the spade and mattock from the previous day, a spirit level, and some string. The blocks themselves were to act as ‘squaring’ guides, in due course. And, as we hadn’t yet managed to pick up a bag of sharp sand, we had only the soil itself to use to pack the blocks straight and level.
 The first course of blocks assembled itself quite straightforwardly. The mattock is a great help in cutting a clean trench, and then the blocks just go in one after another, with a check on level and height adjustment on each. After setting the corner as square as we could using one of the blocks for reference, a couple of pegs and a length of string set the alignment for the next course. Things were going well!
Two courses more or less complete, we wanted to make sure we had the right dimensions for the greenhouse, so we decided to get out the base from the kit and get that assembled for reference. This done – and it was nice and straightforward (though it revealed that the assembly instructions were a ~50 page pictographic document, in the IKEA tradition) – we offered the frame to the greenhouse site, and discovered our slot was too narrow, given the width of the blocks. In a stroke of good luck, we also discovered the base build could be bodged to use only whole blocks, which was a huge bonus.
 Carrying on with the cut, measure, level, we had three courses installed. We laid out, crudely, the blocks for the fourth course. Inevitably, this is when you discover that, rather than a neat rectangle, and despite your most careful efforts, you’ve built some sort of trapezoid only theoretically known to mathematics. A bit of head-scratching and adjustments to the squaring, requiring a bit of extra turf cutting, and we put down the fourth course.

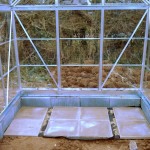
It had been trying to snow all afternoon, and we’d been outside for five continuous hours laying the foundation blocks. It seemed apparent that one of the corners (the back one, in this photo) was lower than it should have been, but we were running out of energy, and light. We tidied up and came back indoors, and gave up for the weekend.
Pro-tip: you know you’re really, properly, cold to the core when you *start* shivering several minutes after you get into a nice warm bath…
Skip ahead, then, through a working week to this weekend. Finishing the greenhouse was our main order of business. The weather, at least, is improving – no snow this weekend and even moments of sunshine!
 First up on Saturday, completing the levelling of the base. Easy enough with the base frame sitting on top to confirm our suspicion that the back corner was ‘down’. We’d got hold of a bag of sharp sand, so correcting this by lifting the two sides progressively was pretty straight forward.
Then, after placing the base as square as we could on top of the blocks, we marked the fixing holes, drilled these out with a hand drill, and then after placing rawlplugs, screwed the greenhouse frame down into place. (Hint – mark carefully, and then *check* – it’s annoying when the holes aren’t quite in the right place!) Skip any holes which are really close to an edge, as the block will just crumble away. Note that we’ve used no mortar at all in constructing this base. You could, of course, if you wanted a more permanent foundation.
 The sun was thinking about coming out, and we were ready, finally, to get the greenhouse build out of the ground. The construction guide is purely pictorial, and weighing in at 51 pictographic pages, is something out of a flat-pack-furniture-phobe’s screaming nightmare. In the end, it’s just a question of following the instructions, as carefully as you can.
Our greenhouse was manufactured by ‘Palram’ and is a ‘crystal clear’ (read vaccuum-formed, single-ply) polycarbonate glazed aluminium framed greenhouse. We bought it via B&Q but their greenhouses are stocked by lots of different retailers. We’d built a tiny (6ft x 4ft) polycarbonate and aluminium greenhouse in our previous townhouse garden, and I was expecting the same, two-ply corrugated polycarbonate glazing that we’d had before, and which we were very pleased with. I can only surmise that the insulation properties of this single-ply material won’t be as impressive as the other option. And handling the glazing panels, which seemed alarmingly lightweight, was a bit hairy in places. That said, once complete, the finished greenhouse does seem reassuringly ‘solid’. So, time will tell!
 But, back to the build. Proceed carefully according to your pictograms. Those on the cover informed me two people would be required, and that was certainly the case – at various times this build would have been completely impossible to perform single-handed. I was expecting to assemble the four walls individually and then combine them, but this wasn’t the case – the whole thing came vertically out of the base, acquiring glazing as it went, and then the build continued up into the gables and finally onto the roof.
We made one mistake (repeated at all four corners), which gave us some trouble until we noticed what we’d done wrong – fortunately our efforts at mitigation only involved some very slight trimming of some edges of the polycarbonate panels, nothing with any lasting consequences. Hint – if there’s more than one possible hole you could screw in, check, and check again before committing (and stop that giggling at the back!).
I gave a few small blood sacrifices on the sharp metal edges of the frame while threading the glazing panels. The instructions tell you to wear gloves, of course, but it’s impossible to do this while fiddling with the 120 pairs of small metal nuts and bolts that hold this monstrous Meccano set together, and in the end I gave up, and suffered the consequences. Overall we felt that, at least where it came to the glazing panels, the manufacturing tolerances were probably wider than the assembly ones, which made things a bit tricky from time to time.
 Getting the roof apex installed did require a ladder (at least for us – though we’re both a little on the short side!), which isn’t on the list of required equipment. It would have been a bit of a nuisance if we hadn’t had one conveniently available! With the sun setting, and the roof on – missing only the final fitting of the window vent, and the door – and after seven hours solid work, we gave up and went to the pub for a well-earned steak dinner and a couple of pints of rather nice Ringwood bitter.
This morning, after a more sedate Sunday breakfast, we got on with the finishing-up tasks. The window went in quite straightforwardly. The door was a bit fiddlier but posed no major challenges (and is very thoughtfully designed, in fact). By lunchtime, we had a completed greenhouse frame and glazing.
Hubby had work to do this afternoon, so after a whistle-stop trip to Wickes, he got on with that while I cracked on with the inside of the greenhouse. I was hoping, rather ambitiously, to finish this evening with the hard-standing for the staging installed, as well as a paving slab path, the staging fitted, and the borders initially dug-over with a ceremonial planting – perhaps a row of early carrots, or something – completed.
 Levelling the ground and installing the slabs was probably, in fairness, a good worked example of why you shouldn’t let amateurs do hard-landscaping! The soil at the back of the greenhouse, where the staging was going, produced a rich vein of solid clay, the kind that would probably have made a victorian brick-maker’s month. Again, we wanted to avoid concrete or mortar, so the paving slabs are to be laid directly onto a layer of landscape fabric on top of the soil, using some ‘pads’ of sharp sand to help level them.
 There are gaps between my slabs, which I’ll fill with some gravel once I’ve remembered to buy a bag. Eight blocks across the back of the greenhouse provide a space for some shelving, and then a five-block path runs between the two greenhouse borders from the door. I’m hoping that the slabs will also provide some useful heat-sink effect to hold warmth into the evenings as the temperature drops.
It’s around this stage in the process, when you’re raking the soil under the pathway to a fine tilth, while treading your precious borders harder and harder, that you remember that gardening is about pretty flowers in the same way that house-building is about paint colours for the hall. In the end, it’s mostly hard labour!
 Just as I was ready to give myself a big pat on the back and congratulate myself on a job well done, I realised I had a small problem with my (great, cheap!) greenhouse staging. The pack, describing itself as 2ft 11in (x2) greenhouse shelving (and I’d measured the gap!!) turned out to have the ‘aprox’ behaviour in the, compulsory, unhelpful direction. They don’t fit! Until I decide whether I want to take a hacksaw to eight lengths of steel tubing, they’re installed at a rather ‘jaunty’ angle…
No ceremonial carrots, but three big pots of compost with my newly-arrived hop rhizomes in them, pending the preparation of their final planting site. There’ll also be a water butt to collect the run-off from the roof and reduce the distance I have to walk to fill the watering can.

I think we’re both, it’s fair to say, seriously pleased with our efforts, even though it’s been physically very demanding and taken about twice as long as we had imagined it would.
To finish, and following Ross’s example in his excellent barn door guest blog post, some summaries:
Costings –
- Greenhouse kit, including base & glazing – ~£350
- Breezeblocks – £32
- Paving slabs – £32
- Sharp sand – £1.81
- Landscape fabric – can’t remember, it was in the back of the shed
Time invested –
- Ground clearance ~1 day, two people (or a bit longer for one)
- Installing breeze-blocks ~1 day, two people
- Greenhouse build ~ 1 day, two people (if you get up sharpish or have more hours of light than we did!) allowing extra if you want to do silly things with paving slabs inside.
Lessons learnt –
- Measure, then measure again. Then have someone else measure too. Don’t trust the measurements on packets, especially when they may be ‘metric’ feet-and-inches!
- Wear gloves, unless you want to discover quite how sharp the sliced edges of extruded aluminium components can be.
- Consider the weather forecast. It can be really *really* cold in February! And finally,
- If there is more than one possible hole… insert your own joke here.
I can’t wait to really get growing!
Read more from the Country Skills blog >>

I love it! Time is going to stand still for you each time you step inside and get on with things 🙂
I can’t wait to really get some things growing in there! Can’t you just feel that buzz of spring in the air??
Funny thing – I built a greenhouse for my mother in her garden more than 20 years ago. I look at it now and wonder how I ever did it – I just don’t see myself being able to do it now! (and yes its still there….)
we got our first greenhouse a few months ago, its not a big as yours but was a very exciting weekend.
It’s the sense of potential which is so exciting I think! Sure it won’t be all plain sailing, but I’ve got *big* plans!
Pingback: Growing and Healing – back after an unscheduled break from blogging | Country Skills for Modern Life
Pingback: April Showers Bring May Flowers | Country Skills for Modern Life