Time: 4 hours build time – Difficulty: Easy – Knackyness: Moderate (woodworking skills & equipment required) – Cost: around £50
I’ve wanted to try cold smoking for a long time. Hot smoking is an easily solved problem, modify a BBQ with a lid or some heavy duty tinfoil and add some woodchips, or even on the kitchen hob burning rice in an un-loved saucepan and steamer with the cooker hood running full pelt. Hot smoked food is tasty enough, but though our American cousins have raised it to an art-form, I can’t get terribly excited about it.
Cold smoking, on the other hand, is far more interesting. It requires more complicated equipment and, a bit like curing, feels like a sort of culinary alchemy. The knack is to fill a space with sufficiently thick smoke for a long enough period to flavour your food, without raising the temperature so high that the food starts to cook, or worse, is at risk of spoilng. Now someone observant once said, ‘no smoke without fire’, and therein lies the problem. The internet, and the various books published on the subject, have a wide variety of different designs for low-cost home smokers. The involve oil drums, modified fridges and filing cabinets, air conditioning duct, garden sheds, breeze blocks, and innumerable other approaches. There are high tech ‘smoke generators’ and low tech fires in holes in the ground. Then there are the purpose built smokers like the lovely-looking ones Bradley make, but they’re a bit outside my budget.
My smoker is a variation on a wooden box, and uses the ProQ cold smoke generator, which burns sawdust, as a smoke source. I have built my smoker out of new wood, though I would have preferred to have used reclaimed wood – both on cost and ecological grounds. If you are using reclaimed or scrap wood do make sure it’s clean and hasn’t been treated with any toxic wood preservatives. The roof is a spare slate I happened to have, you may need to come up with something different. The structure is assembled from 2.5cm square section timber and covered with tongue-and-groove cladding, using various screws and fixings you are likely have in your toolbox.
What I bought to make the smoker –
- The ProQ smoke generator and a few bags of wood dust
- Set of 3 non-stick cooling racks (mine were from Amazon, but a cookshop would have similar products)
- Four 2.5cm square 1.8m lengths of timber
- Ten 1.8m lengths of tongue-and-groove cladding board
- Four magnetic clips
I also used the following items I already had –
- Wood saw, tape measure, screw driver
- Electric drill and screwdriver, work bench (not essential, but useful)
- Variety of screws, pins, fencing staples
- A roof slate
- Wood glue
- Water-based shed stain
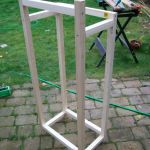
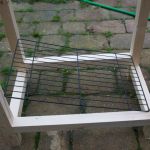
Dimensions of the smoker are 1.1m high at the front, 1.0m high at the back. The width and depth are based on the size of the racks you want to use.
First, build the frame. It will probably look something like this (note it is slightly narrower than the width of the rack. Secure the horizontal timbers with long wood screws.
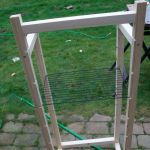 Slot the front vertical timbers to hold the racks. The choice of spacings is yours, I placed a slot about every 15cm from about 40cm above the ground. We cut the slots with a large drill bit and tidied up with a chisel. There’s a bit of hit-and-miss here and while all the slots are not equally beautiful, they should do the job. You could also slot the back timbers, but we decided to use small screws here with their heads proud to support the back of the racks, also preventing backward and forward slip. The highest slot is positioned to allow a rack to rest on the side timbers to take the weight of items hanging from it on hooks.
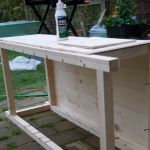 Next cover the back and sides with cladding going from floor level all the way to the top of the frame, including the triangle sections at the top of the sides. I glued the tongue and groove for extra stability. You could equally use plywood to clad the box. We used fencing staples to secure the cladding to the frame. Panel pins would be more traditional.
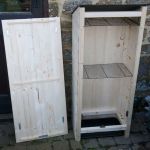 I want the whole front of the smoker box to be removable, in two sections – a large top section to allow me to load and unload the smoker racks and hooks, and a small bottom strip to allow management and monitoring of the smoke generator without letting all the smoke ‘escape’ from the box during use. I built the main panel and secured it with three strips of 1cm baton. The top and bottom baton positions are chosen to rest on the horizontal timbers forming the front of the structure, taking the weight of the front panel. Four magnetic clips hold the front panel snugly in place. The angle of the roof will allow a 1cm ventilation gap above the front panel. A final length of cladding is used horizontally for the bottom section.
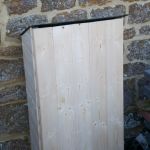 Fixing the roof will depend on your materials. For the time being my slate just rests carefully on top, in due course we’ll come up with some sort of clip arrangement. A plywood roof could be screwed in place. I’m going to use a knackered old baking tray on the floor of the smoker to catch ash and any drips from the food.
The outside of the smoker will be painted with water based fence and shed stain. The inside will not be painted, and I hope that with time exposure to smoke should provide a good seal to these surfaces.
Next, the first very experimental firing… I can hardly wait!
Read more DIY Cold Smoker & Home-Curing posts >>
Read more from the Country Skills blog >>

Pingback: A little bit fishy – first attempt at smoked salmon | Country Skills for Modern Life
Pingback: First smoke! Testing the DIY cold smoker | Country Skills for Modern Life
Pingback: Tinker and Try Again – second burn of the DIY cold smoker | Country Skills for Modern Life
Pingback: Big Bacon Challenge: after the challenge – what now? | Country Skills for Modern Life
Pingback: Smoked Trout – so simple, so tasty, and all home-made | Country Skills for Modern Life
A few years back, I built a cabinet a little bigger than the one you show, and I divided it into an upper portion and a lower. I put one of the commercial hot smokers in the bottom and smoked food on racks in the upper part. I had to be careful and watch to make sure the heat didn’t go to high… but generally it didn’t and the results were great!
This is worth knowing – makes me less worried about the heat generated by my cold-smoke unit! Out of interest what was your working definition of ‘too high’? I’ve not had the smoker running since about March because daytime temperatures have been too high and I’m not brave enough to run it overnight unsupervised. In an odd sort of way looking forward to autumn so I can start smoking again!
I tried never to go much above 80. The issue was less food spoilage (especially as I brined most everything), but rather that, once the heat got up there, you started to get some ‘cooking’ going on. This was less a problem with red meat, but with fish it altered the quality of the finished product quite a bit.
Gosh, that’s higher than I’d expect – I’ve been restricting myself to ~15C (60F or therabouts) for a 10 hour smoke. All the meat and fish I smoke is cured too – and a few hours at warm room temperature isn’t going to kill garlic, chillies or salt after all! I may have to have an experiment… Thanks!
I really couldn’t get lower than 70ish easily in the contraption I built … somewhere in the mid 70s was about average.
Reassuring to know that if I go on slightly warmer days I’m probably not going to poison anyone! But smoked salt-cured trout done on a nearly freezing winter day is pretty awesome!
I was rerstricted to running my smoker in an enclosed, insulated porch… outside it would definitely have frozen 😦
Totally diffrent to your Curing/smoking which I am interested in .. more about your safety concerns of wam temps .. Myself and wife Cured fish in direct sunlight purely by cutting into thin strips seasoning with a little salt and pepper which is purely for taste but the salt does remove some fluid which is drained away the fish dries into a chewable product which lasts well several weeks in a Dry Environment or sealed container The daytime temps often Exceeded 30 to 40 degees Celsius.
Thank you Brian, that’s really interesting to know!
Pingback: Food - Page 264 - London Fixed-gear and Single-speed
Noticed the top rack and hooks… Maybe try dowels across the top and run hooks along that then you could free up the rack for use. I love the look and simple design. I am gonna try a build of the same type.. We’ll let you know how it goes.
Hi, thank you for visiting, would love to know how your smoker build comes along. I’ve made a small modification to the smoker to support a top-rod or dowel for hooks, which you can almost see in the photo here. It’s simply two pins hammered into the top frame each side so that the rod rests between them rather than rolling off!
Finally! This was exactly what I have been looking for! I will use this for my own build.
Thanks a lot!
I use the same smoke generator as you and agree that it works very well. However, I use my lidded gas BBQ, not lit of course, as the enclosure. The smoke generator is placed down in the burner area and the food on the grill bars and the higher rack in the lid. The BBQ then has it’s cover put over it to reduce smoke leakage. I’ve found that this works a treat. Mostly I smoke my own bacon, pastrami, garlic, chillis and everytime a chunk of cheddar cheese.
Great article, many thanks for posting it. I have used some of your methods and built my own smoker. Wrote my build process up here if anyone is interested:
https://timlawson.co.uk/building-a-cold-smoker-for-smoking-trout/